Python Learning Path — Junior Developer
Python Learning Path — Junior Developer
Section titled “Python Learning Path — Junior Developer”Target: Junior Python Developer (3rd Year ITI — High School) Prerequisites: Basics from 2nd year (variables, simple programs) Duration: 14 weeks Language: English Content source: tutorialsteacher.com/python
Module 1 — Python Foundations
Section titled “Module 1 — Python Foundations”Week 1
|-------|-------------|
Python Overview
Python is a high-level, cross-platform, and open-sourced programming language released under a GPL-compatible license. Python Software Foundation (PSF), a non-profit organization, holds the copyright of Python. Python Software Foundation Guido Van Rossum conceived Python in the late 1980s. It was released in 1991 at Centrum Wiskunde & Informatica (CWI) in the Netherlands as a successor to the ABC language. He named this language after a popular comedy show called ‘Monty Python’s Flying Circus’ (and not after Python-the snake).
In the last few years, its popularity has increased immensely. According to stackoverflow.com’s recent survey, Python is in the top three Most Loved Programming Language in 2020. Most Loved Programming Language in 2020 Official Web Site: https://www.python.org https://www.python.org
Python Features:
Section titled “Python Features:”- Python is an interpreter-based language, which allows the execution of one instruction at a time.
- Extensive basic data types are supported e.g., numbers (floating point, complex, and unlimited-length long integers), strings (both ASCII and Unicode), lists, and dictionaries.
- Variables can be strongly typed as well as dynamic typed.
- Supports object-oriented programming concepts such as class, inheritance, objects, module, namespace etc.
- Cleaner exception handling support.
- Supports automatic memory management.
- Various built-in and third-party modules, which can be imported and used independently in the Python application.
Python Advantages
Section titled “Python Advantages”- Python provides enhanced readability. For that purpose, uniform indents are used to delimit blocks of statements instead of curly brackets, like in many languages such as C, C++, and Java.
- Python is free and distributed as open-source software. A large programming community is actively involved in the development and support of Python libraries for various applications such as web frameworks, mathematical computing, and data science.
- Python is a cross-platform language. It works equally on different OS platforms like Windows, Linux, Mac OSX, etc. Hence Python applications can be easily ported across OS platforms.
- Python supports multiple programming paradigms including imperative, procedural, object-oriented, and functional programming styles.
- Python is an extensible language. Additional functionality (other than what is provided in the core language) can be made available through modules and packages written in other languages (C, C++, Java, etc.)
- A standard DB-API for database connectivity has been defined in Python. It can be enabled using any data source (Oracle, MySQL, SQLite etc.) as a backend to the Python program for storage, retrieval, and processing of data.
- The standard distribution of Python contains the Tkinter GUI toolkit, which is the implementation of a popular GUI library called Tcl/Tk. An attractive GUI can be constructed using Tkinter. Many other GUI libraries like Qt, GTK, WxWidgets, etc. are also ported to Python.
- Python can be integrated with other popular programming technologies like C, C++, Java, ActiveX, and CORBA.
Python Tools and Frameworks
Section titled “Python Tools and Frameworks”The following lists important tools and frameworks to develop different types of Python applications:
- Web Development:Django, Pyramid, Bottle, Tornado, Flask, web2py DjangoPyramidBottleTornadoFlaskweb2py- GUI Development:tkInter, PyGObject, PyQt, PySide, Kivy, wxPython tkInterPyGObjectPyQtPySideKivywxPython- Scientific and Numeric:SciPy, Pandas, IPython SciPyPandasIPython- Software Development:Buildbot, Trac, Roundup BuildbotTracRoundup- System Administration:Ansible, Salt, OpenStack AnsibleSaltOpenStack
Where to Use Python
Even though Python started as a general-purpose programming language with no particular application as its focus, it has emerged as the language of choice for developers in some application areas over the last few years. Some important applications of Python are summarized below:
Data Science
Section titled “Data Science”Python experienced a recent emergence in popularity charts, mainly because of its Data science libraries. A huge amount of data is being generated today by web applications, mobile applications, and other devices. Companies need business insights from this data.
Today Python has become the language of choice for data scientists. Python libraries like NumPy, Pandas, and Matplotlib are extensively used in the process of data analysis, including the collection, processing and cleansing of data sets, applying mathematical algorithms, and generating visualizations for the benefit of users. Commercial and community Python distributions by third-parties such as Anaconda and ActiveState provide all the essential libraries required for data science. NumPyPandasMatplotlibAnaconda
Machine Learning
Section titled “Machine Learning”This is another key application area of Python. Python libraries such as Scikit-learn, Tensorflow and NLTK are widely used for the prediction of trends like customer satisfaction, projected values of stocks, etc. Some of the real-world applications of machine learning include medical diagnosis, statistical arbitrage, basket analysis, sales prediction, etc. Scikit-learnTensorflowNLTK
Web Development
Section titled “Web Development”This is another application area in which Python is becoming popular. Web application framework libraries like django, Pyramid, Flask, etc. make it very easy to develop and deploy simple as well as complex web applications. These frameworks are used extensively by various IT companies. Dropbox, for example, uses Django as a backend to store and synchronize local folders. djangoPyramidFlask Today, most of the web servers are compatible with WSGI (Web Server Gateway Interface) - a specification for the universal interface between Python web frameworks and web servers. All leading web servers such as Apache, IIS, Nginxetc can now host Python web applications. Google’s App Engine hosts web applications built with almost all Python web frameworks.
Image Processing
Section titled “Image Processing”The OpenCV library is commonly used for face detection and gesture recognition. OpenCV is a C++ library but has been ported to Python. Because of the rapid development of this feature, Python is a very popular choice from image processing. OpenCV
Game Development
Section titled “Game Development”Python is a popular choice for game developers. The PyGame library is extensively used for building games for desktop as well as for mobile platforms. PyGame applications can be installed on Android too. PyGame
Embedded Systems and IoT
Section titled “Embedded Systems and IoT”Another important area of Python application is in embedded systems. Raspberry Pi is a very popular yet low-cost single-board computer. It is extensively used in automation products, robotics, IoT, and kiosk applications. Popular microcontrollers like Arduino are used in many IoT products and are being programmed with Python. A lightweight version of Python called Micropython has been developed, especially for microcontrollers. A special Micropython-compatible controller called PyBoard has also been developed. Micropython
Android Apps
Section titled “Android Apps”Although Android apps are predominantly developed using Android SDK, which is similar to Java, Python can also be used to develop Android apps. Python’s Kivy library has all the functionalities required for a mobile application. Kivy library
Automated Jobs
Section titled “Automated Jobs”Python is extremely useful and widely used for automating CRON (Command Run ON) jobs. Certain tasks like backups, defined in Python scripts, can be scheduled to be invoked automatically by the operating system scheduler to be executed at predefined times.
Python is embedded as a scripting language in many popular software products. This is similar to VBA used for writing macros in Excel, PowerPoint, etc. Python API is integrated with Maya, PaintShop Pro, etc.
Rapid Development Tool
Section titled “Rapid Development Tool”The standard distribution of Python, as developed by Rossum and maintained by Python Software Foundation, is called CPython, which is a reference implementation. Its alternative implementations - Jython, the JRE implementation of Python and IronPython - the .NET implementation, interact seamlessly with Java and C#, respectively. For example, Jython can use all Java libraries such as Swing. So the development time can be minimized by using simpler Python syntaxes and Java libraries for prototyping the software product. CPythonJythonIronPython The following summarises important tools and frameworks for different types of Python applications:
- Web Development:Django, Pyramid, Bottle, Tornado, Flask, web2py DjangoPyramidBottleTornadoFlaskweb2py- GUI Development:tkInter, PyGObject, PyQt, PySide, Kivy, wxPython tkInterPyGObjectPyQtPySideKivywxPython- Scientific and Numeric:SciPy, Pandas, IPython SciPyPandasIPython- Software Development:Buildbot, Trac, Roundup BuildbotTracRoundup- System Administration:Ansible, Salt, OpenStack AnsibleSaltOpenStack
Install Python
Python can be installed on Windows, Linux, Mac OS as well as certain other platforms such as IBM AS/400, iOS, Solaris, etc.
To install Python on your local machine, get a copy of the standard distribution of Python software from https://www.python.org/downloads based on your operating system, hardware architecture and version of your local machine. https://www.python.org/downloads
Install Python on Windows
Section titled “Install Python on Windows”To install Python on a Windows platform, you need to download the installer. A web-based installer, executable installer and embeddable zip files are available to install Python on Windows. Visit https://www.python.org/downloads/windows and download the installer based on your local machine’s hardware architecture.
https://www.python.org/downloads/windows
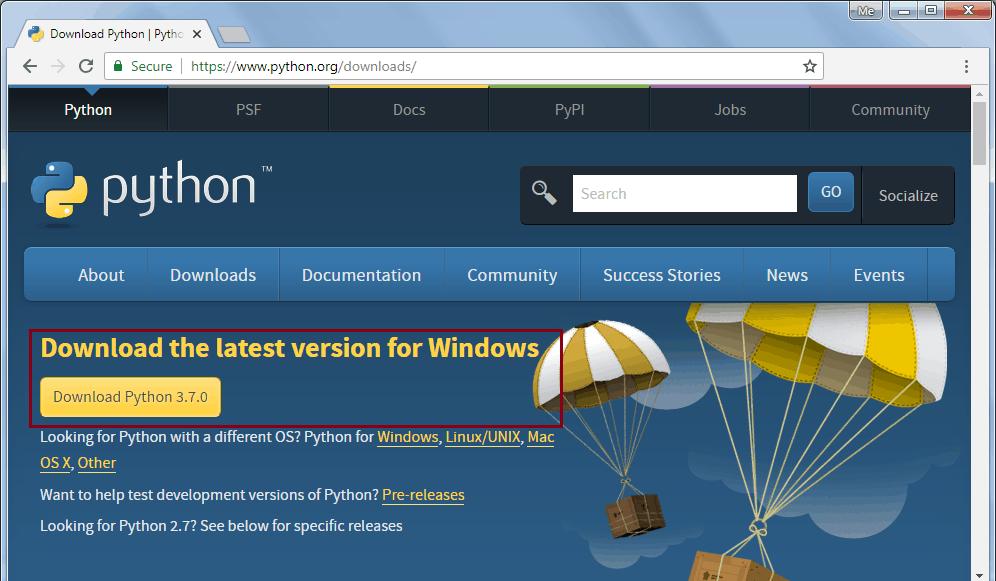
The web-based installer needs an active internet connection. So, you can also download the standalone executable installer. Visit https://www.python.org/downloads and click on the Download Python 3.7.0 button as shown below. (3.7.0 is the latest version as of this writing.)
https://www.python.org/downloads
This will download python-3.7.0.exe for 32 bit. For the 64 bit installer, go to https://www.python.org/downloads/windows and select the appropriate 64 bit installer, as shown below.
https://www.python.org/downloads/windows
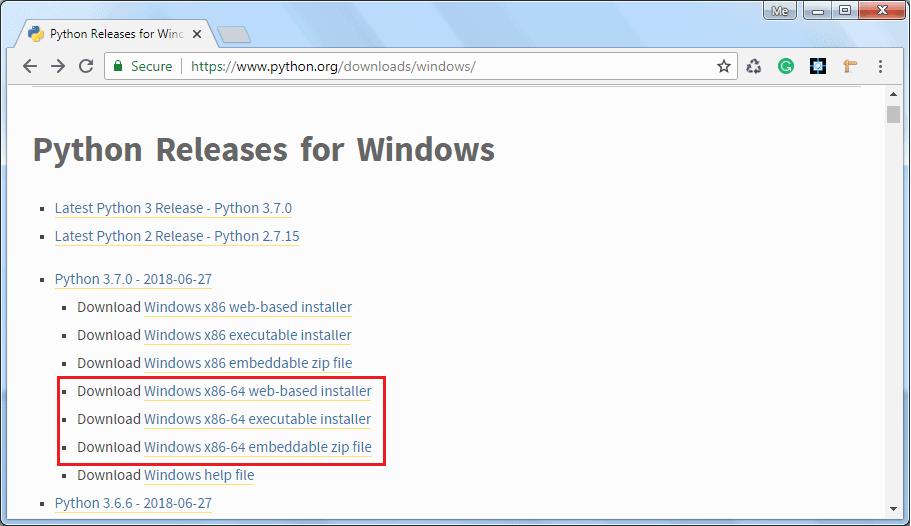
Now, download the Windows x86-64 executable installer for 64-bit Windows and double click on it to start the python installation wizard as shown below.
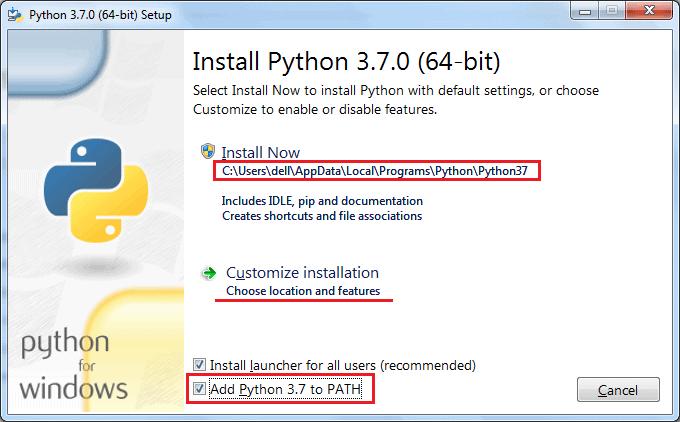
Installation is a simple wizard-based process. As you can see in the above figure, the default installation folder will be C:\ Users[UserName]\ AppData\ Local\Programs\ Python\ Python37 for Python 3.7.0 64 bit. Check the Add Python 3.7 to PATH checkbox, so that you can execute python scripts from any path. You may choose the installation folder or feature by clicking on Customize installation. This will go to the next step of optional features, as shown below.
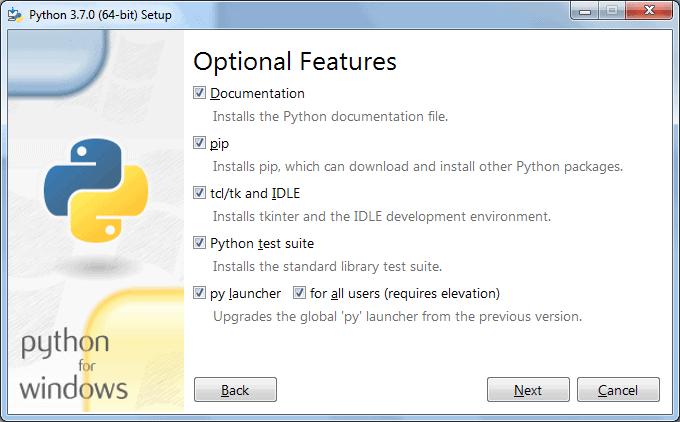
Click Next to continue.
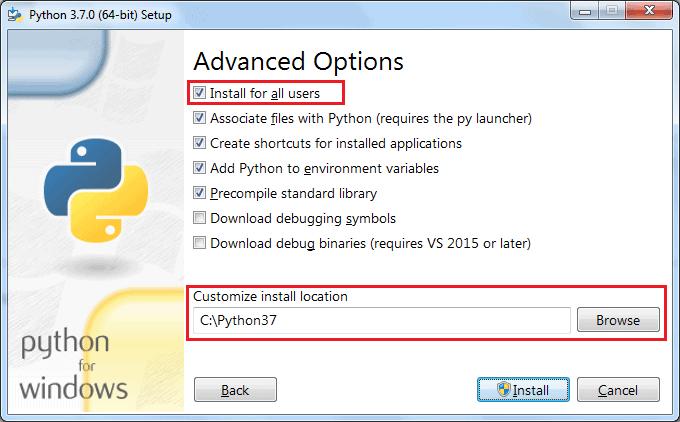
In Advanced Options, select the Install for all users option so that any user of your local machine can execute Python scripts. Also, choose the installation folder to make a shorter path for Python executable (something like C:\python37), keeping the rest of the choices to default and finally click on the Install button.
After successful installation, you can check the Python installation by opening a command prompt and type python —version or python -V and press Enter. If Python installed successfully then it will display the installed version.
python --version``python -V
Install Python on Mac OS X
Section titled “Install Python on Mac OS X”You can install Python by downloading official installer from https://www.python.org/downloads/mac-osx page. Download the latest version of Python under the heading Python Releases for Mac OS X. Double click on the installer file to start the installation wizard.
https://www.python.org/downloads/mac-osx
On the installation wizard, click on Continue a few times until you’re asked to agree to the software license agreement, click on Agree and finish the installation.
Continue``Agree
Install Python on Linux
Section titled “Install Python on Linux”Most of Linux distributions come with Python already installed. However, the Python 2.x version is incorporated in many of them. To check if Python 3.x is available, run the following command in the Linux terminal:
If available, it will return the path to the Python3 executable as /usr/local/bin/python3.
/usr/local/bin/python3
To install Python on Ubuntu 18.04, Ubuntu 20.04 and above, execute the following commands:
After the installation, you can run Python 3.8 and pip3 commands.
For other Linux distributions use the corresponding package managers, such as YUM for Red Hat, aptitude for debian, DNF for Fedora, etc.
For installation on other platforms as well as installation from the source code, please refer to the official documentation on Python Source Releases page. Python Source Releases
Python IDLE
IDLE (Integrated Development and Learning Environment) is an integrated development environment (IDE) for Python. The Python installer for Windows contains the IDLE module by default.
IDLE is not available by default in Python distributions for Linux. It needs to be installed using the respective package managers. Execute the following command to install IDLE on Ubuntu:
IDLE can be used to execute a single statement just like Python Shell and also to create, modify, and execute Python scripts. IDLE provides a fully-featured text editor to create Python script that includes features like syntax highlighting, autocompletion, and smart indent. It also has a debugger with stepping and breakpoints features.
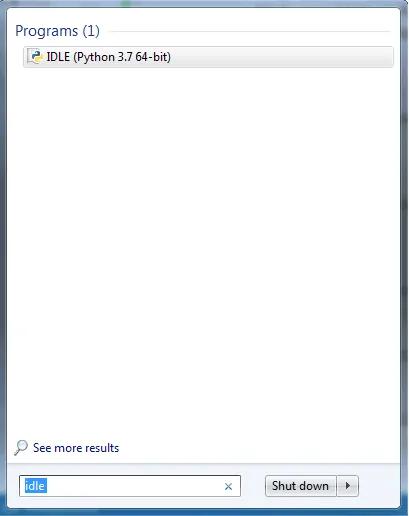
To start an IDLE interactive shell, search for the IDLE icon in the start menu and double click on it.
This will open IDLE, where you can write and execute the Python scripts, as shown below.
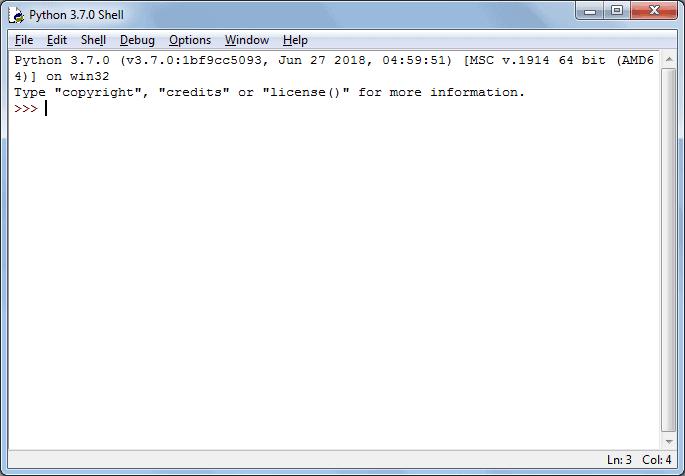
You can execute Python statements same as in Python Shell as shown below.
Python Shell

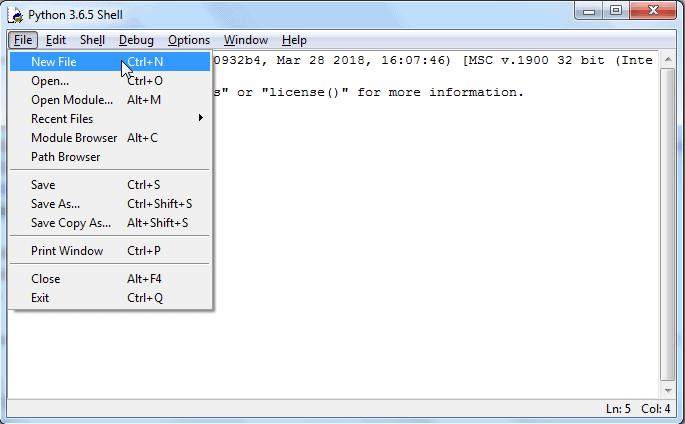
To execute a Python script, create a new file by selecting File -> New File from the menu.
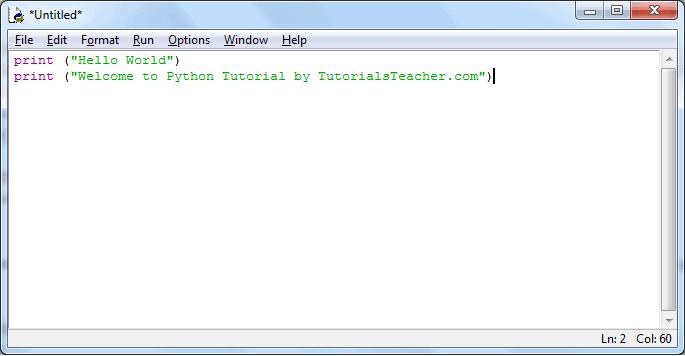
Enter multiple statements and save the file with extension .py using File -> Save. For example, save the following code as hello.py.
hello.py
Now, press F5 to run the script in the editor window. The IDLE shell will show the output.
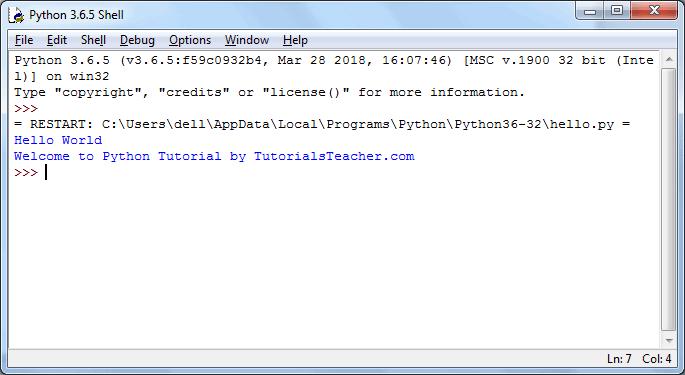
Thus, it is easy to write, test and run Python scripts in IDLE.
Learn about different open-source editors for Python in the next chapter.
Interactive Shell
Python is an interpreter language. It means it executes the code line by line. Python provides a Python Shell, which is used to execute a single Python command and display the result.
It is also known as REPL (Read, Evaluate, Print, Loop), where it reads the command, evaluates the command, prints the result, and loop it back to read the command again.
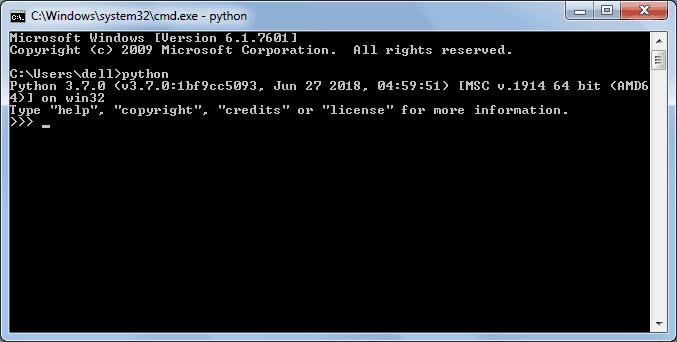
To run the Python Shell, open the command prompt or power shell on Windows and terminal window on mac, write python and press enter. A Python Prompt comprising of three greater-than symbols >>> appears, as shown below.
python``>>>
Now, you can enter a single statement and get the result. For example, enter a simple expression like 3 + 2, press enter and it will display the result in the next line, as shown below.
3 + 2
Execute Python Script
Section titled “Execute Python Script”As you have seen above, Python Shell executes a single statement. To execute multiple statements, create a Python file with extension .py, and write Python scripts (multiple statements).
.py
For example, enter the following statement in a text editor such as Notepad.
print ("This is Python Script.")print ("Welcome to Python Tutorial by TutorialsTeacher.com")print ("This is Python Script.") print ("Welcome to Python Tutorial by TutorialsTeacher.com")
Save it as myPythonScript.py, navigate the command prompt to the folder where you have saved this file and execute the python myPythonScript.py command, as shown below. It will display the result.
myPythonScript.py``python myPythonScript.py

Thus, you can execute Python expressions and commands using Python REPL to quickly execute Python code.
Python Syntax
Here, you will learn the basic syntax of Python 3.
Display Output
Section titled “Display Output”The print() funtion in Python displays an output to a console or to the text stream file. You can pass any type of data to the print() function to be displayed on the console.
print()print()
name="Ram"print(name) # display single variable
age=21print(name, age)# display multiple variablesprint("Name:", name, ", Age:",age) # display formatted output
`name=“Ram”
print(name) # display single variable
age=21
print(name, age)# display multiple variables
print(“Name:”, name, ”, Age:“,age) # display formatted output[Try it](/codeeditor?cid=go-3z7cjmfg7) By default, a single space ' ' acts as a separator between values. However, any other character can be used by providing a sep parameter. Visit the print() funtion for more information. ’ ‘“sep`print() funtion
Getting User’s Input
Section titled “Getting User’s Input”The input() function is used to get the user’s input. It reads the key strokes as a string object which can be referred to by a variable having a suitable name.
input()
Note that the blinking cursor waits for the user’s input. The user enters his input and then hits Enter. This will be captured as a string.
In the above example, the input() function takes the user’s input from the next line, e.g. ‘Steve’ in this case.input() will capture it and assign it to a name variable. The name variable will display whatever the user has provided as the input.
input()``input()``name``name
The input() function has an optional string parameter that acts as a prompt for the user.
input()
The input() function always reads the input as a string, even if comprises of digits. Visit input() function for more information.
input()input() function
Python Statements
Section titled “Python Statements”Python statement ends with the token NEWLINE character (carriage return). It means each line in a Python script is a statement. The following Python script contains three statements in three separate lines.
list = [1, 2, 3, 4 5, 6, 7, 8, 9, 10, 11, 12]list = [1, 2, 3, 4 5, 6, 7, 8, 9, 10, 11, 12]
Please note that the backslash character spans a single line in one logical line and multiple physical lines, but not the two different statements in one logical line.
Use the semicolon ; to separate multiple statements in a single line.
;
print('id: ', 1);print('First Name: ', 'Steve');print('Last Name: ', 'Jobs')print('id: ', 1);print('First Name: ', 'Steve');print('Last Name: ', 'Jobs')Try it
Code Comments in Python
Section titled “Code Comments in Python”In a Python script, the symbol # indicates the start of a comment line. It is effective till the end of the line in the editor.
# this is a commentprint("Hello World")print("Welcome to Python Tutorial") #comment after a statement.# this is a comment print("Hello World") print("Welcome to Python Tutorial") #comment after a statement.
In Python, there is no provision to write multi-line comments, or a block comment. For multi-line comments, each line should have the # symbol at the start.
#
A triple quoted multi-line string is also treated as a comment if it is not a docstring of the function or the class.
functionclass
'''comment1comment2comment3'''''' comment1 comment2 comment3 '''
Visit PEP 8 style Guide for Python Code for more information.
PEP 8 style Guide for Python Code
Indentation in Python
Section titled “Indentation in Python”Leading space or tab at the beginning of the line is considered as indentation level of the line, which is used to determine the group of statements. Statements with the same level of indentation considered as a group or block.
For example, functions, classes, or loops in Python contains a block of statements to be executed. Other programming languages such as C# or Java use curly braces to denote a block of code. Python uses indentation (a space or a tab) to denote a block of statements. “
Indentation Rules
Section titled “Indentation Rules”- Use the colon : to start a block and press Enter.
- All the lines in a block must use the same indentation, either space or a tab.
- Python recommends four spaces as indentation to make the code more readable. Do not mix space and tab in the same block.
- A block can have inner blocks with next level indentation.
The following example demonstrates if elif blocks: if elif
if 10 > 5: # 1st block starts print("10 is greater than 5") # 1st block if 20 > 10: # 1st block print("20 is greater than 10") # inner blockelse: # 2nd block starts print("10 is less than 5") # 2nd blockif 10 > 5: # 1st block starts print("10 is greater than 5") # 1st block if 20 > 10: # 1st block print("20 is greater than 10") # inner block else: # 2nd block starts print("10 is less than 5") # 2nd blockTry it
A function contains all the same level indented statements. The following function contains a block with two statements.
def SayHello(name):  print("Hello ", name)  print("This is the second statement of the SayHello() function")  print("This is the last statement of the SayHello() function")print("This is not the part of the SayHello() function")
#calling a functionSayHello("Abdul")
`def SayHello(name): print(“Hello ”, name) print(“This is the second statement of the SayHello() function”) print(“This is the last statement of the SayHello() function”) print(“This is not the part of the SayHello() function”)
#calling a function SayHello(“Abdul”)`Try it The following example illustrates the use of indents in Python shell:
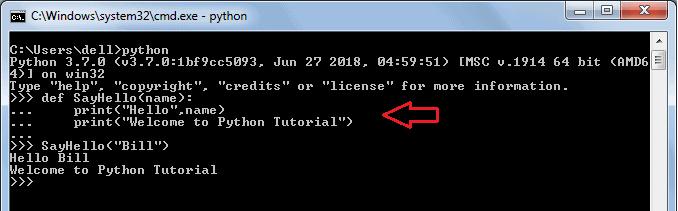
As you can see, in the Python shell, the SayHello() function block started after : and pressing Enter. It then displayed … to mark the block. Use four space (even a single space is ok) or a tab for indent and then write a statement. To end the block, press Enter two times.
SayHello()``:
Python Naming Convetions
Section titled “Python Naming Convetions”The Python program can contain variables, functions, classes, modules, packages, etc. Identifier is the name given to these programming elements. An identifier should start with either an alphabet letter (lower or upper case) or an underscore (_). After that, more than one alphabet letter (a-z or A-Z), digits (0-9), or underscores may be used to form an identifier. No other characters are allowed.
- Identifiers in Python are case sensitive, which means variables named age and Age are different.
age``Age- Class names should use the TitleCase convention. It should begin with an uppercase alphabet letter e.g. MyClass, Employee, Person.MyClass``Employee``Person- Function names should be in lowercase. Multiple words should be separated by underscores, e.g. add(num), calculate_tax(amount).add(num)``calculate_tax(amount)- Variable names in the function should be in lowercase e.g., x, num, salary.x``num``salary- Module and package names should be in lowercase e.g., mymodule, tax_calculation. Use underscores to improve readability.mymodule``tax_calculation- Constant variable names should be in uppercase e.g., RATE, TAX_RATE.RATE``TAX_RATE- Use of one or two underscore characters when naming the instance attributes of a class. - Two leading and trailing underscores are used in Python itself for a special purpose, e.g. add, init, etc.
Visit PEP 8 - Prescriptive Naming Conventions for more information. PEP 8 - Prescriptive Naming Conventions
Python Keywords
Just like natural languages, a computer programming language comprises of a set of predefined words which are called keywords. A prescribed rule of usage for each keyword is called a syntax.
Python 3.x has 33 keywords. Since they have a predefined meaning attached, they cannot be used for any other purpose. The list of Python keywords can be obtained using the following help command in Python shell.
>>>help("keywords")>>>help("keywords")
The following table list all the keywords in Python.
ifeliftryelsewhilelambdafinallybreakforclasscontinueglobalpass
Except for the first three (False, None and True), the other keywords are entirely in lowercase.
Use help() command to know more about each individual keyword. The following will display information on theglobal keyword.
help()``global
>>>help("global")>>>help("global")
Reserved Identifiers
Section titled “Reserved Identifiers”Python built-in classes contains some identifiers that have special meanings. These special identifiers are recognized by the patterns of leading and trailing underscore characters:
>>> 5 * 5 25 >>> _ 25>>> 5 * 5 25 >>> _ 25``__new__()``__init__()``__name__``__main__
>>> __name__ '__main__' >>> __name__ '__main__'
Version History
Python Software Foundation (PSF) used to support two major versions, Python 2.x & Python 3.x. PSF supported Python 2 because a large body of existing code could not be forward ported to Python 3. So, they supported Python 2 until January 2020, but now they have stopped supporting it. Python Software Foundation Python 3.0 was released on December 3rd, 2008. It was designed to rectify certain flaws in the earlier version. This version is not completely backward-compatible with previous versions. However, many of its major features have since been back-ported to the Python 2.6.x and 2.7.x version series. Releases of Python 3 include utilities to facilitate the automation of Python 2 code translation to Python 3.
The following table lists all the important versions of Python:
- Classes with inheritance exception handling
- Functions
- Modules
- Functional programming tools (lambda, map, filter and reduce).
- Support for complex numbers.
- Functions with keyword arguments
- List comprehension.
- Cycle-detecting garbage collector.
- Support for Unicode. Unification of data types and classes
- Backward incompatible.
- print keyword changed to print() function
- raw_input() function depreciated
- Unified str/Unicode types.
- Utilities for automatic conversion of Pytthon 2.x code
- New C API for thread-local storage
- Built-in breakpoint()
- Data classes
- Context variables
- More.. More..- Assignment Expression
- Positional-only parameters
- Parallel filesystem cache for compiled bytecode files
- More.. More..- Dictionary Merge & Update Operators
- New removeprefix() and removesuffix() string methods
- Builtin Generic Types
- More.. More..
Learning objectives:
- Understand what Python is and where it is used
- Install Python and set up the development environment
- Write and run first Python script using IDLE and interactive shell
- Recognize basic Python syntax rules and reserved keywords
Project: “My First Python Script” — A simple calculator that takes user input and performs basic arithmetic operations.
Module 2 — Variables, Data Types & Strings
Section titled “Module 2 — Variables, Data Types & Strings”Week 2
|-------|-------------|
Python Variables
In Python, a variable is a container that stores a value. In other words, variable is the name given to a value, so that it becomes easy to refer a value later on.
Unlike C# or Java, it’s not necessary to explicitly define a variable in Python before using it. Just assign a value to a variable using the = operator e.g. variable_name = value. That’s it.
=``variable_name = value
The following creates a variable with the integer value.
num = 10num = 10Try it
In the above example, we declared a variable named num and assigned an integer value 10 to it. Use the built-in print() function to display the value of a variable on the console or IDLE or REPL.
numprint()REPL
In the same way, the following declares variables with different types of values.
num = 10 #integer variableamount = 78.50 #float variablegreet='Hello World' #string variableisActive = True #boolean variablenum = 10 #integer variable amount = 78.50 #float variable greet='Hello World' #string variable isActive = True #boolean variableTry it
Multiple Variables Assignment
Section titled “Multiple Variables Assignment”You can declare multiple variables and assign values to each variable in a single statement, as shown below.
x, y, z = 10, 20, 30print(x, y, z) #10 20 30x, y, z = 10, 20, 30 print(x, y, z) #10 20 30Try it
In the above example, the first int value 10 will be assigned to the first variable x, the second value to the second variable y, and the third value to the third variable z. Assignment of values to variables must be in the same order in they declared.
10
You can also declare different types of values to variables in a single statement separated by a comma, as shown below.
x, y, z = 10, 'Hello', Trueprint(x, y, z) #10 Hello Truex, y, z = 10, 'Hello', True print(x, y, z) #10 Hello TrueTry it
Above, the variable x stores 10, y stores a string ‘Hello’, and z stores a boolean value True. The type of variables are based on the types of assigned value.
x``10``y``'Hello'``z``True
Assign a value to each individual variable separated by a comma will throw a syntax error, as shown below.
x = 10, y = 'Hello', z = Truex = 10, y = 'Hello', z = TrueTry it
Objects
Section titled “Objects”Variables in Python are objects. A variable is an object of a class based on the value it stores. Use the type() function to get the class name (type) of a variable. type()
num = 10type(num)  #<class 'int'>
amount = 78.50type(amount)  #<class 'float'>
greet='Hello World'type(greet)   #<class 'str'>
isActive = Truetype(isActive)  #<class 'bool'>
`num = 10 type(num) #<class ‘int’>
amount = 78.50 type(amount) #<class ‘float’>
greet=‘Hello World’ type(greet) #<class ‘str’>
isActive = True
type(isActive) #<class ‘bool’>[Try it](/codeeditor?cid=go-3z7dhuhv7) In the above example, num is an object of the int class that contains integre value 10. In the same way, amount is an object of the float class, greet is an object of the str class,isActive is an object of the bool class. numint10amountfloatgreetstrisActivebool`
Unlike other programming languages like C# or Java, Python is a dynamically-typed language, which means you don’t need to declare a type of a variable. The type will be assigned dynamically based on the assigned value.
x = 100print(type(x))  #<class 'int'>
x = 'Hello World!'print(type(x))  #<class 'str'>
`x = 100 print(type(x)) #<class ‘int’>
x = ‘Hello World!’
print(type(x)) #<class ‘str’>[Try it](/codeeditor?cid=go-3z7fvreq8) The + operator sums up two int variables, whereas it concatenates two string type variables. +`
x = 100print(x + 10)   #110
x = 'Hello'print(x + ' Python')  #Hello Python
`x = 100 print(x + 10) #110
x = ‘Hello’ print(x + ’ Python’) #Hello Python`Try it
Object’s Identity
Section titled “Object’s Identity”Each object in Python has an id. It is the object’s address in memory represented by an integer value. The id() function returns the id of the specified object where it is stored, as shown below.
id()
x = 100id(x)
greet='Hello'id(greet)
`x = 100 id(x)
greet=‘Hello’ id(greet)`Try it Variables with the same value will have the same id.
x = 100y = x;z = 100
print(id(x), id(y), id(z))
`x = 100 y = x; z = 100
print(id(x), id(y), id(z))`Try it Thus, Python optimize memory usage by not creating separate objects if they point to same value.
Naming Conventions
Section titled “Naming Conventions”Any suitable identifier can be used as a name of a variable, based on the following rules:
- The name of the variable should start with either an alphabet letter (lower or upper case) or an underscore (_), but it cannot start with a digit.
- More than one alpha-numeric characters or underscores may follow.
- The variable name can consist of alphabet letter(s), number(s) and underscore(s) only. For example, myVar, MyVar, _myVar, MyVar123 are valid variable names, but m*var, my-var, 1myVar are invalid variable names.
myVar``MyVar``_myVar``MyVar123``m*var``my-var``1myVar1. Variable names in Python are case sensitive. So, NAME, name, nAME, and nAmE are treated as different variable names.NAME``name``nAME``nAmE1. Variable names cannot be a reserved keywords in Python. keywords
Local & Global Variables
In general, a variable that is defined in a block is available in that block only. It is not accessible outside the block. Such a variable is called a local variable. Formal argument identifiers also behave as local variables.
variable
The following example will underline this point. An attempt to print a local variable outside its scope will raise the NameError exception.
NameErrorexception
def greet():  name = 'Steve'  print('Hello ', name)
greet()print(name) #NameError
`def greet(): name = ‘Steve’ print(‘Hello ’, name)
greet()
print(name) #NameError[Try it](/codeeditor?cid=python-3z7yc8y8j) Here, name is a local variable for the greet() function and is not accessible outside of it. name“greet() Any variable present outside any function block is called a global variable. Its value is accessible from inside any function. In the following example, the name variable is initialized before the function definition. Hence, it is a global variable. [function](/python/python-user-defined-function)name`
name='John'def greet():  print ("Hello ", name)
greet()print(name)
`name=‘John’ def greet(): print (“Hello ”, name)
greet()
print(name)[Try it](/codeeditor?cid=python-3z7ycbp95) Here, you can access the global variable name because it has been defined out of a function. name`
However, if we assign another value to a globally declared variable inside the function, a new local variable is created in the function’s namespace. This assignment will not alter the value of the global variable. For example:
name = 'Steve'def greet():    name = 'Bill'    print('Hello ', name)  #Hello Bill
greet()print(name) #steve
`name = ‘Steve’ def greet(): name = ‘Bill’ print(‘Hello ’, name) #Hello Bill
greet()
print(name) #steve[Try it](/codeeditor?cid=python-3z7ycff7a) Now, changing the value of global variable name inside a function will not affect its global value. nameIf you need to access and change the value of the global variable from within a function, this permission is granted by the global keyword.global`
name = 'Steve'def greet():    global name    name = 'Bill'    print('Hello ', name)
greet()print(name) #Bill
`name = ‘Steve’ def greet(): global name name = ‘Bill’ print(‘Hello ’, name)
greet()
print(name) #Bill[Try it](/codeeditor?cid=python-3z7yckd6s) The above would display the following output in the Python shell. [Python shell](/python/python-interective-shell) It is also possible to use a global and local variable with the same name simultaneously. Built-in function globals() returns a dictionary object of all global variables and their respective values. Using the name of the variable as a key, its value can be accessed and modified. globals()`
name = 'Steve'def greet():  globals()['name'] = 'Ram'  name='Steve'  print ('Hello ', name)
greet()print(name) #Ram
`name = ‘Steve’ def greet(): globals()[‘name’] = ‘Ram’ name=‘Steve’ print (‘Hello ’, name)
greet()
print(name) #Ram`Try it
The result of the above code shows a conflict between the global and local variables with the same name and how it is resolved.
Visit Globals and Locals in Python for more information. Globals and Locals in Python
Python Data Types
Data types are the classification or categorization of data items. Python supports the following built-in data types.
Scalar Types
Section titled “Scalar Types”- int: Positive or negative whole numbers (without a fractional part) e.g. -10, 10, 456, 4654654.
int- float: Any real number with a floating-point representation in which a fractional component is denoted by a decimal symbol or scientific notation e.g. 1.23, 3.4556789e2.
float- complex: A number with a real and imaginary component represented as x + 2y.
complex
x + 2y- bool: Data with one of two built-in values True or False. Notice that ‘T’ and ‘F’ are capital. true and false are not valid booleans and Python will throw an error for them.True``False``true``false- None: The None represents the null object in Python. A None is returned by functions that don’t explicitly return a value.None``None
Sequence Type
Section titled “Sequence Type”A sequence is an ordered collection of similar or different data types. Python has the following built-in sequence data types:
- String: A string value is a collection of one or more characters put in single, double or triple quotes. String- List: A list object is an ordered collection of one or more data items, not necessarily of the same type, put in square brackets. List- Tuple: A Tuple object is an ordered collection of one or more data items, not necessarily of the same type, put in parentheses. Tuple
Mapping Type
Section titled “Mapping Type”Dictionary: A dictionary Dict() object is an unordered collection of data in a key:value pair form. A collection of such pairs is enclosed in curly brackets. For example: {1:“Steve”, 2:“Bill”, 3:“Ram”, 4: “Farha”}
DictionaryDict()``{1:"Steve", 2:"Bill", 3:"Ram", 4: "Farha"}
Set Types
Section titled “Set Types”- set: Set is mutable, unordered collection of distinct hashable objects. The set is a Python implementation of the set in Mathematics. A set object has suitable methods to perform mathematical set operations like union, intersection, difference, etc. set- frozenset: Frozenset is immutable version of set whose elements are added from other iterables.
Mutable and Immutable Types
Section titled “Mutable and Immutable Types”Data objects of the above types are stored in a computer’s memory for processing. Some of these values can be modified during processing, but contents of others can’t be altered once they are created in the memory.
Numbers, strings, and Tuples are immutable, which means their contents can’t be altered after creation. NumbersstringsTuples On the other hand, items in a List or Dictionary object can be modified. It is possible to add, delete, insert, and rearrange items in a list or dictionary. Hence, they are mutable objects. ListDictionary
Number Type
Python supports three numeric types to represent numbers: integers, float, and complex number. Here you will learn about each number type.
In Python, integers are zero, positive or negative whole numbers without a fractional part and having unlimited precision, e.g. 0, 100, -10. The followings are valid integer literals in Python.
#integer variablesx = 0print(x)
x = 100print(x)
x = -10print(x)
x = 1234567890print(x)
x = 5000000000000000000000000000000000000000000000000000000print(x)
`#integer variables x = 0 print(x)
x = 100 print(x)
x = -10 print(x)
x = 1234567890 print(x)
x = 5000000000000000000000000000000000000000000000000000000 print(x)`Try it Integers can be binary, octal, and hexadecimal values.
b = 0b11011000 # binaryprint(b)
o = 0o12 # octalprint(o)
h = 0x12 # hexadecimalprint(h)
`b = 0b11011000 # binary print(b)
o = 0o12 # octal print(o)
h = 0x12 # hexadecimal
print(h)[Try it](/codeeditor?cid=python-3z7kemnmm) All integer literals or variables are objects of the int class. Use the type() method to get the class name, as shown below. int“type()`
print(type(100))
x=1234567890print(type(x))
y=5000000000000000000000000000000000000000000000000000000print(type(y))
`print(type(100))
x=1234567890 print(type(x))
y=5000000000000000000000000000000000000000000000000000000 print(type(y))`Try it Note: Leading zeros in non-zero integers are not allowed in Python, e.g. 000123 is invalid number and 0000 becomes 0.
x=001234567890 #syntaxError: invalid tokenx=001234567890 #syntaxError: invalid token
Python does not allow comma as number delimiter. Use underscore _ as a delimiter instead.
_
x = 1_234_567_890print(x) #output: 1234567890x = 1_234_567_890 print(x) #output: 1234567890Try it
Note that integers must be without a fractional part (decimal point). It it includes a fractional then it becomes a float.
x=5print(type(x)) #output: <class 'int'>
x=5.0print(type(x)) #output: <class 'float'>
`x=5 print(type(x)) #output: <class ‘int’>
x=5.0
print(type(x)) #output: <class ‘float’>[Try it](/codeeditor?cid=python-3z7kfc6nu ) The int() function converts a string or float to int. int()`
x = int('100')print(x) #output: 100
y = int('-10')print(y) #output: -10
z = int(5.5)print(z) #output: 5
n = int('100', 2)print(n) #output: 4
`x = int(‘100’) print(x) #output: 100
y = int(‘-10’) print(y) #output: -10
z = int(5.5) print(z) #output: 5
n = int(‘100’, 2) print(n) #output: 4`Try it
Binary
Section titled “Binary”A number having 0b with eight digits in the combination of 0 and 1 represent the binary numbers in Python. For example, 0b11011000 is a binary number equivalent to integer 216.
x = 0b11011000print(x)
x = 0b_1101_1000print(x)print(type(x))
`x = 0b11011000 print(x)
x = 0b_1101_1000 print(x) print(type(x))`Try it
A number having 0o or 0O as prefix represents an octal number. For example, 0O12 is equivalent to integer 10.
x = 0o12
print(x)print(type(x))
`x = 0o12
print(x) print(type(x))`Try it
Hexadecimal
Section titled “Hexadecimal”A number with 0x or 0X as prefix represents hexadecimal number. For example, 0x12 is equivalent to integer 18.
x = 0x12
print(x)print(type(x))
`x = 0x12
print(x) print(type(x))`Try it
In Python, floating point numbers (float) are positive and negative real numbers with a fractional part denoted by the decimal symbol . or the scientific notation E or e, e.g. 1234.56, 3.142, -1.55, 0.23.
.``E``e
f = 1.2print(f) #output: 1.2print(type(f)) #output: <class 'float'>
f=123_42.222_013 #output: 12342.222013print(f)
f=2e400print(f) #output: inf
`f = 1.2 print(f) #output: 1.2 print(type(f)) #output: <class ‘float’>
f=123_42.222_013 #output: 12342.222013 print(f)
f=2e400
print(f) #output: inf[Try it](/codeeditor?cid=python-3z7khfdhd ) As you can see, a floating point number can be separated by the underscore _. The maximum size of a float is depend on your system. The float beyond its maximum size referred as inf, Inf, INFINITY, or infinity. For example, a float number 2e400 will be considered as infinity for most systems. _“2e400`
Scientific notation is used as a short representation to express floats having many digits. For example: 345.56789 is represented as 3.4556789e2 or 3.4556789E2
f = 1e3print(f) #output: 1000.0
f = 1e5print(f) #output:100000.0
f = 3.4556789e2print(f) #output:print(type(f)) #output:345.56789
`f = 1e3 print(f) #output: 1000.0
f = 1e5 print(f) #output:100000.0
f = 3.4556789e2
print(f) #output:
print(type(f)) #output:345.56789[Try it](/codeeditor?cid=python-3z7nmbj4w ) Use the float() function to convert string, int to float. float()`
f=float('5.5')print(f) #output: 5.5
f=float('5')print(f) #output: 5.0
f=float('     -5')print(f) #output: -5.0
f=float('1e3')print(f) #output: 1000.0
f=float('-Infinity')print(f) #output: -inf
f=float('inf')print(f)  #output: infprint(type(f)) #output:<class 'float'>
`f=float(‘5.5’) print(f) #output: 5.5
f=float(‘5’) print(f) #output: 5.0
f=float(’ -5’) print(f) #output: -5.0
f=float(‘1e3’) print(f) #output: 1000.0
f=float(‘-Infinity’) print(f) #output: -inf
f=float(‘inf’) print(f) #output: inf print(type(f)) #output:<class ‘float’>`Try it
Complex Numbers
Section titled “Complex Numbers”A complex number is a number with real and imaginary components. For example, 5 + 6j is a complex number where 5 is the real component and 6 multiplied by j is an imaginary component.
5 + 6j
a = 5+2jprint(a)print(type(a))a = 5+2j print(a) print(type(a))Try it
You must use j or J as imaginary component. Using other character will throw syntax error.
a=5+2ka=5+ja=5i+2ja=5+2k a=5+j a=5i+2jTry it
Arithmetic Operators
Section titled “Arithmetic Operators”The following table list arithmetic operators on integer values: Try it
Arithmetic Operations on Complex Numbers
Section titled “Arithmetic Operations on Complex Numbers”Addition and subtraction of complex numbers is straightforward. Real and imaginary parts are added/subtracted to get the result.
a=6+4jb=3+2j
print("a+2=",a+2)print("a*2=",a*2)print("a/2=",a/2)print("a**2=",a**2)print("a+b=",a+b)print("a-b=",a-b)
`a=6+4j b=3+2j
print(“a+2=“,a+2) print(“a2=“,a2) print(“a/2=“,a/2) print(“a2=“,a2) print(“a+b=“,a+b) print(“a-b=“,a-b)`Try it As you can see in the above example, the arithmetic operators can also be used with two complex numbers.
The process of multiplying these two complex numbers is very similar to multiplying two binomials. Multiply each term in the first number by each term in the second number.
a=6+4jb=3+2j
c=a*bprint(c)
c=(6+4j)*(3+2j)print(c)
c=(18+12j+14j+8*1)print(c)
`a=6+4j
b=3+2j
c=a*b
print(c)
c=(6+4j)*(3+2j)
print(c)
c=(18+12j+14j+8*1) print(c)`Try it
Numeric Functions
Section titled “Numeric Functions”A numeric object of one type can be converted in another type using the following functions: intfloatcomplexhexoctpowabsround
Python String
In Python, string is an immutable sequence data type. It is the sequence of Unicode characters wrapped inside single, double, or triple quotes.
The followings are valid string literals in Python.
'This is a string in Python' # string in single quotes"This is a string in Python" # string in double quotes'''This is a string in Python''' # string in triple quotes"""This is a string in Python""" # string in triple double-quotes'This is a string in Python' # string in single quotes "This is a string in Python" # string in double quotes '''This is a string in Python''' # string in triple quotes """This is a string in Python""" # string in triple double-quotes
A string literal can be assigned to a variable, as shown below.
str1='This is a string in Python'print(str1)
str2="This is a string in Python"print(str2)
`str1=‘This is a string in Python’ print(str1)
str2=“This is a string in Python” print(str2)`Try it Multi-line strings must be embed in triple quotes, as shown below.
str1='''This isthe firstMulti-line string.'''print(str1)
str2="""This isthe secondMulti-linestring."""print(str2)
`str1='''This is the first Multi-line string. ''' print(str1)
str2="""This is the second Multi-line string.""" print(str2)`Try it If a string literal required to embed double quotes as part of a string then, it should be put in single quotes. Likewise, if a string includes a single quote as a part of a string then, it should be written in double quotes.
str1='Welcome to "Python Tutorial" on TutorialsTeacher'print(str1)
str2="Welcome to 'Python Tutorial' on TutorialsTeacher"print(str2)
`str1=‘Welcome to “Python Tutorial” on TutorialsTeacher’ print(str1)
str2=“Welcome to ‘Python Tutorial’ on TutorialsTeacher”
print(str2)[Try it](/codeeditor?cid=python-3z7p9wkj3) Use the len() function to retrieve the length of a string, as shown below. len()`
greet='Hello'n = len(greet) #returns 5greet='Hello' n = len(greet) #returns 5Try it
A sequence is defined as an ordered collection of items. Hence, a string is an ordered collection of characters. The sequence uses an index, starting with zero to fetch a certain item (a character in case of a string) from it.
greet='hello'print(greet[0])print(greet[1])print(greet[2])print(greet[3])print(greet[4])print(greet[5]) #IndexError: string index out of rangegreet='hello' print(greet[0]) print(greet[1]) print(greet[2]) print(greet[3]) print(greet[4]) print(greet[5]) #IndexError: string index out of rangeTry it
Python supports negative indexing too, starting with -(length of string) till -1.
greet='hello'print(greet[-5])print(greet[-4])print(greet[-3])print(greet[-2])print(greet[-1])print(greet[0])greet='hello' print(greet[-5]) print(greet[-4]) print(greet[-3]) print(greet[-2]) print(greet[-1]) print(greet[0])Try it
The string is an immutable object. Hence, it is not possible to modify it. The attempt to assign different characters at a certain index results in errors.
greet='hello'greet[0]='A' #TypeError:'str' object does not support item assignmentgreet='hello' greet[0]='A' #TypeError:'str' object does not support item assignment
str Class
Section titled “str Class”All strings are objects of the str class in Python.
str
greet='hello'print(type(greet)) #output: <class 'str'>greet='hello' print(type(greet)) #output: <class 'str'>Try it
Use the str() function to convert a number to a string.
str()
s = str(100)print(s)  #'100'
s = str(-10)print(s) #'-10'
s = str(True)print(s) #'True'
`s = str(100) print(s) #‘100’
s = str(-10) print(s) #‘-10’
s = str(True) print(s) #‘True’`Try it
Escape Sequences
Section titled “Escape Sequences”The escape character is used to invoke an alternative implementation of the subsequent character in a sequence. In Python, backslash \ is used as an escape character. Use a backslash character followed by the character you want to insert in a string e.g. ’ to include a quote, or ” to include a double quotes in a string, as shown below.
\``\'``\"
str1='Welcome to 'Python Tutorial' on TutorialsTeacher'print(str1)
str2="Welcome to "Python Tutorial" on TutorialsTeacher"print(str2)
`str1=‘Welcome to ‘Python Tutorial’ on TutorialsTeacher’ print(str1)
str2=“Welcome to “Python Tutorial” on TutorialsTeacher”
print(str2)[Try it](/codeeditor?cid=python-3z7pau6e6) Use r or R to ignore escape sequences in a string. r“R`
str1 = r'Welcome to 'Python Tutorial' on TutorialsTeacher'print(str1)str1 = r'Welcome to 'Python Tutorial' on TutorialsTeacher' print(str1)Try it
The following table lists escape sequences in Python.
String Operators
Section titled “String Operators”Obviously, arithmetic operators don’t operate on strings. However, there are special operators for string processing.
String Methods
Section titled “String Methods”str.capitalize()string.casefold()string.center()string.count()string.endswith()string.expandtabs()string.find()string.index()string.isalnum()string.isalpha()string.isascii()string.isdecimal()string.isdigit()string.isidentifier()string.islower()string.isnumeric()string.isprintable()string.isspace()string.istitle()string.isupper()string.join()string.ljust()string.lower()string.lstrip()string.maketrans()string.partition()string.replace()string.rfind()string.rindex()string.rjust()string.rpartition()string.rsplit()string.rstrip()string.split()string.splitlines()string.startswith()string.strip()string.swapcase()string.title()string.translate()string.upper()string.zfill()
Learning objectives:
- Declare and use variables with proper naming conventions
- Understand local vs global variable scope
- Work with different data types (int, float, bool, str)
- Perform string operations and formatting
Project: “Personal Info Manager” — A program that stores and displays user information using strings and numbers, demonstrating variable types and string formatting.
Module 3 — Operators & Control Flow
Section titled “Module 3 — Operators & Control Flow”Week 3
|-------|-------------|
Python Operators
Operators are special symbols that perform some operation on operands and returns the result. For example, 5 + 6 is an expression where + is an operator that performs arithmetic add operation on numeric left operand 5 and the right side operand 6 and returns a sum of two operands as a result.
5 + 6``+``5``6
Python includes the operator module that includes underlying methods for each operator. For example, the + operator calls the operator.add(a,b) method.
operator+``operator.add(a,b)
import operator
n=5+5print(n)
n=operator.add(5, 10)print(n)
n=operator.__add__(5, 20)print(n)
`import operator
n=5+5
print(n)
n=operator.add(5, 10) print(n)
n=operator.add(5, 20)
print(n)[Try it](/codeeditor?cid=python-3z7uz4reb) Above, expression 5 + 6 is equivalent to the expression operator.add(5, 6) and operator.__add__(5, 6). Many function names are those used for special methods, without the double underscores (dunder methods). For backward compatibility, many of these have functions with the double underscores kept. 5 + 6operator.add(5, 6)operator.add(5, 6)`
Python includes the following categories of operators:
- Arithmetic Operators Arithmetic Operators- Assignment Operators Assignment Operators- Comparison Operators Comparison Operators- Logical Operators Logical Operators- Identity Operators Identity Operators- Membership Test Operators Membership Test Operators- Bitwise Operators Bitwise Operators
Arithmetic Operators
Section titled “Arithmetic Operators”Arithmetic operators perform the common mathematical operation on the numeric operands.
The arithmetic operators return the type of result depends on the type of operands, as below.
- If either operand is a complex number, the result is converted to complex;
- If either operand is a floating point number, the result is converted to floating point;
- If both operands are integers, then the result is an integer and no conversion is needed.
The following table lists all the arithmetic operators in Python:
x,y= 5,6 print(x + y) #output: 11 import operator operator.add(5,6) #output: 11x,y =5,6 print(x - y) #output: -1 import operator operator.sub(10, 5) #output: 5x,y =5,6 print(x * y) #output: 30 import operator operator.mul(5,6) #output: 30x = 2; y = 3 print(x ** y) #output: 8 import operator operator.pow(2, 3) #output: 8x = 6; y = 3 print(x / y) #output: 2 import operator operator.truediv(6, 3) #output: 2math.floor(a/b)
x = 6; y = 5 print(x // y) #output: 1 import operator operator.floordiv(6,5) #output: 1a/b
x = 11; y = 3 print(x % y) #output: 12 import operator operator.mod(11, 3) #output: 2Assignment Operators
Section titled “Assignment Operators”The assignment operators are used to assign values to variables. The following table lists all the arithmetic operators in Python:
x = 5; x 5x = 5 print(x += 5) #output: 10 import operator x = operator.iadd(5, 5) #output: 10x = 5 print(x -= 2) #output: 3 import operator x = operator.isub(5,2)x = 2 print(x *= 3) #output: 6 import operator x = operator.imul(2, 3)x = 6 print(x /= 3) #output: 2 import operator x = operator.itruediv(6, 3)x = 6 print(x //= 5) #output: 1 import operator operator.ifloordiv(6,5)x = 11 print(x %= 3) #output: 2 import operator operator.imod(11, 3) #output: 2x = 11 print(x &= 3) #output: 1 import operator operator.iand(11, 3) #output: 1x = 3 print(x |= 4) #output: 7 import operator operator.mod(3, 4) #output: 7x = 5 print(x ^= 2) #output: 7 import operator operator.ixor(5, 2) #output: 7x = 5 print(x >>= 2) #output: 1 import operator operator.irshift(5, 2) #output: 1x = 5 print(x <<= 2) #output: 20 import operator operator.ilshift(5, 2) #output: 20Comparison Operators
Section titled “Comparison Operators”The comparison operators compare two operands and return a boolean either True or False. The following table lists comparison operators in Python.
x,y =5,6 print(x > y) #output: False import operator operator.gt(5,6) #output: Falsex,y =5,6 print(x < y) #output: True import operator operator.add(5,6) #output: Truex,y =5,6 print(x == y) #output: False import operator operator.eq(5,6) #output: Falsex,y =5,6 print(x != y) #output: True import operator operator.ne(5,6) #output: Truex,y =5,6 print(x >= y) #output: False import operator operator.ge(5,6) #output: Falsex,y =5,6 print(x <= y) #output: True import operator operator.le(5,6) #output: TrueLogical Operators
Section titled “Logical Operators”The logical operators are used to combine two boolean expressions. The logical operations are generally applicable to all objects, and support truth tests, identity tests, and boolean operations.
x,y =5,6 print(x > 1 and y <10) #output: Truex,y =5,6 print(x > 6 or y <10) #output: Truex = 5 print(not x > 1) #output: FalseIdentity Operators
Section titled “Identity Operators”The identity operators check whether the two objects have the same id value e.i. both the objects point to the same memory location.
x,y =5,6 print(x is y) #output: False import operator operator.is_(x,y) #output: Falsex,y =5,6 print(x is not y) #output: True import operator operator.is_not(x, y) #output: TrueMembership Test Operators
Section titled “Membership Test Operators”The membership test operators in and not in test whether the sequence has a given item or not. For the string and bytes types, x in y is True if and only if x is a substring of y.
in``not in``x in y``x``y
nums = [1,2,3,4,5] print(1 in nums) #output: True print(10 in nums) #output: False print('str' in 'string') #output: True import operator operator.contains(nums, 2) #output: Truenums = [1,2,3,4,5] print(1 not in nums) #output: False print(10 not in nums) #output: True print('str' not in 'string') #output: False import operator not operator.contains(nums, 2) #output: FalseBitwise Operators
Section titled “Bitwise Operators”Bitwise operators perform operations on binary operands.
x=5; y=10 z=x & y print(z) #output: 0 import operator operator.and_(x, y)x=5; y=10 z=x | y print(z) #output: 15 import operator operator.or_(x, y)x=5; y=10 z=x ^ y print(z) #output: 15 import operator operator.xor(x, y)x=5 print(~x) #output: -6 import operator operator.invert(x)x=5 print(x<<2) #output: 20 import operator operator.lshift(x,2)x=5 print(x>>2) #output: 1 import operator operator.rshift(x,2)If / Elif
By default, statements in the script are executed sequentially from the first to the last. If the processing logic requires so, the sequential flow can be altered in two ways:
Python uses the if keyword to implement decision control. Python’s syntax for executing a block conditionally is as below:
if
if [boolean expression]: statement1 statement2 ... statementNAny Boolean expression evaluating to True or False appears after the if keyword. Use the : symbol and press Enter after the expression to start a block with an increased indent. One or more statements written with the same level of indent will be executed if the Boolean expression evaluates to True.
True``False``if``:``if``True
To end the block, decrease the indentation. Subsequent statements after the block will be executed out of the if condition. The following example demonstrates the if condition.
if``if
price = 50
if price < 100:    print("price is less than 100")
`price = 50
if price < 100: print(“price is less than 100”)`Try it
price is less than 100price is less than 100
In the above example, the expression price < 100 evaluates to True, so it will execute the block. The if block starts from the new line after : and all the statements under the if condition starts with an increased indentation, either space or tab. Above, the if block contains only one statement. The following example has multiple statements in the if condition.
price < 100``True``if``:``if``if
price = 50quantity = 5
if price*quantity < 500:    print("price*quantity is less than 500")    print("price = ", price)    print("quantity = ", quantity)
`price = 50 quantity = 5
if pricequantity < 500: print(“pricequantity is less than 500”) print(“price = ”, price) print(“quantity = ”, quantity)`Try it
price*quantity is less than 500 price = 50 quantity = 5price*quantity is less than 500 price = 50 quantity = 5
Above, the if condition contains multiple statements with the same indentation. If all the statements are not in the same indentation, either space or a tab then it will raise an IdentationError.
IdentationError
price = 50quantity = 5if price*quantity < 500: print("price is less than 500") print("price = ", price) print("quantity = ", quantity)price = 50 quantity = 5 if price*quantity < 500: print("price is less than 500") print("price = ", price) print("quantity = ", quantity)Try it
print("quantity = ", quantity) ^ IdentationError: unexpected indent print("quantity = ", quantity) ^ IdentationError: unexpected indent
The statements with the same indentation level as if condition will not consider in the if block. They will consider out of the if condition.
if``if
price = 50quantity = 5if price*quantity < 100: print("price is less than 500") print("price = ", price) print("quantity = ", quantity)print("No if block executed.")price = 50 quantity = 5 if price*quantity < 100: print("price is less than 500") print("price = ", price) print("quantity = ", quantity) print("No if block executed.")Try it
No if block executed.No if block executed.
The following example demonstrates multiple if conditions.
price = 100
if price > 100: print("price is greater than 100")
if price == 100:  print("price is 100")
if price < 100:    print("price is less than 100")
`price = 100
if price > 100: print(“price is greater than 100”)
if price == 100: print(“price is 100”)
if price < 100: print(“price is less than 100”)`Try it
price is 100price is 100
Notice that each if block contains a statement in a different indentation, and that’s valid because they are different from each other.
if
else Condition
Section titled “else Condition”Along with the if statement, the else condition can be optionally used to define an alternate block of statements to be executed if the boolean expression in the if condition evaluates to False.
if``else``if``False
if [boolean expression]: statement1 statement2 ... statementN else: statement1 statement2 ... statementNAs mentioned before, the indented block starts after the : symbol, after the boolean expression. It will get executed when the condition is True. We have another block that should be executed when the if condition is False. First, complete the if block by a backspace and write else, put add the : symbol in front of the new block to begin it, and add the required statements in the block.
:``True``if``False``if``else``:
price = 50
if price >= 100:    print("price is greater than 100")else:    print("price is less than 100")
`price = 50
if price >= 100: print(“price is greater than 100”) else: print(“price is less than 100”)`Try it
price is less than 100price is less than 100
In the above example, the if condition price >= 100 is False, so the else block will be executed. The else block can also contain multiple statements with the same indentation; otherwise, it will raise the IndentationError.
price >= 100``False``else``IndentationError
Note that you cannot have multiple else blocks, and it must be the last block.
else
elif Condition
Section titled “elif Condition”Use the elif condition is used to include multiple conditional expressions after the if condition or between the if and else conditions.
elif``if``if``else
if [boolean expression]: [statements] elif [boolean expresion]: [statements] elif [boolean expresion]: [statements] else: [statements]The elif block is executed if the specified condition evaluates to True.
elif``True
price = 100
if price > 100:    print("price is greater than 100")elif price == 100:    print("price is 100")elif price < 100:    print("price is less than 100")
`price = 100
if price > 100: print(“price is greater than 100”) elif price == 100: print(“price is 100”) elif price < 100: print(“price is less than 100”)`Try it
price is 100price is 100
In the above example, the elif conditions are applied after the if condition. Python will evalute the if condition and if it evaluates to False then it will evalute the elif blocks and execute the elif block whose expression evaluates to True. If multiple elif conditions become True, then the first elif block will be executed.
elif``if``if``False``elif``elif``True``elif``True``elif
The following example demonstrates if, elif, and else conditions.
price = 50
if price > 100:    print("price is greater than 100")elif price == 100:    print("price is 100")else price < 100:    print("price is less than 100")
`price = 50
if price > 100: print(“price is greater than 100”) elif price == 100: print(“price is 100”) else price < 100: print(“price is less than 100”)`Try it
price is less than 100price is less than 100
All the if, elif, and else conditions must start from the same indentation level, otherwise it will raise the IndentationError.
IndentationError
price = 50
if price > 100:    print("price is greater than 100") elif price == 100:    print("price is 100")  else price < 100:    print("price is less than 100")
`price = 50
if price > 100: print(“price is greater than 100”) elif price == 100: print(“price is 100”) else price < 100: print(“price is less than 100”)`Try it
elif price == 100: ^IdentationError: unindent does not match any outer indentation level elif price == 100: ^ IdentationError: unindent does not match any outer indentation level
Nested if, elif, else Conditions
Section titled “Nested if, elif, else Conditions”Python supports nested if, elif, and else condition. The inner condition must be with increased indentation than the outer condition, and all the statements under the one block should be with the same indentation.
price = 50quantity = 5amount = price*quantity
if amount > 100: if amount > 500: print("Amount is greater than 500") else: if amount <= 500 and amount >= 400: print("Amount is between 400 and 500") elif amount <= 400 and amount >= 300: print("Amount is between 300 and 400") else: print("Amount is between 200 and 300")elif amount == 100: print("Amount is 100")else: print("Amount is less than 100")`price = 50 quantity = 5 amount = price*quantity
if amount > 100: if amount > 500: print(“Amount is greater than 500”) else: if amount <= 500 and amount >= 400: print(“Amount is between 400 and 500”) elif amount <= 400 and amount >= 300: print(“Amount is between 300 and 400”) else: print(“Amount is between 200 and 300”) elif amount == 100: print(“Amount is 100”) else: print(“Amount is less than 100”)`Try it
Amount is between 200 and 500Amount is between 200 and 500
For Loop
In Python, the for loop is used for iterating over sequence types such as list, tuple, set, range, etc. Unlike other programming language, it cannot be used to execute some code repeatedly.
listtuplesetrange
The body of the for loop is executed for each member element in the sequence. Hence, it doesn’t require explicit verification of a boolean expression controlling the loop (as in the while loop).
for
for x in sequence: statement1 statement2 ... statementNTo start with, a variable x in the for statement refers to the item at the 0 index in the sequence. The block of statements with increased uniform indent after the : symbol will be executed. A variable x now refers to the next item and repeats the body of the loop till the sequence is exhausted.
x``:``x
The following example demonstrates the for loop with the list object.
list
nums = [10, 20, 30, 40, 50]
for i in nums:    print(i)
`nums = [10, 20, 30, 40, 50]
for i in nums: print(i)`Try it
10 20 30 40 5010 20 30 40 50
The following demonstrates the for loop with a tuple object.
nums = (10, 20, 30, 40, 50)for i in nums: print(i)nums = (10, 20, 30, 40, 50) for i in nums: print(i)Try it
10 20 30 40 5010 20 30 40 50
The object of any Python sequence data type can be iterated using the for statement.
for char in 'Hello': print (char)for char in 'Hello': print (char)Try it
H e l l oH e l l o
The following for loop iterates over the dictionary using the items() method.
fordictionaryitems()
numNames = { 1:'One', 2: 'Two', 3: 'Three'}
for pair in numNames.items():    print(pair)
`numNames = { 1:‘One’, 2: ‘Two’, 3: ‘Three’}
for pair in numNames.items(): print(pair)`Try it
(1, 'One') (2, 'Two') (3, 'Three')(1, 'One') (2, 'Two') (3, 'Three')
The key-value paris can be unpacked into two variables in the for loop to get the key and value separately.
for
numNames = { 1:'One', 2: 'Two', 3: 'Three'}
for k,v in numNames.items():    print("key = ", k , ", value =", v)
`numNames = { 1:‘One’, 2: ‘Two’, 3: ‘Three’}
for k,v in numNames.items(): print(“key = ”, k , ”, value =”, v)`Try it
key = 1, value = One key = 2, value = Two key = 3, value = Threekey = 1, value = One key = 2, value = Two key = 3, value = Three
For Loop with the range() Function
Section titled “For Loop with the range() Function”The range class is an immutable sequence type. The range() returns the range object that can be used with the for loop.
rangerange()range``for
for i in range(5): print(i)for i in range(5): print(i)Try it
0 1 2 3 40 1 2 3 4
Exit the For Loop
Section titled “Exit the For Loop”The execution of the for loop can be stop and exit using the break keyword on some condition, as shown below.
break
for i in range(1, 5): if i > 2 : break print(i)for i in range(1, 5): if i > 2 : break print(i)Try it
1 21 2
Continue Next Iteration
Section titled “Continue Next Iteration”Use the continue keyword to skip the current execution and continue on the next iteration using the continue keyword on some condition, as shown below.
continue``continue
for i in range(1, 5): if i > 3: continue print(i)for i in range(1, 5): if i > 3: continue print(i)Try it
1 2 31 2 3
For Loop with Else Block
Section titled “For Loop with Else Block”The else block can follow the for loop, which will be executed when the for loop ends.
else``for``for
for i in range(2): print(i)else: print('End of for loop')for i in range(2): print(i) else: print('End of for loop')Try it
0 1 End of for loop0 1 End of for loop
Nested for Loop
Section titled “Nested for Loop”If a loop (for loop or while loop) contains another loop in its body block, we say that the two loops are nested. If the outer loop is designed to perform m iterations and the inner loop is designed to perform n repetitions, the body block of the inner loop will get executed m X n times.
for x in range(1,4): for y in range(1,3): print('x = ', x, ', y = ', y)for x in range(1,4): for y in range(1,3): print('x = ', x, ', y = ', y)Try it
x = 1, y = 1 x = 1, y = 2 x = 2, y = 1 x = 2, y = 2 x = 3, y = 1 x = 3, y = 2x = 1, y = 1 x = 1, y = 2 x = 2, y = 1 x = 2, y = 2 x = 3, y = 1 x = 3, y = 2
While Loop
Python uses the while and for keywords to constitute a conditional loop, by which repeated execution of a block of statements is done until the specified boolean expression is true.
whilefor
The following is the while loop syntax.
while [boolean expression]: statement1 statement2 ... statementNPython keyword while has a conditional expression followed by the : symbol to start a block with an increased indent. This block has statements to be executed repeatedly. Such a block is usually referred to as the body of the loop. The body will keep executing till the condition evaluates to True. If and when it turns out to be False, the program will exit the loop. The following example demonstrates a while loop.
:``True``False
num =0
while num < 5:    num = num + 1    print('num = ', num)
`num =0
while num < 5: num = num + 1 print(‘num = ’, num)`Try it
num = 1 num = 2 num = 3 num = 4 num = 5num = 1 num = 2 num = 3 num = 4 num = 5
Here the repetitive block after the while statement involves incrementing the value of an integer variable and printing it. Before the block begins, the variable num is initialized to 0. Till it is less than 5, num is incremented by 1 and printed to display the sequence of numbers, as above.
All the statements in the body of the loop must start with the same indentation, otherwise it will raise a IndentationError.
IndentationError
num =0while num < 5: num = num + 1 print('num = ', num)num =0 while num < 5: num = num + 1 print('num = ', num)Try it
print('num = ', num) ^ IndentationError: unexpected indent print('num = ', num) ^ IndentationError: unexpected indent
Exit from the While Loop
Section titled “Exit from the While Loop”Use the break keyword to exit the while loop at some condition. Use the if condition to determine when to exit from the while loop, as shown below.
breakif
num = 0
while num < 5:    num += 1   # num += 1 is same as num = num + 1    print('num = ', num)    if num == 3: # condition before exiting a loop        break
`num = 0
while num < 5: num += 1 # num += 1 is same as num = num + 1 print(‘num = ’, num) if num == 3: # condition before exiting a loop break`Try it
num = 1 num = 2 num = 3num = 1 num = 2 num = 3
Continue Next Iteration
Section titled “Continue Next Iteration”Use the continue keyword to start the next iteration and skip the statements after the continue statement on some conditions, as shown below.
continue``continue
num = 0
while num < 5:  num += 1   # num += 1 is same as num = num + 1  if num > 3: # condition before exiting a loop    continue  print('num = ', num)
`num = 0
while num < 5: num += 1 # num += 1 is same as num = num + 1 if num > 3: # condition before exiting a loop continue print(‘num = ’, num)`Try it
num = 1 num = 2 num = 3num = 1 num = 2 num = 3
While Loop with else Block
Section titled “While Loop with else Block”The else block can follow the while loop. The else block will be executed when the boolean expression of the while loop evaluates to False.
else``while``while``False
Use the continue keyword to start the next iteration and skip the statements after the continue statement on some conditions, as shown below.
continue``continue
num = 0
while num < 3:  num += 1   # num += 1 is same as num = num + 1  print('num = ', num)else:    print('else block executed')
`num = 0
while num < 3: num += 1 # num += 1 is same as num = num + 1 print(‘num = ’, num) else: print(‘else block executed’)`
num = 1 num = 2 num = 3 else block executednum = 1 num = 2 num = 3 else block executed
The following Python program successively takes a number as input from the user and calculates the average, as long as the user enters a positive number. Here, the repetitive block (the body of the loop) asks the user to input a number, adds it cumulatively and keeps the count if it is non-negative.
num=0count=0sum=0
while num>=0:    num = int(input('enter any number .. -1 to exit: '))    if num >= 0:        count = count + 1 # this counts number of inputs        sum = sum + num # this adds input number cumulatively.avg = sum/countprint('Total numbers: ', count, ', Average: ', avg)
`num=0 count=0 sum=0
while num>=0: num = int(input(‘enter any number .. -1 to exit: ’)) if num >= 0: count = count + 1 # this counts number of inputs sum = sum + num # this adds input number cumulatively. avg = sum/count print(‘Total numbers: ’, count, ’, Average: ’, avg)`Try it When a negative number is provided by the user, the loop terminates and displays the average of the numbers provided so far. A sample run of the above code is below:
enter any number .. -1 to exit: 10 enter any number .. -1 to exit: 20 enter any number .. -1 to exit: 30 enter any number .. -1 to exit: -1 Total numbers: 3, Average: 20.0enter any number .. -1 to exit: 10 enter any number .. -1 to exit: 20 enter any number .. -1 to exit: 30 enter any number .. -1 to exit: -1 Total numbers: 3, Average: 20.0
Learning objectives:
- Use arithmetic, comparison, logical, and assignment operators
- Write conditional statements for decision making
- Implement loops (for and while) for repeated execution
- Control loop flow with break and continue
Project: “Number Guessing Game” — The program generates a random number and the user has to guess it, with hints and limited attempts.
Module 4 — Data Structures
Section titled “Module 4 — Data Structures”Week 4
|-------|-------------|
Python List
In Python, the list is a mutable sequence type. A list object contains one or more items of different data types in the square brackets [] separated by a comma. The following declares the lists variable.
mylist=[] # empty listprint(mylist)
names=["Jeff", "Bill", "Steve", "Mohan"] # string listprint(names)
item=[1, "Jeff", "Computer", 75.50, True] # list with heterogeneous dataprint(item)
`mylist=[] # empty list print(mylist)
names=[“Jeff”, “Bill”, “Steve”, “Mohan”] # string list print(names)
item=[1, “Jeff”, “Computer”, 75.50, True] # list with heterogeneous data print(item)`Try it A list can contain unlimited data depending upon the limitation of your computer’s memory.
nums=[1,2,3,4,5,6,7,8,9,10,11,12,13,14,15,16,17,18,19,20, 21,22,23,24,25,26,27,28,29,30,31,32,33,34,35,36,37,38,39,40, 41,42,43,44,45,46,47,48,49,50,51,52,53,54,55,56,57,58,59,60]nums=[1,2,3,4,5,6,7,8,9,10,11,12,13,14,15,16,17,18,19,20, 21,22,23,24,25,26,27,28,29,30,31,32,33,34,35,36,37,38,39,40, 41,42,43,44,45,46,47,48,49,50,51,52,53,54,55,56,57,58,59,60]
List items can be accessed using a zero-based index in the square brackets []. Indexes start from zero and increment by one for each item. Accessing an item using a large index than the list’s total items would result in IndexError.
IndexError
names=["Jeff", "Bill", "Steve", "Mohan"]print(names[0]) # returns "Jeff"print(names[1]) # returns "Bill"print(names[2]) # returns "Steve"print(names[3]) # returns "Mohan"print(names[4]) # throws IndexError: list index out of rangenames=["Jeff", "Bill", "Steve", "Mohan"] print(names[0]) # returns "Jeff" print(names[1]) # returns "Bill" print(names[2]) # returns "Steve" print(names[3]) # returns "Mohan" print(names[4]) # throws IndexError: list index out of rangeTry it
A list can contain multiple inner lists as items that can be accessed using indexes.
nums=[1, 2, 3, [4, 5, 6, [7, 8, [9]]], 10]
print(nums[0]) # returns 1print(nums[1]) # returns 2print(nums[3]) # returns [4, 5, 6, [7, 8, [9]]]print(nums[4]) # returns 10print(nums[3][0]) # returns 4print(nums[3][3]) # returns [7, 8, [9]]print(nums[3][3][0]) # returns 7print(nums[3][3][2]) # returns [9]
`nums=[1, 2, 3, [4, 5, 6, [7, 8, [9]]], 10]
print(nums[0]) # returns 1 print(nums[1]) # returns 2 print(nums[3]) # returns [4, 5, 6, [7, 8, [9]]] print(nums[4]) # returns 10 print(nums[3][0]) # returns 4 print(nums[3][3]) # returns [7, 8, [9]] print(nums[3][3][0]) # returns 7 print(nums[3][3][2]) # returns [9]`Try it
List Class
Section titled “List Class”All the list objects are the objects of the list class in Python. Use the list() constructor to convert from other sequence types such as tuple, set, dictionary, string to list.
list``list()
nums=[1,2,3,4]print(type(nums))
mylist=list('Hello')print(mylist)
nums=list({1:'one',2:'two'})print(nums)
nums=list((10, 20, 30))print(nums)
nums=list({100, 200, 300})print(nums)
`nums=[1,2,3,4] print(type(nums))
mylist=list(‘Hello’) print(mylist)
nums=list({1:‘one’,2:‘two’}) print(nums)
nums=list((10, 20, 30)) print(nums)
nums=list({100, 200, 300}) print(nums)`Try it
Iterate List
Section titled “Iterate List”A list items can be iterate using the for loop. for
names=["Jeff", "Bill", "Steve", "Mohan"]
for name in names:    print(name)
`names=[“Jeff”, “Bill”, “Steve”, “Mohan”]
for name in names: print(name)`Try it
JeffBillSteveMohanJeff Bill Steve Mohan
Update List
Section titled “Update List”The list is mutable. You can add new items in the list using the append() or insert() methods, and update items using indexes.
append()``insert()
names=["Jeff", "Bill", "Steve", "Mohan"]names[0]="Newton" # update 1st item at index 0names[1]="Ram" # update 2nd item at index 1
names.append("Abdul") # adds new item at the end
print(names)
`names=[“Jeff”, “Bill”, “Steve”, “Mohan”] names[0]=“Newton” # update 1st item at index 0 names[1]=“Ram” # update 2nd item at index 1
names.append(“Abdul”) # adds new item at the end
print(names)`Try it
["Newton", "Ram", "Steve", "Mohan", "Abdul"]["Newton", "Ram", "Steve", "Mohan", "Abdul"]
Be careful, an error “index out of range” will be thrown if the element at the specified index does not exist.
Remove Items
Section titled “Remove Items”Use the remove(), pop() methods, or del keyword to delete the list item or the whole list.
remove()``pop()``del
names=["Jeff", "Bill", "Steve", "Mohan"]del names[0] # removes item at index 0print("After del names[0]: ", names)
names.remove("Bill") # removes "Bill"print("After names.remove("Bill"): ", names)
print(names.pop(0)) # return and removes item at index 0print("After names.pop(0): ", names)
names.pop() # return removes item at last indexprint("After names.pop(): ", names)
del names # removes entire list objectprint(names) #error
`names=[“Jeff”, “Bill”, “Steve”, “Mohan”] del names[0] # removes item at index 0 print(“After del names[0]: ”, names)
names.remove(“Bill”) # removes “Bill” print(“After names.remove(“Bill”): ”, names)
print(names.pop(0)) # return and removes item at index 0 print(“After names.pop(0): ”, names)
names.pop() # return removes item at last index print(“After names.pop(): ”, names)
del names # removes entire list object print(names) #error`Try it
After del names[0]: ["Bill", "Steve", "Mohan"]After names.remove("Bill"): ["Steve", "Mohan"]"Steve"After names.pop(0):["Mohan"]"Mohan"After names.pop(): []NameError: name 'names' is not definedAfter del names[0]: ["Bill", "Steve", "Mohan"] After names.remove("Bill"): ["Steve", "Mohan"] "Steve" After names.pop(0):["Mohan"] "Mohan" After names.pop(): [] NameError: name 'names' is not defined
List Operators
Section titled “List Operators”Like the string, the list is also a sequence. Hence, the operators used with strings are also available for use with the list (and tuple also).
>>> L1=[1,2,3] >>> L2=[4,5,6] >>> L1+L2 [1, 2, 3, 4, 5, 6]>>> L1=[1,2,3] >>> L2=[4,5,6] >>> L1+L2 [1, 2, 3, 4, 5, 6]
>>> L1=[1,2,3] >>> L1*3 [1, 2, 3, 1, 2, 3, 1, 2, 3]>>> L1=[1,2,3] >>> L1*3 [1, 2, 3, 1, 2, 3, 1, 2, 3]
>>> L1=[1, 2, 3] >>> L1[0] 1 >>> L1[-3] 1 >>> L1[1] 2 >>> L1[-2] 2 >>> L1[2] 3 >>> L1[-1] 3>>> L1=[1, 2, 3] >>> L1[0] 1 >>> L1[-3] 1 >>> L1[1] 2 >>> L1[-2] 2 >>> L1[2] 3 >>> L1[-1] 3
>>> L1=[1, 2, 3, 4, 5, 6] >>> L1[1:] [2, 3, 4, 5, 6] >>> L1[:3] [1, 2, 3] >>> L1[1:4] [2, 3, 4] >>> L1[3:] [4, 5, 6] >>> L1[:3] [1, 2, 3] >>> L1[-5:-3] [2, 3]>>> L1=[1, 2, 3, 4, 5, 6] >>> L1[1:] [2, 3, 4, 5, 6] >>> L1[:3] [1, 2, 3] >>> L1[1:4] [2, 3, 4] >>> L1[3:] [4, 5, 6] >>> L1[:3] [1, 2, 3] >>> L1[-5:-3] [2, 3]
>>> L1=[1, 2, 3, 4, 5, 6] >>> 4 in L1 True >>> 10 in L1 False>>> L1=[1, 2, 3, 4, 5, 6] >>> 4 in L1 True >>> 10 in L1 False
>>> L1=[1, 2, 3, 4, 5, 6] >>> 5 not in L1 False >>> 10 not in L1 True>>> L1=[1, 2, 3, 4, 5, 6] >>> 5 not in L1 False >>> 10 not in L1 True
List Methods
Section titled “List Methods”list.append()list.clear()list.copy()list.count()list.extend()list.index()list.insert()list.pop()list.remove()list.reverse()list.sort()
Python Tuple
Tuple is an immutable (unchangeable) collection of elements of different data types. It is an ordered collection, so it preserves the order of elements in which they were defined.
Tuples are defined by enclosing elements in parentheses (), separated by a comma. The following declares a tuple type variable.
()
tpl=() # empty tupleprint(tpl)  #output: ()
names = ('Jeff', 'Bill', 'Steve', 'Yash') # string tupleprint(names)  #output:('Jeff', 'Bill', 'Steve', 'Yash')
nums = (1, 2, 3, 4, 5) # int tupleprint(nums)  #output:(1, 2, 3, 4, 5)
employee=(1, 'Steve', True, 25, 12000)  # heterogeneous data tupleprint(employee)  #output:(1, 'Steve', True, 25, 12000)
`tpl=() # empty tuple print(tpl) #output: ()
names = (‘Jeff’, ‘Bill’, ‘Steve’, ‘Yash’) # string tuple print(names) #output:(‘Jeff’, ‘Bill’, ‘Steve’, ‘Yash’)
nums = (1, 2, 3, 4, 5) # int tuple print(nums) #output:(1, 2, 3, 4, 5)
employee=(1, ‘Steve’, True, 25, 12000) # heterogeneous data tuple print(employee) #output:(1, ‘Steve’, True, 25, 12000)`Try it However, it is not necessary to enclose the tuple elements in parentheses. The tuple object can include elements separated by a comma without parentheses.
names = 'Jeff', 'Bill', 'Steve', 'Yash' # string tupleprint(names)  #output: ('Jeff', 'Bill', 'Steve', 'Yash')
nums = 1, 2, 3, 4, 5 # int tupleprint(nums)  #output: (1, 2, 3, 4, 5)
employee=1, 'Steve', True, 25, 12000  # heterogeneous data tupleprint(employee)  #output: (1, 'Steve', True, 25, 12000)
`names = ‘Jeff’, ‘Bill’, ‘Steve’, ‘Yash’ # string tuple print(names) #output: (‘Jeff’, ‘Bill’, ‘Steve’, ‘Yash’)
nums = 1, 2, 3, 4, 5 # int tuple print(nums) #output: (1, 2, 3, 4, 5)
employee=1, ‘Steve’, True, 25, 12000 # heterogeneous data tuple print(employee) #output: (1, ‘Steve’, True, 25, 12000)`Try it Tuples cannot be declared with a single element unless followed by a comma.
names = ('Jeff') # considered as string typeprint(names)  #output: 'Jeff'print(type(names))  #output: <class 'string'>
names = ('Jeff',) # tuple with single elementprint(names)  #output: (Jeff)print(type(names))  #output: <class 'tuple'>
`names = (‘Jeff’) # considered as string type print(names) #output: ‘Jeff’ print(type(names)) #output: <class ‘string’>
names = (‘Jeff’,) # tuple with single element print(names) #output: (Jeff) print(type(names)) #output: <class ‘tuple’>`Try it
Access Tuple Elements
Section titled “Access Tuple Elements”Each element in the tuple is accessed by the index in the square brackets []. An index starts with zero and ends with (number of elements - 1), as shown below.
names = ('Jeff', 'Bill', 'Steve', 'Yash')print(names[0]) #output: 'Jeff'print(names[1]) #output: 'Bill'print(names[2]) #output: 'Steve'print(names[3]) #output: 'Yash'
nums = (1, 2, 3, 4, 5)print(nums[0]) #output: 1print(nums[1]) #output: 2print(nums[4]) #output: 5
`names = (‘Jeff’, ‘Bill’, ‘Steve’, ‘Yash’) print(names[0]) #output: ‘Jeff’ print(names[1]) #output: ‘Bill’ print(names[2]) #output: ‘Steve’ print(names[3]) #output: ‘Yash’
nums = (1, 2, 3, 4, 5)
print(nums[0]) #output: 1
print(nums[1]) #output: 2
print(nums[4]) #output: 5[Try it](/codeeditor?cid=python-3z7rxwjmm) The tuple supports negative indexing also, the same as list type. The negative index for the first element starts from -number of elements and ends with -1 for the last element. -number of elements`
names = ('Jeff', 'Bill', 'Steve', 'Yash')print(names[-4]) #output: 'Jeff'print(names[-3]) #output: 'Bill'print(names[-2]) #output: 'Steve'print(names[-1]) #output: 'Yash'names = ('Jeff', 'Bill', 'Steve', 'Yash') print(names[-4]) #output: 'Jeff' print(names[-3]) #output: 'Bill' print(names[-2]) #output: 'Steve' print(names[-1]) #output: 'Yash'Try it
If the element at the specified index does not exist, then the error “index out of range” will be thrown.
s = names[5] #IndexError: tuple index out of ranges = names[5] #IndexError: tuple index out of range
Tuple elements can be unpacked and assigned to variables, as shown below. However, the number of variables must match with the number of elements in a tuple; otherwise, an error will be thrown.
names = ('Jeff', 'Bill', 'Steve', 'Yash')a, b, c, d = names # unpack tupleprint(a, b, c, d)names = ('Jeff', 'Bill', 'Steve', 'Yash') a, b, c, d = names # unpack tuple print(a, b, c, d)Try it
Update or Delete Tuple Elements
Section titled “Update or Delete Tuple Elements”Tuple is unchangeable. So, once a tuple is created, any operation that seeks to change its contents is not allowed. For instance, trying to modify or delete an element of names tuple will result in an error. However, you can delete an entire tuple using the del keyword.
names``del
names = ('Jeff', 'Bill', 'Steve', 'Yash')names[0] = 'Swati' #throws errordel names[0] #throws errordel names #delete names variablenames = ('Jeff', 'Bill', 'Steve', 'Yash') names[0] = 'Swati' #throws error del names[0] #throws error del names #delete names variableTry it
Tuple Class
Section titled “Tuple Class”The underlying type of a tuple is the tuple class. Check the type of a variable using the type() function.
type()
names = ('Jeff', 'Bill', 'Steve', 'Yash')print(type(names)) #output: <class 'tuple'>
nums = (1,2,3,4,5)print(type(nums))  #output: <class 'tuple'>
`names = (‘Jeff’, ‘Bill’, ‘Steve’, ‘Yash’) print(type(names)) #output: <class ‘tuple’>
nums = (1,2,3,4,5)
print(type(nums)) #output: <class ‘tuple’>[Try it](/codeeditor?cid=python-3z7rydxgc) The tuple() constructor is used to convert any iterable to tuple type. tuple()`
tpl = tuple('Hello')print(tpl) #output: ('H','e','l','l','o')
tpl = tuple([1,2,3,4,5])print(tpl) #output: (1,2,3,4,5)
tpl = tuple({1,2,3,4,5}) # converts set to tupleprint(tpl)  #output: (1,2,3,4,5)
tpl = tuple({1:"One",2:"Two"}) # converts dictionary to tupleprint(tpl)  #output: (1,2)
`tpl = tuple(‘Hello’) print(tpl) #output: (‘H’,‘e’,‘l’,‘l’,‘o’)
tpl = tuple([1,2,3,4,5]) print(tpl) #output: (1,2,3,4,5)
tpl = tuple({1,2,3,4,5}) # converts set to tuple print(tpl) #output: (1,2,3,4,5)
tpl = tuple({1:“One”,2:“Two”}) # converts dictionary to tuple print(tpl) #output: (1,2)`Try it
Tuple Operations
Section titled “Tuple Operations”Like string, tuple objects are also a sequence. Hence, the operators used with strings are also available for the tuple.
t1=(1,2,3) t2=(4,5,6) print(t1+t2) #(1, 2, 3, 4, 5, 6) t2+(7,) #(4, 5, 6, 7)t1=(1,2,3) t1*4 #(1, 2, 3, 1, 2, 3, 1, 2, 3, 1, 2, 3)t1=(1,2,3,4,5,6) t1[3] # 4 t1[-2] #5t1=(1,2,3,4,5,6) t1[1:3] #(2, 3) t1[3:] #(4, 5, 6) t1[:3] #(1, 2, 3)t1=(1,2,3,4,5,6) 5 in t1 #True 10 in t1 #Falset1=(1,2,3,4,5,6) 4 not in t1 #False 10 not in t1 #TruePython Set
A set is a mutable collection of distinct hashable objects, same as the list and tuple. It is an unordered collection of objects, meaning it does not record element position or order of insertion and so cannot access elements using indexes. listtuple The set is a Python implementation of the set in Mathematics. A set object has suitable methods to perform mathematical set operations like union, intersection, difference, etc.
A set object contains one or more items, not necessarily of the same type, which are separated by a comma and enclosed in curly brackets . The following defines a set object with even numbers.
even_nums = {2, 4, 6, 8, 10} # set of even numbersemp = {1, 'Steve', 10.5, True} # set of different objectseven_nums = {2, 4, 6, 8, 10} # set of even numbers emp = {1, 'Steve', 10.5, True} # set of different objectsTry it
A set doesn’t store duplicate objects. Even if an object is added more than once inside the curly brackets, only one copy is held in the set object. Hence, indexing and slicing operations cannot be done on a set object.
nums = {1, 2, 2, 3, 4, 4, 5, 5}print(nums) #output: {1, 2, 3, 4, 5}nums = {1, 2, 2, 3, 4, 4, 5, 5} print(nums) #output: {1, 2, 3, 4, 5}Try it
The order of elements in the set is not necessarily the same as the order given at the time of assignment. Python optimizes the structure of a set for performing operations over it, as defined in mathematics.
Only immutable (and hashable) objects can be a part of a set object. Numbers (integer, float, as well as complex), strings, and tuple objects are accepted, but set, list, and dictionary objects are not.
myset = {(10,10), 10, 20}print(myset)
myset = {[10, 10], 10, 20}  #TypeError can't add a list
myset = { {10, 10}, 10, 20} #TypeError can't add a set
`myset = {(10,10), 10, 20} print(myset)
myset = {[10, 10], 10, 20} #TypeError can’t add a list
myset = { {10, 10}, 10, 20} #TypeError can’t add a set[Try it](/codeeditor?cid=python-3z7umnxcc) In the above example, (10,10) is a tuple, hence it becomes part of the set. However, [10,10] is a list, hence an error message is displayed saying that the list is unhashable. (Hashing is a mechanism in computer science which enables quicker search of objects in the computer's memory.) (10,10)“[10,10]`Hashing
Even though mutable objects are not stored in a set, the set itself is a mutable object.
Use the set() function to create an empty set. Empty curly braces will create an empty dictionary instead of an empty set. set() functiondictionary
emp = {} # creates an empty dictionaryprint(type(emp)) #<class 'dict'>
s = set() # creates an empty setprint(type(s)) #<class 'set'>
`emp = {} # creates an empty dictionary print(type(emp)) #<class ‘dict’>
s = set() # creates an empty set print(type(s)) #<class ‘set’>`Try it The set() function also use to convert string, tuple, or dictionary object to a set object, as shown below. set() function
s = set('Hello') # converts string to setprint(s) #output: {'l', 'H', 'o', 'e'}
s = set((1,2,3,4,5)) # converts tuple to setprint(s) #output: {1, 2, 3, 4, 5}
d = {1:'One', 2: 'Two'}s = set(d) # converts dict to setprint(s) #{1, 2}
`s = set(‘Hello’) # converts string to set print(s) #output: {‘l’, ‘H’, ‘o’, ‘e’}
s = set((1,2,3,4,5)) # converts tuple to set print(s) #output: {1, 2, 3, 4, 5}
d = {1:‘One’, 2: ‘Two’} s = set(d) # converts dict to set print(s) #{1, 2}`Try it
Modify Set Elements
Section titled “Modify Set Elements”Use built-in set functions add(), remove() or update() methods to modify set collection. add()remove()update()
s = set() # creates an empty sets.add(10) # add an elements.add(20)s.add(30)print(s) #output: {10, 20, 30}
primeNums = {2, 3, 5, 7}s.update(primeNums) # update set with another setprint(s)  #output:{2, 3, 20, 5, 7, 10, 30}
s.remove(2) # remove an elementprint(s)  #output:{3, 20, 5, 7, 10, 30}
`s = set() # creates an empty set s.add(10) # add an element s.add(20) s.add(30) print(s) #output: {10, 20, 30}
primeNums = {2, 3, 5, 7} s.update(primeNums) # update set with another set print(s) #output:{2, 3, 20, 5, 7, 10, 30}
s.remove(2) # remove an element print(s) #output:{3, 20, 5, 7, 10, 30}`Try it
Set Operations
Section titled “Set Operations”As mentioned earlier, the set data type in Python implements as the set defined in mathematics. Various set operations can be performed. Operators |, &, - and ^ perform union, intersection, difference, and symmetric difference operations, respectively. Each of these operators has a corresponding method associated with the built-in set class. set.union()
s1=5s2=8s1|s2 #8s1=5s2=8s1.union(s2) #8s2.union(s1) #8s1=5s2=8s1&s2 #5s2&s1 #5s1=5s2=8s1.intersection(s2) #5s2.intersection(s1) #5s1=5s2=8s1-s2 #3s2-s1 #7s1=5s2=8s1.difference(s2) #3s2.difference(s1) #7Try itset.symmetric_difference()
s1=5s2=8s1^s2 #8s2^s1 #8s1=5s2=8s1.symmetric_difference(s2) #8s2.symmetric_difference(s1) #8Set Methods
Section titled “Set Methods”The following table lists built-in set methods: set.add()set.clear()set.copy()set.difference()set.difference_update()set.discard()set.intersection()set.intersection_update()set.isdisjoint()set.issubset()set.pop()set.remove()set.symmetric_difference()set.symmetric_difference_update()set.union()set.update()
Python Dictionary
The dictionary is an unordered collection that contains key:value pairs separated by commas inside curly brackets. Dictionaries are optimized to retrieve values when the key is known.
key:value
The following declares a dictionary object.
capitals = {"USA":"Washington D.C.", "France":"Paris", "India":"New Delhi"}print(type(capitals)) #output: <class 'dict'>capitals = {"USA":"Washington D.C.", "France":"Paris", "India":"New Delhi"} print(type(capitals)) #output: <class 'dict'>Try it
Above, capitals is a dictionary object which contains key-value pairs inside . The left side of : is a key, and the right side is a value. The key should be unique and an immutable object. The dictionary class is dict.
capitals````:``dict
A number, string or tuple can be used as key. Hence, the following dictionaries are also valid:
d = {} # empty dictionary
numNames={1:"One", 2: "Two", 3:"Three"} # int key, string value
decNames={1.5:"One and Half", 2.5: "Two and Half", 3.5:"Three and Half"} # float key, string value
items={("Parker","Reynolds","Camlin"):"pen", ("LG","Whirlpool","Samsung"): "Refrigerator"} # tuple key, string value
romanNums = {'I':1, 'II':2, 'III':3, 'IV':4, 'V':5} # string key, int value
`d = {} # empty dictionary
numNames={1:“One”, 2: “Two”, 3:“Three”} # int key, string value
decNames={1.5:“One and Half”, 2.5: “Two and Half”, 3.5:“Three and Half”} # float key, string value
items={(“Parker”,“Reynolds”,“Camlin”):“pen”, (“LG”,“Whirlpool”,“Samsung”): “Refrigerator”} # tuple key, string value
romanNums = {‘I’:1, ‘II’:2, ‘III’:3, ‘IV’:4, ‘V’:5} # string key, int value`Try it However, a dictionary with a list as a key is not valid, as the list is mutable:
dict_obj = {["Mango","Banana"]:"Fruit", ["Blue", "Red"]:"Color"}dict_obj = {["Mango","Banana"]:"Fruit", ["Blue", "Red"]:"Color"}
But, a list can be used as a value.
dict_obj = {"Fruit":["Mango","Banana"], "Color":["Blue", "Red"]}dict_obj = {"Fruit":["Mango","Banana"], "Color":["Blue", "Red"]}Try it
The same key cannot appear more than once in a collection. If the key appears more than once, only the last will be retained. The value can be of any data type. One value can be assigned to more than one key.
numNames = {1:"One", 2:"Two", 3:"Three", 2:"Two", 1:"One", 2:"Two"}print(numNames) #output: {1:"One", 2:"Two", 3:"Three"}numNames = {1:"One", 2:"Two", 3:"Three", 2:"Two", 1:"One", 2:"Two"} print(numNames) #output: {1:"One", 2:"Two", 3:"Three"}Try it
A dictionary can also be created using the dict() constructor method.
dict()
emptydict = dict()
numdict = dict(I='one', II='two', III='three')
`emptydict = dict()
numdict = dict(I=‘one’, II=‘two’, III=‘three’)`Try it
Access Dictionary
Section titled “Access Dictionary”Dictionary is an unordered collection, so a value cannot be accessed using an index; instead, a key must be specified in the square brackets, as shown below.
numNames={1:"One", 2: "Two", 3:"Three"}print(numNames[1], numNames[2], numNames[3],) #output:One Two Three
capitals = {"USA":"Washington DC", "France":"Paris", "India":"New Delhi"}print(capitals["USA"], capitals["France"],)  #output:Washington DC Paris
#following throws an KeyError#print(capitals["usa"])#print(capitals["Japan"])
`numNames={1:“One”, 2: “Two”, 3:“Three”} print(numNames[1], numNames[2], numNames[3],) #output:One Two Three
capitals = {“USA”:“Washington DC”, “France”:“Paris”, “India”:“New Delhi”} print(capitals[“USA”], capitals[“France”],) #output:Washington DC Paris
#following throws an KeyError
#print(capitals[“usa”])
#print(capitals[“Japan”])[Try it](/codeeditor?cid=python-3z7uupb4f) Keys are case-sensitive. So, usa and USA are treated as different keys. If the specified key does not exist then it will raise an error. usa“USA Use the get() method to retrieve the key's value even if keys are not known. It returns None if the key does not exist instead of raising an error. [get()](/python/dict-get)None`
numNames={1:"One", 2: "Two", 3:"Three"}print(numNames.get(1), numNames.get(2),numNames.get(3))
capitals = {"USA":"Washington DC", "France":"Paris", "India":"New Delhi"}print(capitals.get("USA"), capitals.get("France"))
#following throws an KeyError#print(capitals.get("usa"))#print(capitals.get("Japan"))
`numNames={1:“One”, 2: “Two”, 3:“Three”} print(numNames.get(1), numNames.get(2),numNames.get(3))
capitals = {“USA”:“Washington DC”, “France”:“Paris”, “India”:“New Delhi”} print(capitals.get(“USA”), capitals.get(“France”))
#following throws an KeyError #print(capitals.get(“usa”)) #print(capitals.get(“Japan”))`Try it
Access Dictionary using For Loop
Section titled “Access Dictionary using For Loop”Use the for loop to iterate a dictionary in the Python script.
capitals = {"USA":"Washington D.C.", "France":"Paris", "India":"New Delhi"}
for key in capitals:    print("Key = " + key + ", Value = " + capitals[key])
`capitals = {“USA”:“Washington D.C.”, “France”:“Paris”, “India”:“New Delhi”}
for key in capitals: print(“Key = ” + key + ”, Value = ” + capitals[key])`Try it
Key = 'USA', Value = 'Washington D.C.' Key = 'France', Value = 'Paris' Key = 'India', Value = 'New Delhi'Key = 'USA', Value = 'Washington D.C.' Key = 'France', Value = 'Paris' Key = 'India', Value = 'New Delhi'
Update Dictionary
Section titled “Update Dictionary”As mentioned earlier, the key cannot appear more than once. Use the same key and assign a new value to it to update the dictionary object.
captains = {"England":"Root", "Australia":"Smith", "India":"Dhoni"}print(captains)
captains['India'] = 'Virat'captains['Australia'] = 'Paine'print(captains)  #output: {'England': 'Root', 'Australia': 'Paine', 'India': 'Virat'}
`captains = {“England”:“Root”, “Australia”:“Smith”, “India”:“Dhoni”} print(captains)
captains[‘India’] = ‘Virat’ captains[‘Australia’] = ‘Paine’ print(captains) #output: {‘England’: ‘Root’, ‘Australia’: ‘Paine’, ‘India’: ‘Virat’}`Try it If you use a new key and assign a value to it then it will add a new key-value pair into a dictionary.
captains = {"England":"Root", "India":"Dhoni"}captains['SouthAfrica']='Plessis'print(captains) #output: {'England': 'Root', 'India': 'Virat', 'SouthAfrica': 'Plessis'}captains = {"England":"Root", "India":"Dhoni"} captains['SouthAfrica']='Plessis' print(captains) #output: {'England': 'Root', 'India': 'Virat', 'SouthAfrica': 'Plessis'}Try it
Deleting Values from a Dictionary
Section titled “Deleting Values from a Dictionary”Use the del keyword, pop(), or popitem() methods to delete a pair from a dictionary or the dictionary object itself. To delete a pair, use its key as a parameter. To delete a dictionary object itself, use del dictionary_name.
pop()popitem()del dictionary_name
captains = {'Australia': 'Paine', 'India': 'Virat', 'Srilanka': 'Jayasurya'}print(captains)
del captains['Australia'] # deletes a key-value pairprint(captains)
del captains # delete dict object#print(captains) #error
`captains = {‘Australia’: ‘Paine’, ‘India’: ‘Virat’, ‘Srilanka’: ‘Jayasurya’} print(captains)
del captains[‘Australia’] # deletes a key-value pair print(captains)
del captains # delete dict object #print(captains) #error`Try it
Retrieve Dictionary Keys and Values
Section titled “Retrieve Dictionary Keys and Values”The keys() and values() methods return a view objects containing keys and values respectively. keys()values()
d1 = {'name': 'Steve', 'age': 21, 'marks': 60, 'course': 'Computer Engg'}
print(d1.keys()) #output: dict_keys(['name', 'age', 'marks', 'course'])print(d1.values())  #output: dict_values(['Steve', 21, 60, 'Computer Engg'])
`d1 = {‘name’: ‘Steve’, ‘age’: 21, ‘marks’: 60, ‘course’: ‘Computer Engg’}
print(d1.keys()) #output: dict_keys([‘name’, ‘age’, ‘marks’, ‘course’]) print(d1.values()) #output: dict_values([‘Steve’, 21, 60, ‘Computer Engg’])`Try it
Check Dictionary Keys
Section titled “Check Dictionary Keys”You can check whether a paritular key exists in a dictionary collection or not usng the in or not in keywords, as shown below. Note that it only checks for keys not values.
in``not in
captains = {'England': 'Root', 'Australia': 'Paine', 'India': 'Virat', 'Srilanka': 'Jayasurya'}
b = 'England' in captainsprint(b) #True
b = 'India' in captainsprint(b)  #True
b = 'France' in captainsprint(b)  #False
`captains = {‘England’: ‘Root’, ‘Australia’: ‘Paine’, ‘India’: ‘Virat’, ‘Srilanka’: ‘Jayasurya’}
b = ‘England’ in captains print(b) #True
b = ‘India’ in captains print(b) #True
b = ‘France’ in captains print(b) #False`Try it
Multi-dimensional Dictionary
Section titled “Multi-dimensional Dictionary”Let’s assume there are three dictionary objects, as below:
d1={"name":"Steve","age":25, "marks":60}d2={"name":"Anil","age":23, "marks":75}d3={"name":"Asha", "age":20, "marks":70}d1={"name":"Steve","age":25, "marks":60} d2={"name":"Anil","age":23, "marks":75} d3={"name":"Asha", "age":20, "marks":70}
Let’s assign roll numbers to these students and create a multi-dimensional dictionary with roll number as key and the above dictionaries at their value.
students={1:d1, 2:d2, 3:d3}print(students) #{1: {'name': 'Steve', 'age': 25, 'marks': 60}, 2: {'name': 'Anil', 'age': 23, 'marks': 75}, 3: {'name': 'Asha', 'age': 20, 'marks': 70}}
print(students[1]) # {'name': 'Steve', 'age': 25, 'marks': 60}print(students[2]) # {'name': 'Anil', 'age': 23, 'marks': 75}print(students[3]) # {'name': 'Asha', 'age': 20, 'marks': 70}
`students={1:d1, 2:d2, 3:d3} print(students) #{1: {‘name’: ‘Steve’, ‘age’: 25, ‘marks’: 60}, 2: {‘name’: ‘Anil’, ‘age’: 23, ‘marks’: 75}, 3: {‘name’: ‘Asha’, ‘age’: 20, ‘marks’: 70}}
print(students[1]) # {‘name’: ‘Steve’, ‘age’: 25, ‘marks’: 60}
print(students[2]) # {‘name’: ‘Anil’, ‘age’: 23, ‘marks’: 75}
print(students[3]) # {‘name’: ‘Asha’, ‘age’: 20, ‘marks’: 70}[Try it](/codeeditor?cid=python-3z7uwamcz) The student object is a two-dimensional dictionary. Here d1, d2, and d3 are assigned as values to keys 1, 2, and 3, respectively. The students[1] returns d1. studentd1d2d3students[1]“d1`
Built-in Dictionary Methods
Section titled “Built-in Dictionary Methods”dict.clear()dict.copy()dict.fromkeys()dict.get()dict.items()dict.keys()dictionary view objectdict.pop()dict.popitem()dict.setdefault()dict.update()dict.values()dictionary view object
List Comprehension
List comprehension in Python is an easy and compact syntax for creating a list from a string or another list. It is a very concise way to create a new list by performing an operation on each item in the existing list. List comprehension is considerably faster than processing a list using the for loop. list
[expression for element in iterable if condition]As per the above syntax, the list comprehension syntax contains three parts: an expression, one or more for loop, and optionally, one or more if conditions. The list comprehension must be in the square brackets []. The result of the first expression will be stored in the new list. The for loop is used to iterate over the iterable object that optionally includes the if condition.
for loopif conditions[]
Suppose we want to find even numbers from 0 to 20 then we can do it using a for loop, as shown below:
for loop
even_nums = []for x in range(21): if x%2 == 0: even_nums.append(x)print(even_nums)even_nums = [] for x in range(21): if x%2 == 0: even_nums.append(x) print(even_nums)Try it
[0, 2, 4, 6, 8, 10, 12, 14, 16, 18, 20][0, 2, 4, 6, 8, 10, 12, 14, 16, 18, 20]
The same result can be easily achieved using a list comprehension technique shown below.
even_nums = [x for x in range(21) if x%2 == 0]print(even_nums)even_nums = [x for x in range(21) if x%2 == 0] print(even_nums)Try it
[0, 2, 4, 6, 8, 10, 12, 14, 16, 18, 20][0, 2, 4, 6, 8, 10, 12, 14, 16, 18, 20]
In the above example, [x for x in range(21) if x%2 == 0] returns a new list using the list comprehension. First, it executes the for loop for x in range(21) if x%2 == 0. The element x would be returned if the specified condition if x%2 == 0 evaluates to True. If the condition evaluates to True, then the expression before for loop would be executed and stored in the new list. Here, expression x simply stores the value of x into a new list.
[x for x in range(21) if x%2 == 0]``for x in range(21) if x%2 == 0``x``if x%2 == 0``x``x
List comprehension works with string lists also. The following creates a new list of strings that contains ‘a’.
names = ['Steve', 'Bill', 'Ram', 'Mohan', 'Abdul']names2 = [s for s in names if 'a' in s]
print(names2)
`names = [‘Steve’, ‘Bill’, ‘Ram’, ‘Mohan’, ‘Abdul’] names2 = [s for s in names if ‘a’ in s]
print(names2)`Try it
['Ram', 'Mohan']['Ram', 'Mohan']
Above, the expression if ‘a’ in s returns True if an element contains a character ‘a’. So, the new list will include names that contain ‘a’.
if 'a' in s
The following example uses a list comprehension to build a list of squares of the numbers between 1 and 10.
squares = [x*x for x in range(11)]print(squares)squares = [x*x for x in range(11)] print(squares)Try it
[0, 1, 4, 9, 16, 25, 36, 49, 64, 81, 100][0, 1, 4, 9, 16, 25, 36, 49, 64, 81, 100]
Above, a for loop for x in range(11) is executed without any if condition. The expression before for loop x*x stores the square of the element in the new list.
for x in range(11)``x*x
List Comprehension using Nested Loops
Section titled “List Comprehension using Nested Loops”It is possible to use nested loops in a list comprehension expression. In the following example, all combinations of items from two lists in the form of a tuple are added in a third list object.
nums1 = [1, 2, 3]nums2 = [4, 5, 6]nums=[(x,y) for x in nums1 for y in nums2]print(nums)nums1 = [1, 2, 3] nums2 = [4, 5, 6] nums=[(x,y) for x in nums1 for y in nums2] print(nums)Try it
[(1, 4), (1, 5), (1, 6), (2, 4), (2, 5), (2, 6), (3, 4), (3, 5), (3, 6)][(1, 4), (1, 5), (1, 6), (2, 4), (2, 5), (2, 6), (3, 4), (3, 5), (3, 6)]
List Comprehension with Multiple if Conditions
Section titled “List Comprehension with Multiple if Conditions”We can use nested if conditions with a list comprehension.
nums = [x for x in range(21) if x%2==0 if x%5==0]print(nums)nums = [x for x in range(21) if x%2==0 if x%5==0] print(nums)Try it
[0, 10, 20][0, 10, 20]
List Comprehension with if-else Condition
Section titled “List Comprehension with if-else Condition”The following example demonstrates the if..else loop with a list comprehension.
odd_even_list = ["Even" if i%2==0 else "Odd" for i in range(5)]print(odd_even_list)
odd_even_list = [str(i) + '=Even' if i%2==0 else str(i) + "=Odd" for i in range(5)]print(odd_even_list)
`odd_even_list = [“Even” if i%2==0 else “Odd” for i in range(5)] print(odd_even_list)
odd_even_list = [str(i) + ‘=Even’ if i%2==0 else str(i) + “=Odd” for i in range(5)] print(odd_even_list)`Try it
['Even', 'Odd', 'Even', 'Odd', 'Even'] ['0=Even', '1=Odd', '2=Even', '3=Odd', '4=Even']['Even', 'Odd', 'Even', 'Odd', 'Even'] ['0=Even', '1=Odd', '2=Even', '3=Odd', '4=Even']
Flatten List using List Comprehension
Section titled “Flatten List using List Comprehension”One of the applications of list comprehension is to flatten a list comprising of multiple lists into a single list.
matrix=[[1, 2, 3], [4, 5, 6], [7, 8, 9]]flatList=[num for row in matrix for num in row]print(flatList)matrix=[[1, 2, 3], [4, 5, 6], [7, 8, 9]] flatList=[num for row in matrix for num in row] print(flatList)Try it
[1, 2, 3, 4, 5, 6, 7, 8, 9][1, 2, 3, 4, 5, 6, 7, 8, 9]
Learn more about how to flatten list in Python.
how to flatten list in Python
Learning objectives:
- Create and manipulate lists (indexing, slicing, methods)
- Understand tuples and their immutability
- Use sets for unique collections and set operations
- Work with dictionaries for key-value data
- Write concise list comprehensions
Project: “Student Grade Tracker” — A program that stores student names and grades using dictionaries, calculates averages with lists, and displays reports.
Module 5 — Functions
Section titled “Module 5 — Functions”Week 5
|-------|-------------|
User-Defined Functions
Python includes many built-in functions. These functions perform a predefined task and can be called upon in any program, as per requirement. However, if you don’t find a suitable built-in function to serve your purpose, you can define one. We will now see how to define and use a function in a Python program.
Defining a Function
Section titled “Defining a Function”A function is a reusable block of programming statements designed to perform a certain task. To define a function, Python provides the def keyword. The following is the syntax of defining a function.
def
def function_name(parameters): """docstring""" statement1 statement2 ... ... return [expr]The keyword def is followed by a suitable identifier as the name of the function and parentheses. One or more parameters may be optionally mentioned inside parentheses. The : symbol after parentheses starts an indented block.
def``:
The first statement in the function body can be a string, which is called the docstring. It explains the functionality of the function/class. The docstring is not mandatory.
docstring
The function body contains one or more statements that perform some actions. It can also use pass keyword.
pass
Optionally, the last statement in the function block is the return statement. It sends an execution control back to calling the environment. If an expression is added in front of return, its value is also returned to the calling code.
The following example defines the greet() function.
greet()
def greet(): """This function displays 'Hello World!'""" print('Hello World!')def greet(): """This function displays 'Hello World!'""" print('Hello World!')Try it
Above, we have defined the greet() function. The first statement is a docstring that mentions what this function does. The second like is a print method that displays the specified string to the console. Note that it does not have the return statement.
greet()print
To call a defined function, just use its name as a statement anywhere in the code. For example, the above function can be called using parenthesis, greet().
greet()
greet()greet()Try it
Hello World!Hello World!
By default, all the functions return None if the return statement does not exist.
None
val = greet()print(val)val = greet() print(val)Try it
NoneNone
The help() function displays the docstring, as shown below.
help()
help(greet)help(greet)Try it
Function Parameters
Section titled “Function Parameters”It is possible to define a function to receive one or more parameters (also called arguments) and use them for processing inside the function block. Parameters/arguments may be given suitable formal names. The greet() function is now defined to receive a string parameter called name. Inside the function, the print() statement is modified to display the greeting message addressed to the received parameter.
greet()``name``print()
def greet(name):    print ('Hello ', name)
greet('Steve') # calling function with argumentgreet(123)
`def greet(name):
print (‘Hello ’, name)
greet(‘Steve’) # calling function with argument greet(123)`Try it
Hello Steve Hello 123Hello Steve Hello 123
The names of the arguments used in the definition of the function are called formal arguments/parameters. Objects actually used while calling the function are called actual arguments/parameters.
The function parameters can have an annotation to specify the type of the parameter using parameter:type syntax. For example, the following annotates the parameter type string. However, you can pass any type of value to the greet() function.
parameter:typestringgreet()
def greet(name:str):    print ('Hello ', name)
greet('Steve')greet(123)
`def greet(name:str):
print (‘Hello ’, name)
greet(‘Steve’) greet(123)`Try it
Multiple Parameters
Section titled “Multiple Parameters”A function can have multiple parameters. The following function takes three arguments.
def greet(name1, name2, name3):    print ('Hello ', name1, ' , ', name2 , ', and ', name3)
greet('Steve', 'Bill', 'Yash') # calling function with string argument
`def greet(name1, name2, name3):
print (‘Hello ’, name1, ’ , ’, name2 , ’, and ’, name3)
greet(‘Steve’, ‘Bill’, ‘Yash’) # calling function with string argument`Try it
Hello Steve, Bill, and YashHello Steve, Bill, and Yash
Unknown Number of Arguments
Section titled “Unknown Number of Arguments”A function in Python can have an unknown number of arguments by putting * before the parameter if you don’t know the number of arguments the user is going to pass.
*
def greet(*names):    print ('Hello ', names[0], ', ', names[1], ', ', names[2])
greet('Steve', 'Bill', 'Yash')
`def greet(*names):
print (‘Hello ’, names[0], ’, ’, names[1], ’, ’, names[2])
greet(‘Steve’, ‘Bill’, ‘Yash’)`Try it
Hello Steve, Bill, and YashHello Steve, Bill, and Yash
The following function works with any number of arguments.
def greet(*names): i=0 while len(names) > i: print(names[i]) i+=1greet('Steve', 'Bill', 'Yash')greet('Steve', 'Bill', 'Yash', 'Kapil', 'John', 'Amir')def greet(*names): i=0 while len(names) > i: print(names[i]) i+=1 greet('Steve', 'Bill', 'Yash') greet('Steve', 'Bill', 'Yash', 'Kapil', 'John', 'Amir')Try it
Hello Steve, Bill, Yash, Hello Steve, Bill, Yash, Kapil, John, AmirHello Steve, Bill, Yash, Hello Steve, Bill, Yash, Kapil, John, Amir
Function with Keyword Arguments
Section titled “Function with Keyword Arguments”In order to call a function with arguments, the same number of actual arguments must be provided. However, a function can be called by passing parameter values using the parameter names in any order. For example, the following passes values using the parameter names.
def greet(firstname, lastname): print ('Hello', firstname, lastname) greet(lastname='Jobs', firstname='Steve') # passing parameters in any order using keyword argumentdef greet(firstname, lastname): print ('Hello', firstname, lastname) greet(lastname='Jobs', firstname='Steve') # passing parameters in any order using keyword argument
Hello Steve JobsHello Steve Jobs
Keyword Argument **kwarg
Section titled “Keyword Argument **kwarg”The function can have a single parameter prefixed with **. This type of parameter initialized to a new ordered mapping receiving any excess keyword arguments, defaulting to a new empty mapping of the same type.
**
def greet(**person):  print('Hello ', person['firstname'],  person['lastname'])
greet(firstname='Steve', lastname='Jobs')greet(lastname='Jobs', firstname='Steve')greet(firstname='Bill', lastname='Gates', age=55)#greet(firstname='Bill') # raises KeyError
`def greet(**person): print(‘Hello ’, person[‘firstname’], person[‘lastname’])
greet(firstname=‘Steve’, lastname=‘Jobs’) greet(lastname=‘Jobs’, firstname=‘Steve’) greet(firstname=‘Bill’, lastname=‘Gates’, age=55) #greet(firstname=‘Bill’) # raises KeyError`Try it
Hello Steve Jobs Hello Steve Jobs Hello Bill GatesHello Steve Jobs Hello Steve Jobs Hello Bill Gates
When using the ** parameter, the order of arguments does not matter. However, the name of the arguments must be the same. Access the value of keyword arguments using paramter_name[‘keyword_argument’].
**``paramter_name['keyword_argument']
If the function access the keyword argument but the calling code does not pass that keyword argument, then it will raise the KeyError exception, as shown below.
KeyError
def greet(**person):  print('Hello ', person['firstname'],  person['lastname'])
greet(firstname='Bill') #KeyError, must provide 'lastname' arguement
`def greet(**person): print(‘Hello ’, person[‘firstname’], person[‘lastname’])
greet(firstname=‘Bill’) #KeyError, must provide ‘lastname’ arguement`Try it
Traceback (most recent call last): File "<pyshell#21>", line 1, in <module> greet(firstname='Bill') File "<pyshell#19>", line 2, in greet print('Hello ', person['firstname'], person['lastname']) KeyError: 'lastname'Traceback (most recent call last): File "<pyshell#21>", line 1, in <module> greet(firstname='Bill') File "<pyshell#19>", line 2, in greet print('Hello ', person['firstname'], person['lastname']) KeyError: 'lastname'
Parameter with Default Value
Section titled “Parameter with Default Value”While defining a function, its parameters may be assigned default values. This default value gets substituted if an appropriate actual argument is passed when the function is called. However, if the actual argument is not provided, the default value will be used inside the function.
The following greet() function is defined with the name parameter having the default value ‘Guest’. It will be replaced only if some actual argument is passed.
greet()``name``'Guest'
def greet(name = 'Guest'):    print ('Hello', name)
greet()greet('Steve')
`def greet(name = ‘Guest’): print (‘Hello’, name)
greet() greet(‘Steve’)`Try it
Hello Guest Hello SteveHello Guest Hello Steve
Function with Return Value
Section titled “Function with Return Value”Most of the time, we need the result of the function to be used in further processes. Hence, when a function returns, it should also return a value.
A user-defined function can also be made to return a value to the calling environment by putting an expression in front of the return statement. In this case, the returned value has to be assigned to some variable.
def sum(a, b):    return a + b
total=sum(10, 20)print(total)
total=sum(5, sum(10, 20))print(total)
`def sum(a, b): return a + b
total=sum(10, 20) print(total)
total=sum(5, sum(10, 20))
print(total)[Try it](/codeeditor?cid=python-3z7xt545b) You can specify the type of a return value using -> operator, as shown below. ->`
def sum(a, b) -> int:            return a + b
total=sum(10, 20)print(total)
total=sum(5, sum(10, 20))print(total)
`def sum(a, b) -> int: return a + b
total=sum(10, 20) print(total)
total=sum(5, sum(10, 20)) print(total)`Try it
30 3530 35
Main in Python
A Program written in languages of C family (C, C++, Java, C# etc.) needs the main() function to indicate the starting point of execution.
main()
In Python, on the other hand, there is no concept of the main() function, as it is an interpreter based language and can be equally used in an interactive shell. The Python program file with .py extension contains multiple statements. The execution of the Python program file starts from the first statement.
main()interactive shell.py
Python includes the special variable called name that contains the scope of the code being executed as a string. main is the name of the top-level scope in which top-level code executes.
__name__``__main__
For example, the scope of the code executed in the interpreter shell will be main, as shown below.
__main__
>>>__name__'__main__'>>>__name__ '__main__'
All the functions and modules will be executed in the top-level scope main_ in the interpreter shell.
__main___
>>> def f1(): print(__name__)>>> f1()`>>> def f1(): print(name)
f1()
Even the inner functions are executed in the top-level scope __main__:main`
>>> def f1(): print(__name__) def f2():  print(__name__) f2()

>>> f1()__main____main__
`>>> def f1(): print(name) def f2(): print(name) f2()
f1() main main
A Python file can contain multiple functions and statements that can be executed independently. For example, consider the following addition.py:addition.py`
def add(x,y):    z=x+y print('add() executed under the scope: ', __name__)    return z
x=input('Enter the first number to add: ')y=input('Enter the secode number to add: ')result = add(int(x),int(y))print(x, '+', y,'=', result)print('Code executed under the scope: ', __name__)
`def add(x,y): z=x+y print(‘add() executed under the scope: ’, name) return z
x=input(‘Enter the first number to add: ’) y=input(‘Enter the secode number to add: ’) result = add(int(x),int(y)) print(x, ’+’, y,’=’, result) print(‘Code executed under the scope: ’, name)` Python program file can be executed in the following ways:
- Use the command prompt/terminal to execute the Python file as a script.
- Import Python code from one file to another using the import statement
As you can see, the addition.py executed under the top-level scope main.
addition.py``__main__
The addition.py file can be used as a module in another file or in interactive shell by importing it.
addition.py
Let’s see what happens when you import the addition module in the interactive shell.
addition
>>> import additionEnter the first number to add: 3Enter the secode number to add: 3add() executed under the scope: addition3 + 3 = 6Code executed under the scope: addition>>> import addition Enter the first number to add: 3 Enter the secode number to add: 3 add() executed under the scope: addition 3 + 3 = 6 Code executed under the scope: addition
Above, the import statement starts executing from the first statement. But, we only want to use the add() method and don’t want to execute the other statements.
add()
Here we can use the special variable name to check the scope and execute the statements of the addition.py file only when it executes from the command prompt/terminal independently but not when imported it in some other file/module. Rewrite the addition.py, as shown below.
__name__``addition.py``addition.py
def add(x, y):    z=x+y print('add() executed under the scope: ', __name__)    return z
if __name__ == '__main__':    x=input('Enter the first number to add: ')    y=input('Enter the secode number to add: ')    result = add(int(x),int(y))    print(x, '+', y,'=', result)    print('Code executed under the scope: ', __name__)
`def add(x, y): z=x+y print(‘add() executed under the scope: ’, name) return z
if name == ‘main’:
x=input(‘Enter the first number to add: ’)
y=input(‘Enter the secode number to add: ’)
result = add(int(x),int(y))
print(x, ’+’, y,’=’, result)
print(‘Code executed under the scope: ’, name)Above, the if condition check that if the scope is __main__ then only execute the code that takes user's inputs and adds them.mainNow, let's see what happens when we import the above addition module in the interactive shell.addition`
>>> import addition>>> addition.add(3,3)add() executed under the scope: addition6`>>> import addition
addition.add(3,3) add() executed under the scope: addition 6
You can also use the from import statement, as shown below:from import`
>>> from addition import add>>> add(3,3)add() executed under the scope: addition6`>>> from addition import add
add(3,3) add() executed under the scope: addition 6
As you can see, because we used an if condition to check the scope, it does not execute user input codes after importing the addition module, because it executes under the module's scope, which is addition scope. It only imports the add() method. The same thing will happen when you import the addition module in other modules.additionadditionadd()“addition` Now, let’s see what happens when you execute it from the command prompt/terminal.
As you can see, it still executes the same code because of addition.py being executed in the top-level scope main.
addition.py``__main__
Thus, value of the name allows the Python interpreter to determine whether a module is intended to be an executable script or not. If its value is main, the statements outside function definitions will be executed. If not, the contents of the module are populated in top-level module (or interpreter namespace) without the executable part.
name``main
Note: The Python script file executing from the command prompt/terminal will be executed under the top-level scope main scope. However, importing a module will be executed under the module’s own scope. So, the top-level scope will be main, and the second scope would be module’s scope.
__main__``__main__
Thus, using the special variable name and the top-level scope main increases the reusability. The Python script file can be executed from the command prompt/termainal as an indipendent script as well as when imported as a module.
__name__``__main__
Lambda Function
The def keyword is used to define a function in Python, as we have seen in the previous chapter. The lambda keyword is used to define anonymous functions in Python. Usually, such a function is meant for one-time use.
deffunction in Pythonlambda
lambda [arguments] : expressionThe lambda function can have zero or more arguments after the : symbol. When this function is called, the expression after : is executed.
:``:
square = lambda x : x * x
n = square(5)  #calling lambda function
`square = lambda x : x * x
n = square(5) #calling lambda function[Try it](/codeeditor?cid=python-3z7y8x32y) Above, the lambda function starts with the lambda keyword followed by parameter x. An expression x * x after : returns the value of x * x to the caller. The whole lambda function lambda x : x * x is assigned to a variable square in order to call it like a named function. The variable name becomes the function name so that We can call it as a regular function, as shown below. lambdaxx * x:x * xlambda x : x * xsquare`
The above lambda function definition is the same as the following function:
def square(x): return x * xdef square(x): return x * x
The expression does not need to always return a value. The following lambda function does not return anything.
greet = lambda name: print('Hello ', name)greet('Steve') #output: Hello Stevegreet = lambda name: print('Hello ', name) greet('Steve') #output: Hello SteveTry it
The lambda function can have only one expression. Obviously, it cannot substitute a function whose body may have conditionals, loops, etc.
The following lambda function contains three parameters:
sum = lambda x, y, z : x + y + zn = sum(5, 10, 15) #returns 30sum = lambda x, y, z : x + y + z n = sum(5, 10, 15) #returns 30Try it
A lambda function can take any number of parameters by prefixing * before a parameter, as shown below:
sum = lambda *x: x[0]+x[1]+x[2]+x[3]n = sum(5, 10, 15, 20) #returns 50sum = lambda *x: x[0]+x[1]+x[2]+x[3] n = sum(5, 10, 15, 20) #returns 50Try it
Parameterless Lambda Function
Section titled “Parameterless Lambda Function”The following is an example of the parameterless lambda function.
greet = lambda : print('Hello World!')greet() #output: Hello World!greet = lambda : print('Hello World!') greet() #output: Hello World!Try it
Anonymous Function
Section titled “Anonymous Function”We can declare a lambda function and call it as an anonymous function, without assigning it to a variable.
(lambda x: print(x*x))(5) #output 25(lambda x: print(x*x))(5) #output 25Try it
Above, lambda x: xx defines an anonymous function and call it once by passing arguments in the parenthesis (lambda x: xx)(5).
lambda x: x*x``(lambda x: x*x)(5)
In Python, functions are the first-class citizens, which means that just as literals, functions can also be passed as arguments.
The lambda functions are useful when we want to give the function as one of the arguments to another function. We can pass the lambda function without assigning it to a variable, as an anonymous function as an argument to another function.
def dosomething(fn):  print('Calling function argument:')  fn()
dosomething(lambda : print('Hello World')) # passing anonymous function
myfn = lambda : print('Hello World')dosomething(myfn) # passing lambda function
`def dosomething(fn): print(‘Calling function argument:’) fn()
dosomething(lambda : print(‘Hello World’)) # passing anonymous function
myfn = lambda : print(‘Hello World’)
dosomething(myfn) # passing lambda function[Try it](/codeeditor?cid=python-3z7y9fcmg) Above, the dosomething() function is defined with the fn parameter which is called as a function inside dosomething(). The dosomething(lambda : print('Hello World')) calls the dosomething() function with an anonymous lambda function as an argument. dosomething()fndosomething()dosomething(lambda : print('Hello World'))dosomething()`
Python has built-in functions that take other functions as arguments. The map(), filter() and reduce() functions are important functional programming tools. All of them take a function as their argument. The argument function can be a normal function or a lambda function.
map()filter()reduce()
sqrList = map(lambda x: print(x*x), [1, 2, 3, 4]) # passing anonymous functionnext(sqrList)next(sqrList)next(sqrList)next(sqrList)next(sqrList) #errorsqrList = map(lambda x: print(x*x), [1, 2, 3, 4]) # passing anonymous function next(sqrList) next(sqrList) next(sqrList) next(sqrList) next(sqrList) #errorTry it
Recursion
A function that calls itself is a recursive function. This method is used when a certain problem is defined in terms of itself. Although this involves iteration, using an iterative approach to solve such a problem can be tedious. The recursive approach provides a very concise solution to a seemingly complex problem. It looks glamorous but can be difficult to comprehend!
The most popular example of recursion is the calculation of the factorial. Mathematically the factorial is defined as: n! = n * (n-1)!
We use the factorial itself to define the factorial. Hence, this is a suitable case to write a recursive function. Let us expand the above definition for the calculation of the factorial value of 5.
5! = 5 X 4! 5 X4 X 3! 5 X4 X 3 X 2! 5 X4 X 3 X 2 X 1! 5 X4 X 3 X 2 X 1 = 1205! = 5 X 4! 5 X4 X 3! 5 X4 X 3 X 2! 5 X4 X 3 X 2 X 1! 5 X4 X 3 X 2 X 1 = 120
While we can perform this calculation using a loop, its recursive function involves successively calling it by decrementing the number until it reaches 1. The following is a recursive function to calculate the factorial.
def factorial(n):  if n == 1:    print(n)    return 1  else:    print (n,'*', end=' ')    return n * factorial(n-1)
factorial(5) #calling recursive function
`def factorial(n):
if n == 1:
print(n)
return 1
else:
print (n,’*’, end=’ ’)
return n * factorial(n-1)
factorial(5) #calling recursive function`Try it The above recursive function will produce the following output:
5 * 4 * 3 * 2 * 15 * 4 * 3 * 2 * 1
When the factorial function is called with 5 as argument, successive calls to the same function are placed, while reducing the value of 5. Functions start returning to their earlier call after the argument reaches 1. The return value of the first call is a cumulative product of the return values of all calls.
Learning objectives:
- Define and call functions with parameters and return values
- Use
if __name__ == "__main__"pattern - Write anonymous lambda functions
- Understand recursion with practical examples
Project: “Math Tools Library” — A collection of mathematical functions (factorial, fibonacci, prime check, GCD) using both regular and recursive approaches.
Module 6 — Mid-Term Project
Section titled “Module 6 — Mid-Term Project”Week 6
Project: “Student Management System” — A complete console application that:
- Stores student records (name, ID, grades)
- Calculates averages and final grades
- Searches and filters students
- Saves/loads data from a file
- Uses functions, lists, dictionaries, loops, and conditionals from Modules 1–5
Module 7 — File Handling & Exception Management
Section titled “Module 7 — File Handling & Exception Management”Week 7
|-------|-------------|
Read & Write File
In Python, the IO module provides methods of three types of IO operations; raw binary files, buffered binary files, and text files. The canonical way to create a file object is by using the open() function.
IOopen()
Any file operations can be performed in the following three steps:
- Open the file to get the file object using the built-in open() function. There are different access modes, which you can specify while opening a file using the open() function.
open()open() function1. Perform read, write, append operations using the file object retrieved from the open() function.
open()1. Close and dispose the file object.
Reading File
Section titled “Reading File”File object includes the following methods to read data from the file.
- read(chars): reads the specified number of characters starting from the current position.
- readline(): reads the characters starting from the current reading position up to a newline character.
- readlines(): reads all lines until the end of file and returns a list object.
The following C:\myfile.txt file will be used in all the examples of reading and writing files.
C:\myfile.txt
This is the first line.This is the second line.This is the third line.This is the first line. This is the second line. This is the third line.
The following example performs the read operation using the read(chars) method.
read(chars)
f = open('C:myfile.txt') # opening a filelines = f.read() # reading a fileprint(lines) #'This is the first line.This is the second line.This is the third line.'f.close() # closing file objectf = open('C:myfile.txt') # opening a file lines = f.read() # reading a file print(lines) #'This is the first line. This is the second line. This is the third line.' f.close() # closing file object
Above, f = open(‘C:\myfile.txt’) opens the myfile.txt in the default read mode from the current directory and returns a file object.f.read() function reads all the content until EOF as a string. If you specify the char size argument in the read(chars) method, then it will read that many chars only.f.close() will flush and close the stream.
f = open('C:\myfile.txt')``myfile.txtfile objectf.read()``read(chars)``f.close()
Reading a Line
Section titled “Reading a Line”The following example demonstrates reading a line from the file.
f = open('C:myfile.txt') # opening a fileline1 = f.readline() # reading a lineprint(line1)  #'This is the first line.'
line2 = f.readline() # reading a lineprint(line2)  #'This is the second line.'
line3 = f.readline() # reading a lineprint(line3)  #'This is the third line.'
line4 = f.readline() # reading a lineprint(line4)  #''
f.close() # closing file object
`f = open(‘C:myfile.txt’) # opening a file line1 = f.readline() # reading a line print(line1) #‘This is the first line. ’
line2 = f.readline() # reading a line print(line2) #‘This is the second line. ’
line3 = f.readline() # reading a line print(line3) #‘This is the third line.’
line4 = f.readline() # reading a line print(line4) #”
f.close() # closing file objectAs you can see, we have to open the file in 'r' mode. The readline() method will return the first line, and then will point to the second line in the file.’r’“readline()`
Reading All Lines
Section titled “Reading All Lines”The following reads all lines using the readlines() function.
readlines()
f = open('C:myfile.txt') # opening a filelines = f.readlines() # reading all linesprint(lines) #'This is the first line.This is the second line.This is the third line.'f.close() # closing file objectf = open('C:myfile.txt') # opening a file lines = f.readlines() # reading all lines print(lines) #'This is the first line. This is the second line. This is the third line.' f.close() # closing file object
The file object has an inbuilt iterator. The following program reads the given file line by line until StopIteration is raised, i.e., the EOF is reached.
StopIteration
f=open('C:myfile.txt')while True: try: line=next(f) print(line) except StopIteration: breakf.close()f=open('C:myfile.txt') while True: try: line=next(f) print(line) except StopIteration: break f.close()
Use the for loop to read a file easily.
f=open('C:myfile.txt')for line in f: print(line)f.close()f=open('C:myfile.txt') for line in f: print(line) f.close()
This is the first line. This is the second line. This is the third line.This is the first line. This is the second line. This is the third line.
Reading Binary File
Section titled “Reading Binary File”Use the ‘rb’ mode in the open() function to read a binary files, as shown below.
open()
f = open('C:myimg.png', 'rb') # opening a binary filecontent = f.read() # reading all linesprint(content) #print contentf.close() # closing file objectf = open('C:myimg.png', 'rb') # opening a binary file content = f.read() # reading all lines print(content) #print content f.close() # closing file object
Writing to a File
Section titled “Writing to a File”The file object provides the following methods to write to a file.
- write(s): Write the string s to the stream and return the number of characters written.
- writelines(lines): Write a list of lines to the stream. Each line must have a separator at the end of it.
Create a new File and Write
Section titled “Create a new File and Write”The following creates a new file if it does not exist or overwrites to an existing file.
f = open('C:myfile.txt','w')f.write("Hello") # writing to filef.close()
# reading filef = open('C:myfile.txt','r')f.read()  #'Hello'f.close()
`f = open(‘C:myfile.txt’,‘w’) f.write(“Hello”) # writing to file f.close()
reading file
Section titled “reading file”f = open(‘C:myfile.txt’,‘r’)
f.read() #‘Hello’
f.close()In the above example, the f=open("myfile.txt","w") statement opens myfile.txt in write mode, the open() method returns the file object and assigns it to a variable f.'w' specifies that the file should be writable. Next, f.write("Hello") overwrites an existing content of the myfile.txt file. It returns the number of characters written to a file, which is 5 in the above example. In the end, f.close() closes the file object.f=open(“myfile.txt”,“w”)myfile.txtopen()f’w’f.write("Hello")myfile.txt“f.close()`
Appending to an Existing File
Section titled “Appending to an Existing File”The following appends the content at the end of the existing file by passing ‘a’ or ‘a+’ mode in the open() method.
'a'``'a+'``open()
f = open('C:myfile.txt','a')f.write(" World!")f.close()
# reading filef = open('C:myfile.txt','r')f.read()  #'Hello World!'f.close()
`f = open(‘C:myfile.txt’,‘a’) f.write(” World!”) f.close()
reading file
Section titled “reading file”f = open(‘C:myfile.txt’,‘r’) f.read() #‘Hello World!’ f.close()`
Write Multiple Lines
Section titled “Write Multiple Lines”Python provides the writelines() method to save the contents of a list object in a file. Since the newline character is not automatically written to the file, it must be provided as a part of the string.
writelines()
lines=["Hello world.", "Welcome to TutorialsTeacher."]f=open("D:myfile.txt", "w")f.writelines(lines)f.close()lines=["Hello world. ", "Welcome to TutorialsTeacher. "] f=open("D:myfile.txt", "w") f.writelines(lines) f.close()
Opening a file with “w” mode or “a” mode can only be written into and cannot be read from. Similarly “r” mode allows reading only and not writing. In order to perform simultaneous read/append operations, use “a+” mode.
Writing to a Binary File
Section titled “Writing to a Binary File”The open() function opens a file in text format by default. To open a file in binary format, add ‘b’ to the mode parameter. Hence the “rb” mode opens the file in binary format for reading, while the “wb” mode opens the file in binary format for writing. Unlike text files, binary files are not human-readable. When opened using any text editor, the data is unrecognizable.
open()``'b'``"rb"``"wb"
The following code stores a list of numbers in a binary file. The list is first converted in a byte array before writing. The built-in function bytearray() returns a byte representation of the object.
bytearray()
f=open("binfile.bin","wb")num=[5, 10, 15, 20, 25]arr=bytearray(num)f.write(arr)f.close()f=open("binfile.bin","wb") num=[5, 10, 15, 20, 25] arr=bytearray(num) f.write(arr) f.close()
Exception Handling
The cause of an exception is often external to the program itself. For example, an incorrect input, a malfunctioning IO device etc. Because the program abruptly terminates on encountering an exception, it may cause damage to system resources, such as files. Hence, the exceptions should be properly handled so that an abrupt termination of the program is prevented.
Python uses try and except keywords to handle exceptions. Both keywords are followed by indented blocks.
try``except
try : #statements in try block except : #executed when error in try blockThe try: block contains one or more statements which are likely to encounter an exception. If the statements in this block are executed without an exception, the subsequent except: block is skipped.
If the exception does occur, the program flow is transferred to the except: block. The statements in the except: block are meant to handle the cause of the exception appropriately. For example, returning an appropriate error message.
except:
You can specify the type of exception after the except keyword. The subsequent block will be executed only if the specified exception occurs. There may be multiple except clauses with different exception types in a single try block. If the type of exception doesn’t match any of the except blocks, it will remain unhandled and the program will terminate.
except
The rest of the statements after the except block will continue to be executed, regardless if the exception is encountered or not.
The following example will throw an exception when we try to devide an integer by a string.
try: a=5 b='0' print(a/b)except: print('Some error occurred.')print("Out of try except blocks.")try: a=5 b='0' print(a/b) except: print('Some error occurred.') print("Out of try except blocks.")Try it
Some error occurred. Out of try except blocks.Some error occurred. Out of try except blocks.
You can mention a specific type of exception in front of the except keyword. The subsequent block will be executed only if the specified exception occurs. There may be multiple except clauses with different exception types in a single try block. If the type of exception doesn’t match any of the except blocks, it will remain unhandled and the program will terminate.
try: a=5 b='0' print(a+b)except TypeError: print('TypeError Occurred')except: print('Some error occurred.')print ("Out of try except blocks")try: a=5 b='0' print(a+b) except TypeError: print('TypeError Occurred') except: print('Some error occurred.') print ("Out of try except blocks")Try it
TypeError Occurred Out of try except blocksTypeError Occurred Out of try except blocks
The default except: block must come after all the except block that catch specific errors; otherwise Python will raise an error.
except:``except
try: a=5 b='0' print(a+b)except: print('Some error occurred.') #except: before other blocksexcept TypeError: print('TypeError Occurred')print ("Out of try except blocks")try: a=5 b='0' print(a+b) except: print('Some error occurred.') #except: before other blocks except TypeError: print('TypeError Occurred') print ("Out of try except blocks")Try it
File "main.py", line 4 print(a+b) ^ SyntaxError: default 'except:' must be lastFile "main.py", line 4 print(a+b) ^ SyntaxError: default 'except:' must be last
As mentioned above, a single try block may have multiple except blocks. The following example uses two except blocks to process two different exception types:
try: a=5 b=0 print (a/b)except TypeError: print('Unsupported operation')except ZeroDivisionError: print ('Division by zero not allowed')except: print('Some error occurred.')print ('Out of try except blocks')try: a=5 b=0 print (a/b) except TypeError: print('Unsupported operation') except ZeroDivisionError: print ('Division by zero not allowed') except: print('Some error occurred.') print ('Out of try except blocks')Try it
Division by zero not allowed Out of try except blocksDivision by zero not allowed Out of try except blocks
However, if variable b is set to ‘0’, TypeError will be encountered and processed by corresponding except block.
else and finally
Section titled “else and finally”In Python, keywords else and finally can also be used along with the try and except clauses. While the except block is executed if the exception occurs inside the try block, the else block gets processed if the try block is found to be exception free.
else``finally
try: #statements in try block except: #executed when error in try block else: #executed if try block is error-free finally: #executed irrespective of exception occured or notThe finally block consists of statements which should be processed regardless of an exception occurring in the try block or not. As a consequence, the error-free try block skips the except clause and enters the finally block before going on to execute the rest of the code. If, however, there’s an exception in the try block, the appropriate except block will be processed, and the statements in the finally block will be processed before proceeding to the rest of the code.
The example below accepts two numbers from the user and performs their division. It demonstrates the uses of else and finally blocks.
try: x,y = 10, 2 z=x/yexcept ZeroDivisionError: print("except ZeroDivisionError block") print("Division by 0 not accepted")except: print('Some error occurred.')else: print("Division = ", z)finally: print("Executing finally block") x=0 y=0print ("Out of try, except, else and finally blocks." )try: x,y = 10, 2 z=x/y except ZeroDivisionError: print("except ZeroDivisionError block") print("Division by 0 not accepted") except: print('Some error occurred.') else: print("Division = ", z) finally: print("Executing finally block") x=0 y=0 print ("Out of try, except, else and finally blocks." )Try it
The first run is a normal case. The out of the else and finally blocks is displayed because the try block is error-free.
Division = 5.0 Executing finally block Out of try, except, else and finally blocks.Division = 5.0 Executing finally block Out of try, except, else and finally blocks.
The second run is a case of division by zero, hence, the except block and the finally block are executed, but the else block is not executed.
try: x,y = 10, 0 z=x/yexcept ZeroDivisionError: print("Cannot devide by zero. Try again") print("Division by 0 not accepted")except: print('Some error occurred.')else: print("Division = ", z)finally: print("Executing finally block") x=0 y=0print ("Out of try, except, else and finally blocks." )try: x,y = 10, 0 z=x/y except ZeroDivisionError: print("Cannot devide by zero. Try again") print("Division by 0 not accepted") except: print('Some error occurred.') else: print("Division = ", z) finally: print("Executing finally block") x=0 y=0 print ("Out of try, except, else and finally blocks." )Try it
Cannot devide by zero. Try again Division by 0 not accepted Executing finally block Out of try, except, else and finally blocks.Cannot devide by zero. Try again Division by 0 not accepted Executing finally block Out of try, except, else and finally blocks.
In the third run case, an uncaught exception occurs. The finally block is still executed but the program terminates and does not execute the program after the finally block.
try: x,y = 10, "xyz" z=x/yexcept ZeroDivisionError: print("except ZeroDivisionError block") print("Division by 0 not accepted")except: print('Error occurred.')else: print("Division = ", z)finally: print("Executing finally block") x=0 y=0print ("Out of try, except, else and finally blocks." )try: x,y = 10, "xyz" z=x/y except ZeroDivisionError: print("except ZeroDivisionError block") print("Division by 0 not accepted") except: print('Error occurred.') else: print("Division = ", z) finally: print("Executing finally block") x=0 y=0 print ("Out of try, except, else and finally blocks." )Try it
Error occurred. Executing finally block Out of try, except, else and finally blocks.Error occurred. Executing finally block Out of try, except, else and finally blocks.
Typically the finally clause is the ideal place for cleaning up the operations in a process. For example closing a file irrespective of the errors in read/write operations. This will be dealt with in the next chapter.
Raise an Exception
Section titled “Raise an Exception”Python also provides the raise keyword to be used in the context of exception handling. It causes an exception to be generated explicitly. Built-in errors are raised implicitly. However, a built-in or custom exception can be forced during execution.
raise
The following code accepts a number from the user. The try block raises a ValueError exception if the number is outside the allowed range.
try: x,y=100,2 z=x/2 if z > 10: raise ValueError(z)except ValueError: print(z, "is out of allowed range")else: print(z, "is within the allowed range")try: x,y=100,2 z=x/2 if z > 10: raise ValueError(z) except ValueError: print(z, "is out of allowed range") else: print(z, "is within the allowed range")Try it
50.0 is out of allowed range50.0 is out of allowed range
Here, the raised exception is a ValueError type. However, you can also raise a custom exception type. Visit Python docs to know more about user defined exceptions.
ValueErroruser defined exceptions
Error Types
The most common reason of an error in a Python program is when a certain statement is not in accordance with the prescribed usage. Such an error is called a syntax error. The Python interpreter immediately reports it, usually along with the reason.
>>> print "hello"SyntaxError: Missing parentheses in call to 'print'. Did you mean print("hello")?>>> print "hello" SyntaxError: Missing parentheses in call to 'print'. Did you mean print("hello")?
In Python 3.x, print is a built-in function and requires parentheses. The statement above violates this usage and hence syntax error is displayed.
Many times though, a program results in an error after it is run even if it doesn’t have any syntax error. Such an error is a runtime error, called an exception. A number of built-in exceptions are defined in the Python library. Let’s see some common error types.
The following table lists important built-in exceptions in Python.
IndexError
Section titled “IndexError”The IndexError is thrown when trying to access an item at an invalid index.
IndexError
>>> L1=[1,2,3]>>> L1[3]Traceback (most recent call last):File "<pyshell#18>", line 1, in <module>
L1[3]IndexError: list index out of range
`>>> L1=[1,2,3]
L1[3] Traceback (most recent call last): File “<pyshell#18>”, line 1, in
L1[3] IndexError: list index out of range`
ModuleNotFoundError
Section titled “ModuleNotFoundError”The ModuleNotFoundError is thrown when a module could not be found.
ModuleNotFoundError
>>> import notamoduleTraceback (most recent call last):File "<pyshell#10>", line 1, in <module>
import notamoduleModuleNotFoundError: No module named 'notamodule'
`>>> import notamodule
Traceback (most recent call last):
File “<pyshell#10>”, line 1, in
import notamodule ModuleNotFoundError: No module named ‘notamodule’`
KeyError
Section titled “KeyError”The KeyError is thrown when a key is not found.
KeyError
>>> D1={'1':"aa", '2':"bb", '3':"cc"}>>> D1['4']Traceback (most recent call last):File "<pyshell#15>", line 1, in <module>

D1['4']KeyError: '4'
`>>> D1={‘1’:“aa”, ‘2’:“bb”, ‘3’:“cc”}
D1[‘4’] Traceback (most recent call last): File “<pyshell#15>”, line 1, in
D1[‘4’] KeyError: ‘4’`
ImportError
Section titled “ImportError”The ImportError is thrown when a specified function can not be found.
ImportError
>>> from math import cubeTraceback (most recent call last):File "<pyshell#16>", line 1, in <module>
from math import cubeImportError: cannot import name 'cube'
`>>> from math import cube
Traceback (most recent call last):
File “<pyshell#16>”, line 1, in
from math import cube ImportError: cannot import name ‘cube’`
StopIteration
Section titled “StopIteration”The StopIteration is thrown when the next() function goes beyond the iterator items.
StopIteration``next()
>>> it=iter([1,2,3])>>> next(it)1>>> next(it)2>>> next(it)3>>> next(it)Traceback (most recent call last):File "<pyshell#23>", line 1, in <module>
next(it)StopIteration
`>>> it=iter([1,2,3])
next(it) 1 next(it) 2 next(it) 3 next(it) Traceback (most recent call last): File “<pyshell#23>”, line 1, in
next(it) StopIteration`
TypeError
Section titled “TypeError”The TypeError is thrown when an operation or function is applied to an object of an inappropriate type.
TypeError
>>> '2'+2Traceback (most recent call last):File "<pyshell#23>", line 1, in <module>
'2'+2TypeError: must be str, not int
`>>> ‘2’+2
Traceback (most recent call last):
File “<pyshell#23>”, line 1, in
‘2’+2 TypeError: must be str, not int`
ValueError
Section titled “ValueError”The ValueError is thrown when a function’s argument is of an inappropriate type.
ValueError
>>> int('xyz')Traceback (most recent call last):File "<pyshell#14>", line 1, in <module>
int('xyz')ValueError: invalid literal for int() with base 10: 'xyz'
`>>> int(‘xyz’)
Traceback (most recent call last):
File “<pyshell#14>”, line 1, in
int(‘xyz’) ValueError: invalid literal for int() with base 10: ‘xyz’`
NameError
Section titled “NameError”The NameError is thrown when an object could not be found.
NameError
>>> ageTraceback (most recent call last):File "<pyshell#6>", line 1, in <module>
ageNameError: name 'age' is not defined
`>>> age
Traceback (most recent call last):
File “<pyshell#6>”, line 1, in
age NameError: name ‘age’ is not defined`
ZeroDivisionError
Section titled “ZeroDivisionError”The ZeroDivisionError is thrown when the second operator in the division is zero.
ZeroDivisionError
>>> x=100/0Traceback (most recent call last):File "<pyshell#8>", line 1, in <module>
x=100/0ZeroDivisionError: division by zero
`>>> x=100/0
Traceback (most recent call last):
File “<pyshell#8>”, line 1, in
x=100/0 ZeroDivisionError: division by zero`
KeyboardInterrupt
Section titled “KeyboardInterrupt”The KeyboardInterrupt is thrown when the user hits the interrupt key (normally Control-C) during the execution of the program.
KeyboardInterrupt
>>> name=input('enter your name')enter your name^cTraceback (most recent call last):File "<pyshell#9>", line 1, in <module>
name=input('enter your name')KeyboardInterrupt
`>>> name=input(‘enter your name’)
enter your name^c
Traceback (most recent call last):
File “<pyshell#9>”, line 1, in
name=input(‘enter your name’) KeyboardInterrupt` Learn how to handle exceptions in Python in the next chapter.
Python Assert
In Python, the assert statement is a powerful tool that helps with debugging and handling errors during development. It allows you to make assumptions about the code and catch potential issues early on.
assert
The assert statements can be useful when testing functions or methods, as it allows you to ensure that the function is behaving as expected. Additionally, assert statements can be used to enforce certain conditions on the inputs or outputs of a function, such as ensuring that a parameter is within a certain range or that a return value meets certain criteria.
assert
Syntax
Section titled “Syntax”assert condition [, Error Message]assert condition [, Error Message]
The assert statement works by evaluating a boolean condition and raising an AssertionError if the expression is false. If the specified condition evaluates to True then it continues to execute next statements, otherwise it raises the AssertionError exception with the specified error message.
AssertionError``AssertionError
The following example demonstrates a simple assert statement.
def division(x,y):  assert y!=0, "y cannot be zero"
  print(x/y)
division(10,2) #5division(10,0) #AssertionError: y cannot be zero
`def division(x,y): assert y!=0, “y cannot be zero”
print(x/y)
division(10,2) #5
division(10,0) #AssertionError: y cannot be zero[Try it](/codeeditor?cid=python-3z8qspjqr) In the above example, the division() function contains the assert statement to check whether the y parameter is zero or not. If the assert condition y!=0 evalutes to be True, then it will continue to execute the next statement without any error. If it is true then it will raise an AssertionError with the error message y cannot be zero. division()yy!=0AssertionErrory cannot be zeroThe AssertionError is a built-in exception that can be handled using the try-except block, as shown below:AssertionError`try-except
def division(x,y):  assert y!=0, "y cannot be zero"
  print(x/y)
#call division() function in try blocktry:  division(10,0)except AssertionError as msg:  print(msg)
`def division(x,y): assert y!=0, “y cannot be zero”
print(x/y)
#call division() function in try block try: division(10,0) except AssertionError as msg: print(msg)`Try it
y cannot be zeroy cannot be zero
Above, calling division(10,0) will raise an AssertionError, which will be handled by the except block. The error message in the assert statement will be passed as an argument to the exception argument msg, using as keyword.
division(10,0)``AssertionError``msg``as
In this way, the assert statements should be used in conjunction with other error handling techniques, such as try-except blocks and logging, to ensure that your code is robust and reliable.
Thus, the assert statement is a valuable tool for any Python developer looking to improve their debugging and error handling skills.
Learning objectives:
- Read from and write to text files
- Handle exceptions using try/except/finally
- Understand common Python error types
- Use assertions for debugging
Project: “File-based Contact Book” — A program that stores contacts in a file, with full CRUD operations and proper error handling for missing files and invalid input.
Module 8 — Object-Oriented Programming (Basics)
Section titled “Module 8 — Object-Oriented Programming (Basics)”Week 8
|-------|-------------|
Python Class
Python is a completely object-oriented language. You have been working with classes and objects right from the beginning of these tutorials. Every element in a Python program is an object of a class. A number, string, list, dictionary, etc., used in a program is an object of a corresponding built-in class. You can retrieve the class name of variables or objects using the type() method, as shown below. type()
num=20print(type(num)) #<class 'int'>
s="Python"print(type(s)) #<class 'str'>
`num=20 print(type(num)) #<class ‘int’>
s=“Python” print(type(s)) #<class ‘str’>`Try it
Defining a Class
Section titled “Defining a Class”A class in Python can be defined using the class keyword.
class
class <ClassName>: <statement1> <statement2> . . <statementN>class <ClassName>: <statement1> <statement2> . . <statementN>
As per the syntax above, a class is defined using the class keyword followed by the class name and : operator after the class name, which allows you to continue in the next indented line to define class members. The followings are class members.
class``:1. Class Attributes
Class Attributes1. Constructor
Constructor1. Instance Attributes
Instance Attributes1. Properties
Properties1. Class Methods
Class Methods
A class can also be defined without any members. The following example defines an empty class using the pass keyword.
pass
class Student: passclass Student: pass
Class instantiation uses function notation. To create an object of the class, just call a class like a parameterless function that returns a new object of the class, as shown below.
std = Student()std = Student()
Above, Student() returns an object of the Student class, which is assigned to a local variable std. The Student class is an empty class because it does not contain any members.
Student()``Studentvariablestd``Student
Class Attributes
Section titled “Class Attributes”Class attributes are the variables defined directly in the class that are shared by all objects of the class. Class attributes can be accessed using the class name as well as using the objects.
class Student: schoolName = 'XYZ School'class Student: schoolName = 'XYZ School'
Above, the schoolName is a class attribute defined inside a class. The value of the schoolName will remain the same for all the objects unless modified explicitly.
schoolName``schoolName
print(Student.schoolName) #'XYZ School'
Student.schoolName = 'ABC School'print(Student.schoolName)  #'ABC School'
std = Student()print(std.schoolName)  #'ABC School'
std.schoolName = 'Super School'print(std.schoolName)  #'Super School'
print(Student.schoolName) #'ABC School'
`print(Student.schoolName) #‘XYZ School’
Student.schoolName = ‘ABC School’ print(Student.schoolName) #‘ABC School’
std = Student() print(std.schoolName) #‘ABC School’
std.schoolName = ‘Super School’ print(std.schoolName) #‘Super School’
print(Student.schoolName) #‘ABC School’[Try it](/codeeditor?cid=python-3z8rqvw3n) As you can see, a class attribute is accessed by Student.schoolName as well as std.schoolName. Changing the value of class attribute using the class name would change it across all instances. However, changing class attribute value using instance does not reflect to other instances or class. Student.schoolName“std.schoolNameThe following example demonstrates the use of class attribute count.count`
class Student: count = 0 def __init__(self): Student.count += 1class Student: count = 0 def __init__(self): Student.count += 1
In the above example, count is an attribute in the Student class. Whenever a new object is created, the value of count is incremented by 1. You can now access the count attribute after creating the objects, as shown below.
count``count``count
std1=Student()print(Student.count) #1
std2 = Student()print(Student.count) #2
std3 = Student()print(Student.count) #3
`std1=Student() print(Student.count) #1
std2 = Student() print(Student.count) #2
std3 = Student() print(Student.count) #3`Try it
Constructor
Section titled “Constructor”In Python, the constructor method is invoked automatically whenever a new object of a class is instantiated, same as constructors in C# or Java. The constructor must have a special name init() and a special parameter called self.
__init__()``self
The first parameter of each method in a class must be the self , which refers to the calling object. However, you can give any name to the first parameter, not necessarily self.
self ``self
The following example defines a constructor.
class Student:  def __init__(self): # constructor method    print('Constructor invoked')
s1 = Student()s2 = Student()
`class Student: def init(self): # constructor method print(‘Constructor invoked’)
s1 = Student()
s2 = Student()[Try it](/codeeditor?cid=python-3z8rrntsy) In the above example, whenever you create an object of the Student class, the __init__() constructor method will be called. Student“init()`
In Python, the constructors are mostly used to define instance attributes and assign their default values.
Instance Attributes
Section titled “Instance Attributes”Instance attributes are attributes or properties attached to an instance of a class. Instance attributes are defined in the constructor.
The following example defines instance attributes name and age in the constructor.
name``age
class Student:    schoolName = 'XYZ School' # class attribute
    def __init__(self): # constructor        self.name = '' # instance attribute        self.age = 0 # instance attribute
`class Student: schoolName = ‘XYZ School’ # class attribute
def __init__(self): # constructor self.name = '' # instance attribute self.age = 0 # instance attribute`You can get or set the value of instance attributes using the dot notation: [instance name].[attribute name], as shown below.
[instance name].[attribute name]
std = Student()print(std.name) #''print(std.age) #0
std.name = "Bill"std.age=25print(std.name) #'Bill'print(std.age)  #25
`std = Student() print(std.name) #” print(std.age) #0
std.name = “Bill”
std.age=25
print(std.name) #‘Bill’
print(std.age) #25[Try it](/codeeditor?cid=python-3z8rrwf7p) You can specify the values of instance attributes through the constructor. The following constructor includes the name and age parameters, other than the self parameter. self`
class Student:    def __init__(self, name, age):        self.name = name        self.age = age
std = Student('Bill',25) #passing values to constructorprint(std.name)print(std.age)
`class Student: def init(self, name, age): self.name = name self.age = age
std = Student(‘Bill’,25) #passing values to constructor print(std.name) print(std.age)`Try it As you can see, you can pass the attributes value while creating an instance.
You don’t have to specify the value of the self parameter. It will be assigned internally in Python.
self
You can also set default values to the instance attributes. The following code sets the default values of the constructor parameters. So, if the values are not provided when creating an object, the values will be assigned latter.
class Student:    def __init__(self, name="Guest", age=25)        self.name=name        self.age=age
std = Student()print(std.name)  #'Guest'print(std.age)   #25
`class Student: def init(self, name=“Guest”, age=25) self.name=name self.age=age
std = Student() print(std.name) #‘Guest’ print(std.age) #25`Try it Visit class attributes vs instance attributes in Python for more information. class attributes vs instance attributes in Python
Class Properties
Section titled “Class Properties”In Python, a property in the class can be defined using the property() function.
property() function
The property() method in Python provides an interface to instance attributes. It encapsulates instance attributes and provides a property, same as Java and C#.
property()
The property() method takes the get, set and delete methods as arguments and returns an object of the property class.
property()``property
The following example demonstrates how to create a property in Python using the property() function.
property()
class Student:    def displayInfo(self): # class method        print('Student Information')
#create objectstd = Student()std.displayInfo() #calling method
`class Student: def displayInfo(self): # class method print(‘Student Information’)
#create object
std = Student()
std.displayInfo() #calling method[Try it](/codeeditor?cid=python-3z8uabqgd) In the above displayInfo() method, self is just a conventional name for the first argument. The method can be called as object.method(). displayInfo()selfobject.method()The first parameter of the method need not be named self. You can give any name that refers to the instance of the calling method. The following displayInfo() method names the first parameter as obj instead of self and that works perfectly fine.selfdisplayInfo()obj“self`
class Student: def displayInfo(obj): # class method print('Student Information')class Student: def displayInfo(obj): # class method print('Student Information')
Defining a method in the class without the self parameter would raise an exception when calling a method.
self
class Student:    def displayInfo(): # method without self parameter        print('Student Information')
std = Student()std.displayInfo() #error
`class Student: def displayInfo(): # method without self parameter print(‘Student Information’)
std = Student()
std.displayInfo() #errorThe method can access instance attributes using the self parameter.self`
class Student: def __init__(self, name, age): self.name = name self.age = age def displayInfo(self): # class method print('Student Name: ', self.name,', Age: ', self.age)class Student: def __init__(self, name, age): self.name = name self.age = age def displayInfo(self): # class method print('Student Name: ', self.name,', Age: ', self.age)
You can now invoke the method, as shown below.
std = Student('Steve', 25)std.displayInfo()std = Student('Steve', 25) std.displayInfo()Try it
Deleting Attribute, Object, Class
Section titled “Deleting Attribute, Object, Class”You can delete attributes, objects, or the class itself, using the del keyword, as shown below.
del
class Student:  def __init__(self, name, age):    self.name = name    self.age = age  def displayInfo(self): # class method    print('Student Name: ', self.name,', Age: ', self.age)
std = Student('Steve', 25)std.displayInfo()
del std.name # deleting attributeprint(std.name) #error
del stdprint(std.name) #error
del Student  # deleting classstd = Student('Steve', 25) #error
`class Student: def init(self, name, age): self.name = name self.age = age def displayInfo(self): # class method print(‘Student Name: ’, self.name,’, Age: ’, self.age)
std = Student(‘Steve’, 25) std.displayInfo()
del std.name # deleting attribute print(std.name) #error
del std print(std.name) #error
del Student # deleting class std = Student(‘Steve’, 25) #error`Try it
Inheritance
We often come across different products that have a basic model and an advanced model with added features over and above basic model. A software modelling approach of OOP enables extending the capability of an existing class to build a new class, instead of building from scratch. In OOP terminology, this characteristic is called inheritance, the existing class is called base or parent class, while the new class is called child or sub class.
Inheritance comes into picture when a new class possesses the ‘IS A’ relationship with an existing class.
Dog IS an animal. Cat also IS an animal. Hence, animal is the base class, while dog and cat are inherited classes.
A quadrilateral has four sides. A rectangle IS a quadrilateral, and so IS a square. Quadrilateral is a base class (also called parent class), while rectangle and square are the inherited classes - also called child classes.
The child class inherits data definitions and methods from the parent class. This facilitates the reuse of features already available. The child class can add a few more definitions or redefine a base class method.
This feature is extremely useful in building a hierarchy of classes for objects in a system. It is also possible to design a new class based upon more than one existing classes. This feature is called multiple inheritance.
The general mechanism of establishing inheritance is illustrated below:
class parent: statements class child(parent): statementsWhile defining the child class, the name of the parent class is put in the parentheses in front of it, indicating the relation between the two. Instance attributes and methods defined in the parent class will be inherited by the object of the child class.
To demonstrate a more meaningful example, a quadrilateral class is first defined, and it is used as a base class for the rectangle class.
A quadrilateral class having four sides as instance variables and a perimeter() method is defined below:
perimeter()
class quadriLateral:  def __init__(self, a, b, c, d):    self.side1=a    self.side2=b    self.side3=c    self.side4=d
  def perimeter(self):    p=self.side1 + self.side2 + self.side3 + self.side4    print("perimeter=",p)
q1=quadriLateral(7,5,6,4)q1.perimeter()
`class quadriLateral: def init(self, a, b, c, d): self.side1=a self.side2=b self.side3=c self.side4=d
def perimeter(self): p=self.side1 + self.side2 + self.side3 + self.side4 print(“perimeter=“,p)
q1=quadriLateral(7,5,6,4)
q1.perimeter()[Try it](/codeeditor?cid=python-3z8ufe7gz) The constructor (the __init__() method) receives four parameters and assigns them to four instance variables. To test the above class, declare its object and invoke the perimeter() method. init()perimeter()` We now design a rectangle class based upon the quadriLateral class (rectangle IS a quadrilateral!). The instance variables and the perimeter() method from the base class should be automatically available to it without redefining it. `quadriLateralperimeter()Since opposite sides of the rectangle are the same, we need only two adjacent sides to construct its object. Hence, the other two parameters of the __init__() method are set to none. The __init__() method forwards the parameters to the constructor of its base (quadrilateral) class using the super() function. The object is initialized with side3 and side4 set to none. Opposite sides are made equal by the constructor of rectangle class. Remember that it has automatically inherited the perimeter() method, hence there is no need to redefine it.init()__init__()side3side4perimeter()`
class quadriLateral:  def __init__(self, a, b, c, d):    self.side1=a    self.side2=b    self.side3=c    self.side4=d
  def perimeter(self):    p=self.side1 + self.side2 + self.side3 + self.side4    print("perimeter=",p)
class rectangle(quadriLateral):    def __init__(self, a, b):      super().__init__(a, b, a, b)

r1=rectangle(10, 20)r1.perimeter()
`class quadriLateral: def init(self, a, b, c, d): self.side1=a self.side2=b self.side3=c self.side4=d
def perimeter(self): p=self.side1 + self.side2 + self.side3 + self.side4 print(“perimeter=“,p)
class rectangle(quadriLateral): def init(self, a, b): super().init(a, b, a, b)
r1=rectangle(10, 20)
r1.perimeter()[Try it](/codeeditor?cid=python-3z8ufm5nk) We can now declare the object of the rectangle class and call the perimeter() method. perimeter()`
Overriding in Python
Section titled “Overriding in Python”In the above example, we see how resources of the base class are reused while constructing the inherited class. However, the inherited class can have its own instance attributes and methods.
Methods of the parent class are available for use in the inherited class. However, if needed, we can modify the functionality of any base class method. For that purpose, the inherited class contains a new definition of a method (with the same name and the signature already present in the base class). Naturally, the object of a new class will have access to both methods, but the one from its own class will have precedence when invoked. This is called method overriding.
First, we shall define a new method named area() in the rectangle class and use it as a base for the square class. The area of rectangle is the product of its adjacent sides.
area()``square
class quadriLateral:  def __init__(self, a, b, c, d):    self.side1=a    self.side2=b    self.side3=c    self.side4=d
  def perimeter(self):    p=self.side1 + self.side2 + self.side3 + self.side4    print("perimeter=",p)
class rectangle(quadriLateral):  def __init__(self, a,b):    super().__init__(a, b, a, b)
  def area(self):    a = self.side1 * self.side2    print("area of rectangle=", a)
`class quadriLateral: def init(self, a, b, c, d): self.side1=a self.side2=b self.side3=c self.side4=d
def perimeter(self): p=self.side1 + self.side2 + self.side3 + self.side4 print(“perimeter=“,p)
class rectangle(quadriLateral): def init(self, a,b): super().init(a, b, a, b)
def area(self):
a = self.side1 * self.side2
print(“area of rectangle=”, a)Let us define the square class which inherits the rectangle class. The area() method is overridden to implement the formula for the area of the square as the square of its sides.rectangle“area()`
class square(rectangle):  def __init__(self, a):    super().__init__(a, a)
  def area(self):    a=pow(self.side1, 2)    print('Area of Square: ', a)
s=square(10)s.area()  #output: Area of Square:  100
`class square(rectangle): def init(self, a): super().init(a, a)
def area(self): a=pow(self.side1, 2) print(‘Area of Square: ’, a)
s=square(10) s.area() #output: Area of Square: 100`Try it
Magic Methods
Magic methods in Python are the special methods that start and end with the double underscores. They are also called dunder methods. Magic methods are not meant to be invoked directly by you, but the invocation happens internally from the class on a certain action. For example, when you add two numbers using the + operator, internally, the add() method will be called.
__add__()
Built-in classes in Python define many magic methods. Use the dir() function to see the number of magic methods inherited by a class. For example, the following lists all the attributes and methods defined in the int class.
dir()``int
print(dir(int))
#output:#['__abs__', '__add__', '__and__', '__bool__', '__ceil__', '__class__', '__delattr__',#'__dir__', '__divmod__', '__doc__', '__eq__', '__float__', '__floor__', '__floordiv__',#'__format__', '__ge__', '__getattribute__', '__getnewargs__', '__gt__', '__hash__',#'__index__', '__init__', '__init_subclass__', '__int__', '__invert__', '__le__',#'__lshift__', '__lt__', '__mod__', '__mul__', '__ne__', '__neg__', '__new__', '__or__',#'__pos__', '__pow__', '__radd__', '__rand__', '__rdivmod__', '__reduce__', '__reduce_ex__',#'__repr__', '__rfloordiv__', '__rlshift__', '__rmod__', '__rmul__', '__ror__', '__round__',#'__rpow__', '__rrshift__', '__rshift__', '__rsub__', '__rtruediv__', '__rxor__', '__setattr__',#'__sizeof__', '__str__', '__sub__', '__subclasshook__', '__truediv__', '__trunc__', '__xor__', 'bit_length',#'conjugate', 'denominator', 'from_bytes', 'imag', 'numerator', 'real', 'to_bytes']
`print(dir(int))
#output:
#[‘abs’, ‘add’, ‘and’, ‘bool’, ‘ceil’, ‘class’, ‘delattr’,
#‘dir’, ‘divmod’, ‘doc’, ‘eq’, ‘float’, ‘floor’, ‘floordiv’,
#‘format’, ‘ge’, ‘getattribute’, ‘getnewargs’, ‘gt’, ‘hash’,
#‘index’, ‘init’, ‘init_subclass’, ‘int’, ‘invert’, ‘le’,
#‘lshift’, ‘lt’, ‘mod’, ‘mul’, ‘ne’, ‘neg’, ‘new’, ‘or’,
#‘pos’, ‘pow’, ‘radd’, ‘rand’, ‘rdivmod’, ‘reduce’, ‘reduce_ex’,
#‘repr’, ‘rfloordiv’, ‘rlshift’, ‘rmod’, ‘rmul’, ‘ror’, ‘round’,
#‘rpow’, ‘rrshift’, ‘rshift’, ‘rsub’, ‘rtruediv’, ‘rxor’, ‘setattr’,
#‘sizeof’, ‘str’, ‘sub’, ‘subclasshook’, ‘truediv’, ‘trunc’, ‘xor’, ‘bit_length’,
#‘conjugate’, ‘denominator’, ‘from_bytes’, ‘imag’, ‘numerator’, ‘real’, ‘to_bytes’][Try it](/codeeditor?cid=python-3z8uxfuwt) As you can see above, the int class includes various magic methods surrounded by double underscores. For example, the __add__ method is a magic method which gets called when we add two numbers using the + operator. Consider the following example. add`
num=10res = num.__add__(5)print(res)num=10 res = num.__add__(5) print(res)Try it
As you can see, when you do num+10, the + operator calls the add(10) method. You can also call num.add(5) directly which will give the same result. However, as mentioned before, magic methods are not meant to be called directly, but internally, through some other methods or actions.
num+10``__add__(10)``num.__add__(5)
Magic methods are most frequently used to define overloaded behaviours of predefined operators in Python. For instance, arithmetic operators by default operate upon numeric operands. This means that numeric objects must be used along with operators like +, -, *, /, etc. The + operator is also defined as a concatenation operator in string, list and tuple classes. We can say that the + operator is overloaded.
In order to make the overloaded behaviour available in your own custom class, the corresponding magic method should be overridden. For example, in order to use the + operator with objects of a user-defined class, it should include the add() method.
__add__()
Let’s see how to implement and use some of the important magic methods.
new() method
Section titled “new() method”Languages such as Java and C# use the new operator to create a new instance of a class. In Python the new() magic method is implicitly called before the init() method. The new() method returns a new object, which is then initialized by init().
__new__()``__init__()``__new__()``__init__()
class Employee: def __new__(cls): print ("__new__ magic method is called") inst = object.__new__(cls) return inst def __init__(self): print ("__init__ magic method is called") self.name='Satya'class Employee: def __new__(cls): print ("__new__ magic method is called") inst = object.__new__(cls) return inst def __init__(self): print ("__init__ magic method is called") self.name='Satya'Try it
The above example will produce the following output when you create an instance of the Employee class. The new() method is called before the init() method.
Employee``__new__()``__init__()
str() method
Section titled “str() method”Another useful magic method is str(). It is overridden to return a printable string representation of any user defined class. We have seen str() built-in function which returns a string from the object parameter. For example, str(12) returns ‘12’. When invoked, it calls the str() method in the int class.
__str__()``str()``str(12)``__str__()
num=12val = int.__str__(num)print(type(val))num=12 val = int.__str__(num) print(type(val))Try it
Let us now override the str() method in the employee class to return a string representation of its object.
__str__()``employee
class employee:  def __init__(self):    self.name='Swati'    self.salary=10000  def __str__(self):    return 'name='+self.name+', salary=$'+str(self.salary)

e1 = employee()print(e1)
`class employee: def init(self): self.name=‘Swati’ self.salary=10000 def str(self): return ‘name=‘+self.name+’, salary=$‘+str(self.salary)
e1 = employee()
print(e1)[Try it](/codeeditor?cid=python-3z8ww77xe) The str() function internally calls the __str__() method defined in the above employee class. This is why it is called a magic method! str()__str__()employee`
add() method
Section titled “add() method”In following example, a class named distance is defined with two instance attributes - ft and inch. The addition of these two distance objects is desired to be performed using the overloading + operator.
To achieve this, the magic method add() is overridden, which performs the addition of the ft and inch attributes of the two objects. The str() method returns the object’s string representation.
__add__()``__str__()
class distance:  def __init__(self, x=None,y=None):    self.ft=x    self.inch=y  def __add__(self,x):    temp=distance()    temp.ft=self.ft+x.ft    temp.inch=self.inch+x.inch    if temp.inch>=12:        temp.ft+=1        temp.inch-=12        return temp  def __str__(self):    return 'ft:'+str(self.ft)+' in: '+str(self.inch)

d1=distance(3,10)d2=distance(4,4)print("d1= {} d2={}".format(d1, d2))
d3=d1+d2print(d3)
`class distance: def init(self, x=None,y=None): self.ft=x self.inch=y def add(self,x): temp=distance() temp.ft=self.ft+x.ft temp.inch=self.inch+x.inch if temp.inch>=12: temp.ft+=1 temp.inch-=12 return temp def str(self): return ‘ft:‘+str(self.ft)+’ in: ‘+str(self.inch)
d1=distance(3,10) d2=distance(4,4) print(“d1= {} d2={}“.format(d1, d2))
d3=d1+d2
print(d3)[Try it](/codeeditor?cid=python-3z8wwaz8z) The example overloades the __add__() method which will be called when adding two objects using the + operator. add()`
ge() method
Section titled “ge() method”The following method is added in the distance class to overload the >= operator.
>=
class distance:  def __init__(self, x=None,y=None):      self.ft=x      self.inch=y  def __ge__(self, x):      val1=self.ft*12+self.inch      val2=x.ft*12+x.inch      if val1>=val2:          return True      else:          return False

d1=distance(2,1)d2=distance(4,10)print(d1>=d2)
`class distance: def init(self, x=None,y=None): self.ft=x self.inch=y def ge(self, x): val1=self.ft12+self.inch val2=x.ft12+x.inch if val1>=val2: return True else: return False
d1=distance(2,1)
d2=distance(4,10)
print(d1>=d2)The __ge__() method gets invoked when the >= operator is used and returns True or False. Accordingly, the appropriate message can be displayed.ge()“>=`
Important Magic Methods
Section titled “Important Magic Methods”The following tables list important magic methods in Python 3.
Thus, you can use the appropriate magic methods to add various functionalities in your custom class.
Learning objectives:
- Define classes and create objects
- Understand instance vs class attributes
- Implement inheritance between classes
- Override magic methods (dunder methods)
Project: “Library Management System” — Model Book, Member, and Librarian classes with inheritance and magic methods for object representation and comparison.
Module 9 — OOP Advanced
Section titled “Module 9 — OOP Advanced”Week 9
|-------|-------------|
Public, Private, Protected
Classical object-oriented languages, such as C++ and Java, control the access to class resources by public, private, and protected keywords. Private members of the class are denied access from the environment outside the class. They can be handled only from within the class. class
Public Members
Section titled “Public Members”Public members (generally methods declared in a class) are accessible from outside the class. The object of the same class is required to invoke a public method. This arrangement of private instance variables and public methods ensures the principle of data encapsulation.
All members in a Python class are public by default. Any member can be accessed from outside the class environment.
class Student:    schoolName = 'XYZ School' # class attribute
    def __init__(self, name, age):        self.name=name # instance attribute        self.age=age # instance attribute
`class Student: schoolName = ‘XYZ School’ # class attribute
def __init__(self, name, age): self.name=name # instance attribute self.age=age # instance attribute`You can access the Student class’s attributes and also modify their values, as shown below.
Student
std = Student("Steve", 25)print(std.schoolName) #'XYZ School'print(std.name) #'Steve'std.age = 20print(std.age)std = Student("Steve", 25) print(std.schoolName) #'XYZ School' print(std.name) #'Steve' std.age = 20 print(std.age)Try it
Protected Members
Section titled “Protected Members”Protected members of a class are accessible from within the class and are also available to its sub-classes. No other environment is permitted access to it. This enables specific resources of the parent class to be inherited by the child class.
Python’s convention to make an instance variable protected is to add a prefix _ (single underscore) to it. This effectively prevents it from being accessed unless it is from within a sub-class.
class Student:    _schoolName = 'XYZ School' # protected class attribute
    def __init__(self, name, age):        self._name=name  # protected instance attribute        self._age=age # protected instance attribute
`class Student: _schoolName = ‘XYZ School’ # protected class attribute
def __init__(self, name, age): self._name=name # protected instance attribute self._age=age # protected instance attribute`In fact, this doesn’t prevent instance variables from accessing or modifying the instance. You can still perform the following operations:
std = Student("Swati", 25)print(std._name)  #'Swati'
std._name = 'Dipa'print(std._name)  #'Dipa'
`std = Student(“Swati”, 25) print(std._name) #‘Swati’
std._name = ‘Dipa’ print(std._name) #‘Dipa’`Try it However, you can define a property using property decorator and make it protected, as shown below. property decorator
class Student: def __init__(self,name): self._name = name @property def name(self): return self._name @name.setter def name(self,newname): self._name = newnameclass Student: def __init__(self,name): self._name = name @property def name(self): return self._name @name.setter def name(self,newname): self._name = newname
Above, @property decorator is used to make the name() method as property and @name.setter decorator to another overloads of the name() method as property setter method. Now, _name is protected.
name()``@name.setter``name()``_name
std = Student("Swati")print(std.name)  #'Swati'
std.name = 'Dipa'print(std.name)  #'Dipa'print(std._name) #'Dipa'
`std = Student(“Swati”) print(std.name) #‘Swati’
std.name = ‘Dipa’
print(std.name) #‘Dipa’
print(std.name) #‘Dipa’[Try it](/codeeditor?cid=python-3z8ugm952) Above, we used std.name property to modify _name attribute. However, it is still accessible in Python. Hence, the responsible programmer would refrain from accessing and modifying instance variables prefixed with _ from outside its class. std.name_name`
Private Members
Section titled “Private Members”Python doesn’t have any mechanism that effectively restricts access to any instance variable or method. Python prescribes a convention of prefixing the name of the variable/method with a single or double underscore to emulate the behavior of protected and private access specifiers.
The double underscore __ prefixed to a variable makes it private. It gives a strong suggestion not to touch it from outside the class. Any attempt to do so will result in an AttributeError:
__
class Student:    __schoolName = 'XYZ School' # private class attribute
    def __init__(self, name, age):        self.__name=name  # private instance attribute        self.__salary=age # private instance attribute    def __display(self):  # private method      print('This is private method.')
std = Student("Bill", 25)print(std.__schoolName) #AttributeErrorprint(std.__name)   #AttributeErrorprint(std.__display())  #AttributeError
`class Student: __schoolName = ‘XYZ School’ # private class attribute
def __init__(self, name, age): self.__name=name # private instance attribute self.__salary=age # private instance attributedef __display(self): # private method print('This is private method.')std = Student(“Bill”, 25)
print(std.__schoolName) #AttributeError
print(std.__name) #AttributeError
print(std.__display()) #AttributeError[Try it](/codeeditor?cid=python-3z8ugw6jk) Python performs name mangling of private variables. Every member with a double underscore will be changed to _object._class__variable. So, it can still be accessed from outside the class, but the practice should be refrained. _object._class__variable`
std = Student("Bill", 25)print(std._Student__name)  #'Bill'
std._Student__name = 'Steve'print(std._Student__name)  #'Steve'std._Student__display()  #'This is private method.'
`std = Student(“Bill”, 25) print(std._Student__name) #‘Bill’
std._Student__name = ‘Steve’ print(std._Student__name) #‘Steve’ std._Student__display() #‘This is private method.’`Try it Thus, Python provides conceptual implementation of public, protected, and private access modifiers, but not like other languages like C#, Java, C++. C#
Property Decorator
The @property decorator is a built-in decorator in Python for the property() function. Use @property decorator on any method in the class to use the method as a property.
@propertyproperty() function@propertyclass
You can use the following three decorators to define a property:
decorators- @property: Declares the method as a property.
- @
.setter: Specifies the setter method for a property that sets the value to a property. - @
.deleter: Specifies the delete method as a property that deletes a property.
Declare a Property
Section titled “Declare a Property”The following declares the method as a property. This method must return the value of the property.
class Student:
    def __init__(self, name):        self.__name = name
    @property    def name(self):        return self.__name
`class Student:
def __init__(self, name):    self.__name = name
@propertydef name(self):    return self.__name`
Above, @property decorator applied to the name() method. The name() method returns the private instance attribute value __name. So, we can now use the name() method as a property to get the value of the __name attribute, as shown below.
@property``name()``name()private__name``name()``__name
s = Student('Steve')print(s.name) #'Steve's = Student('Steve') print(s.name) #'Steve'Try it
Property Setter
Section titled “Property Setter”Above, we defined the name() method as a property. We can only access the value of the name property but cannot modify it. To modify the property value, we must define the setter method for the name property using @property-name.setter decorator, as shown below.
name()``name``name``@property-name.setter
class Student:    def __init__(self, name):        self.__name=name
    @property    def name(self):        return self.__name
    @name.setter   #property-name.setter decorator    def name(self, value):        self.__name = value
`class Student: def init(self, name): self.__name=name
@propertydef name(self):    return self.__name
@name.setter   #property-name.setter decoratordef name(self, value):    self.__name = value`
Above, we have two overloads of the name() method. One is for the getter and another is the setter method. The setter method must have the value argument that can be used to assign to the underlying private attribute. Now, we can retrieve and modify the property value, as shown below.
name()
s = Student('Steve')print(s.name)  #'Steve'
s.name = 'Bill'print(s.name)  #'Bill'
`s = Student(‘Steve’) print(s.name) #‘Steve’
s.name = ‘Bill’ print(s.name) #‘Bill’`Try it
Property Deleter
Section titled “Property Deleter”Use the @property-name.deleter decorator to define the method that deletes a property, as shown below.
@property-name.deleter
class Student:    def __init__(self, name):        self.__name = name
    @property    def name(self):        return self.__name
    @name.setter    def name(self, value):        self.__name=value
    @name.deleter   #property-name.deleter decorator    def name(self):        print('Deleting..')        del self.__name
std = Student('Steve')del std.nameprint(std.name)  #AttributeError
`class Student: def init(self, name): self.__name = name
@propertydef name(self):    return self.__name
@name.setterdef name(self, value):    self.__name=value
@name.deleter   #property-name.deleter decoratordef name(self):    print('Deleting..')    del self.__name
std = Student(‘Steve’)
del std.name
print(std.name) #AttributeError[Try it](/codeeditor?cid=python-3z8uqc3v6) The deleter would be invoked when you delete the property using keyword del. Once you delete a property, you cannot access it again using the same instance. del`
Property Function
The property() function is used to define properties in the Python class.
property()
The property() method in Python provides an interface to instance attributes. It encapsulates instance attributes and provides a property, same as Java and C#.
property()
The property() method takes the get, set and delete methods as arguments and returns an object of the property class.
property()``property
It is recommended to use the property decorator instead of the property() method.
property decoratorproperty()
property(fget, fset, fdel, doc)property(fget, fset, fdel, doc)
Parameters:
Section titled “Parameters:”- fget: (Optional) Function for getting the attribute value. Default value is none.
- fset: (Optional) Function for setting the attribute value. Default value is none.
- fdel: (Optional) Function for deleting the attribute value. Default value is none.
- doc: (Optional) A string that contains the documentation. Default value is none.
Return Value:
Section titled “Return Value:”Returns the property attribute from the given getter, setter, and deleter.
The following example demonstrates how to create a property in Python using the property() function.
property()
class person: def __init__(self): self.__name='' def setname(self, name): print('setname() called') self.__name=name def getname(self): print('getname() called')return self.__name name=property(getname, setname)class person: def __init__(self): self.__name='' def setname(self, name): print('setname() called') self.__name=name def getname(self): print('getname() called')return self.__name name=property(getname, setname)
In the above example, property(getname, setname) returns the property object and assigns it to name. Thus, the name property hides the private instance attribute __name. The name property is accessed directly, but internally it will invoke the getname() or setname() method, as shown below.
property(getname, setname)``name``name``__name``name``getname()``setname()
>>> from person import person >>> p1=person() >>> p1.name="Steve" setname() called >>> p1.name getname() called 'Steve'>>> from person import person >>> p1=person() >>> p1.name="Steve" setname() called >>> p1.name getname() called 'Steve'
As you can see above, the getname() method gets called automatically when we access the name property. In the same way, the setname method gets called when we assign a value to the name property. It also hides the instance attribute __name.
getname()``name``setname``name``__name
In the same way, you can specify a deleter method for the property, as shown in the below script.
class person: def __init__(self, name): self.__name=name def setname(self, name): print('setname() called') self.__name=name def getname(self): print('getname() called')return self.__name def delname(self): print('delname() called')del self.__name # Set property to use get_name, set_name # and del_name methods name=property(getname, setname, delname)class person: def __init__(self, name): self.__name=name def setname(self, name): print('setname() called') self.__name=name def getname(self): print('getname() called')return self.__name def delname(self): print('delname() called')del self.__name # Set property to use get_name, set_name # and del_name methods name=property(getname, setname, delname)
The delname() function would be invoked when you delete the name property.
delname()``name
>>> from person import person >>> p1=person() >>> p1.name="Steve" setname() called >>> del p1.name delname() called>>> from person import person >>> p1=person() >>> p1.name="Steve" setname() called >>> del p1.name delname() called
In this way, we can define a property in the class using the property() function in Python.
property()
@property decorator makes it easy to declare a property instead of calling the property() function. Learn about it next.
property()
Classmethod Decorator
In Python, the @classmethod decorator is used to declare a method in the class as a class method that can be called using ClassName.MethodName(). The class method can also be called using an object of the class.
@classmethod``ClassName.MethodName()
The @classmethod is an alternative of the classmethod() function. It is recommended to use the @classmethod decorator instead of the function because it is just a syntactic sugar.
@classmethodclassmethod()@classmethod
@classmethod Characteristics
Section titled “@classmethod Characteristics”- Declares a class method.
- The first parameter must be cls, which can be used to access class attributes.
cls- The class method can only access the class attributes but not the instance attributes. - The class method can be called using ClassName.MethodName() and also using object.
ClassName.MethodName()- It can return an object of the class.
The following example declares a class method.
class Student:    name = 'unknown' # class attribute    def __init__(self):        self.age = 20  # instance attribute
    @classmethod    def tostring(cls):        print('Student Class Attributes: name=',cls.name)
Student.tostring()  #Student Class Attributes: name=unknown
`class Student: name = ‘unknown’ # class attribute def init(self): self.age = 20 # instance attribute
@classmethoddef tostring(cls): print('Student Class Attributes: name=',cls.name)Student.tostring() #Student Class Attributes: name=unknown[Try it](/codeeditor?cid=python-3z8uwbrs9) Above, the Student class contains a class attribute name and an instance attribute age. The tostring() method is decorated with the @classmethod decorator that makes it a class method, which can be called using the Student.tostring(). You can call the class method as classname.method() or using class object object.method(). Studentnameagetostring()@classmethodStudent.tostring()classname.method()object.method()` Note: The first parameter of any class method must be cls that can be used to access the class's attributes. You can give any name to the first parameter instead of cls. `clscls`
The class method can only access class attributes, but not the instance attributes. It will raise an error if trying to access the instance attribute in the class method.
class Student:    name = 'unknown' # class attribute    def __init__(self):        self.age = 20  # instance attribute
    @classmethod    def tostring(cls):        print('Student Class Attributes: name=',cls.name,', age=', cls.age)

Student.tostring() #calling class method
`class Student: name = ‘unknown’ # class attribute def init(self): self.age = 20 # instance attribute
@classmethoddef tostring(cls): print('Student Class Attributes: name=',cls.name,', age=', cls.age)Student.tostring() #calling class method`Try it The class method can also be used as a factory method to get an object of the class, as shown below.
class Student:    def __init__(self, name, age):        self.name = name  # instance attribute        self.age = age # instance attribute
    @classmethod    def getobject(cls):        return cls('Steve', 25)

std = Student.getobject()print(std.name)  #'Steve'print(std.age)   #25
`class Student: def init(self, name, age): self.name = name # instance attribute self.age = age # instance attribute
@classmethoddef getobject(cls): return cls('Steve', 25)std = Student.getobject()
print(std.name) #‘Steve’
print(std.age) #25`Try it
@classmethod vs @staticmethod
Section titled “@classmethod vs @staticmethod”The following table lists the difference between the class method and the static method:
static methodClassName.MethodName()``object.MethodName()``ClassName.MethodName()``object.MethodName()
Staticmethod Decorator
The @staticmethod is a built-in decorator that defines a static method in the class in Python. A static method doesn’t receive any reference argument whether it is called by an instance of a class or by the class itself.
@staticmethod
@staticmethod Characteristics
Section titled “@staticmethod Characteristics”- Declares a static method in the class.
- It cannot have cls or self parameter.
cls``self- The static method cannot access the class attributes or the instance attributes. - The static method can be called using ClassName.MethodName() and also using object.MethodName().
ClassName.MethodName()``object.MethodName()- It can return an object of the class.
The following example demonstrates how to define a static method in the class:
class Student:    name = 'unknown' # class attribute
    def __init__(self):        self.age = 20  # instance attribute
    @staticmethod    def tostring():        print('Student Class')
`class Student: name = ‘unknown’ # class attribute
def __init__(self):    self.age = 20  # instance attribute
@staticmethoddef tostring():    print('Student Class')`
Above, the Student class declares the tostring() method as a static method using the @staticmethod decorator. Note that it cannot have self or cls parameter.
Student``tostring()``@staticmethod``self``cls
The static method can be called using the ClassName.MethodName() or object.MethodName(), as shown below.
ClassName.MethodName()``object.MethodName()
#calling static methodStudent.tostring()   #'Student Class'Student().tostring() #'Student Class'
std = Student()std.tostring()     #'Student Class'
`#calling static method
Student.tostring() #‘Student Class’
Student().tostring() #‘Student Class’
std = Student() std.tostring() #‘Student Class’`Try it The static method cannot access the class attributes or instance attributes. It will raise an error if try to do so.
class Student:    name = 'unknown' # class attribute
    def __init__(self):        self.age = 20  # instance attribute
    @staticmethod    def tostring():        print('name=',name,'age=',self.age)

Student.tostring()   #error
`class Student: name = ‘unknown’ # class attribute
def __init__(self):    self.age = 20  # instance attribute
@staticmethoddef tostring():    print('name=',name,'age=',self.age)
Student.tostring() #error`Try it
@classmethod vs @staticmethod
Section titled “@classmethod vs @staticmethod”The following table lists the difference between the class method and the static method:
class methodClassName.MethodName()``object.MethodName()``ClassName.MethodName()``object.MethodName()
Learning objectives:
- Understand access modifiers and encapsulation
- Use properties for controlled attribute access
- Implement class methods and static methods
Project: “Bank Account System” — A class-based system with private attributes, property getters/setters, class methods for interest rates, and static methods for validation.
Module 10 — Modules & Packages
Section titled “Module 10 — Modules & Packages”Week 10
|-------|-------------|
Python Module
Any text file with the .py extension containing Python code is basically a module. Different Python objects such as functions, classes, variables, constants, etc., defined in one module can be made available to an interpreter session or another Python script by using the import statement. Functions defined in built-in modules need to be imported before use. On similar lines, a custom module may have one or more user-defined Python objects in it. These objects can be imported in the interpreter session or another script.
.py``import
If the programming algorithm requires defining a lot of functions and classes, they are logically organized in modules. One module stores classes, functions and other resources of similar relevance. Such a modular structure of the code makes it easy to understand, use and maintain.
Creating a Module
Section titled “Creating a Module”Shown below is a Python script containing the definition of sum() function. It is saved as calc.py.
sum()``calc.py
def sum(x, y): return x + ydef sum(x, y): return x + y
Importing a Module
Section titled “Importing a Module”We can now import this module and execute the sum() function in the Python shell.
sum()Python shell
import calcn = calc.sum(5, 5)print(n) #10import calc n = calc.sum(5, 5) print(n) #10Try it
In the same way, to use the above calc module in another Python script, use the import statement.
calc
Every module, either built-in or custom made, is an object of a module class. Verify the type of different modules using the built-in type() function, as shown below.
type()
import calcprint(type(calc))  # <class 'module'>
import mathprint(type(math))  #<class 'module'>
`import calc print(type(calc)) # <class ‘module’>
import math print(type(math)) #<class ‘module’>`Try it
Renaming the Imported Module
Section titled “Renaming the Imported Module”Use the as keyword to rename the imported module as shown below.
as
import math as caln = cal.log(4)print(n) #1.3862943611198906import math as cal n = cal.log(4) print(n) #1.3862943611198906Try it
from .. import statement
Section titled “from .. import statement”The above import statement will load all the resources of the module in the current working environment (also called namespace). It is possible to import specific objects from a module by using this syntax. For example, the following module calc.py has three functions in it.
calc.py
def sum(x,y):    return x + y
def average(x, y):    return (x + y)/2
def power(x, y):    return x**y
`def sum(x,y): return x + y
def average(x, y): return (x + y)/2
def power(x, y):
return x**yNow, we can import one or more functions using the from...import statement. For example, the following code imports only two functions in the main.py.main.py`
from calc import sum, averagen = sum(10, 20) #30avg = average(10, 20) #15p = power(2, 4) #errorfrom calc import sum, average n = sum(10, 20) #30 avg = average(10, 20) #15 p = power(2, 4) #errorTry it
The following example imports only one function - sum.
from calc import sumn = sum(10, 20) #30from calc import sum n = sum(10, 20) #30
You can also import all of its functions using the from…import * syntax.
from...import *
from calc import *
n = sum(10, 20)print(n)
avg = average(10, 20)print(avg)
p = power(2, 4)print(p)
`from calc import *
n = sum(10, 20) print(n)
avg = average(10, 20) print(avg)
p = power(2, 4) print(p)`Try it
Module Search Path
Section titled “Module Search Path”When the import statement is encountered either in an interactive session or in a script:
- First, the Python interpreter tries to locate the module in the current working directory.
- If not found, directories in the PYTHONPATH environment variable are searched.
- If still not found, it searches the installation default directory.
As the Python interpreter starts, it put all the above locations in a list returned by the sys.path attribute.
import syssys.path['','C:\python36\Lib\idlelib', 'C:\python36\python36.zip','C:\python36\DLLs', 'C:\python36\lib', 'C:\python36','C:\Users\acer\AppData\Roaming\Python\Python36\site-packages','C:\python36\lib\site-packages']import sys sys.path ['','C:\python36\Lib\idlelib', 'C:\python36\python36.zip', 'C:\python36\DLLs', 'C:\python36\lib', 'C:\python36', 'C:\Users\acer\AppData\Roaming\Python\Python36\site-packages', 'C:\python36\lib\site-packages']
If the required module is not present in any of the directories above, the message ModuleNotFoundError is thrown.
ModuleNotFoundError
import MyModuleTraceback (most recent call last):File "<stdin>", line 1, in <module> ModuleNotFoundError: No module named 'MyModule'import MyModule Traceback (most recent call last): File "<stdin>", line 1, in <module> ModuleNotFoundError: No module named 'MyModule'
Reloading a Module
Section titled “Reloading a Module”Suppose you have already imported a module and using it. However, the owner of the module added or modified some functionalities after you imported it. So, you can reload the module to get the latest module using the reload() function of the imp module, as shown below.
reload()``imp
import impimp.reload(calc)import imp imp.reload(calc)
Getting Help on Modules
Section titled “Getting Help on Modules”Use the help() function to know the methods and properties of a module. For example, call the help(“math”) to know about the math module. If you already imported a module, then provide its name, e.g. help(math).
help()help("math")``help(math)
As shown above, you can see the method names and descriptions. It will not display pages of help ending with —More—. Press Enter to see more help.
You can also use the dir() function to know the names and attributes of a module.
dir()
Learn about the module attributes in the next chapter.
Module Attributes
Python module has its attributes that describes it. Attributes perform some tasks or contain some information about the module. Some of the important attributes are explained below:
name Attribute
Section titled “name Attribute”The name attribute returns the name of the module. By default, the name of the file (excluding the extension .py) is the value of __name__attribute.
__name__
import mathprint(math.__name__) #'math'import math print(math.__name__) #'math'Try it
In the same way, it gives the name of your custom module e.g. calc module will return ‘calc’.
import calcprint(calc.__name__) #'calc'import calc print(calc.__name__) #'calc'
However, this can be modified by assigning different strings to this attribute. Change hello.py as shown below.
hello.py
def SayHello(name): print ("Hi {}! How are you?".format(name))__name__="SayHello"def SayHello(name): print ("Hi {}! How are you?".format(name)) __name__="SayHello"
And check the name attribute now.
__name__
import helloprint(hello.__name__) #'SayHello'import hello print(hello.__name__) #'SayHello'Try it
The value of the name attribute is main on the Python interactive shell and in the main.py module.
__name__``__main__Python interactive shellmain.py
print(__name__)print(__name__)Try it
When we run any Python script (i.e. a module), its name attribute is also set to main. For example, create the following welcome.py in IDLE.
__name__``__main__IDLE
print("__name__ = ", __name__)print("__name__ = ", __name__)
Run the above welcome.py in IDLE by pressing F5. You will see the following result.
__name__ = __main__However, when this module is imported, its name is set to its filename. Now, import the welcome module in the new file test.py with the following content.
__name__
import welcomeprint("__name__ = ", __name__)import welcome print("__name__ = ", __name__)
Now run the test.py in IDLE by pressing F5. The name attribute is now “welcome”.
__name__
__name__ = welcome__name__ = welcome
This attribute allows a Python script to be used as an executable or as a module.
Visit main in Python for more information. main in Python
doc Attribute
Section titled “doc Attribute”The doc attribute denotes the documentation string (docstring) line written in a module code.
import math
print(math.__doc__)
`import math
print(math.doc)[Try it](/codeeditor?cid=python-3z7yhvf58) Consider the the following script is saved as greet.py module. greet.py`
"""This is docstring of test module"""def SayHello(name): print ("Hi {}! How are you?".format(name)) return"""This is docstring of test module""" def SayHello(name): print ("Hi {}! How are you?".format(name)) return
The doc attribute will return a string defined at the beginning of the module code.
__doc__
import greet
print(greet.__doc__)
`import greet
print(greet.doc)`Try it
file Attribute
Section titled “file Attribute”file is an optional attribute which holds the name and path of the module file from which it is loaded.
__file__
import io
print(io.__file__) #output: 'C:\python37\lib\io.py'
`import io
print(io.file) #output: ‘C:\python37\lib\io.py’`Try it
dict Attribute
Section titled “dict Attribute”The dict attribute will return a dictionary object of module attributes, functions and other definitions and their respective values.
__dict__
import math
print(math.__dict__)
`import math
print(math.dict)`Try it The dir() is a built-in function that also returns the list of all attributes and functions in a module. dir()
import math
print(dir("math"))
`import math
print(dir(“math”))[Try it](/codeeditor?cid=python-3z7yjc8b9) You can use the dir() function in IDLE too, as shown below. dir()`
Learn more about module attributes in Python Docs. module attributes in Python Docs
Python Package
We organize a large number of files in different folders and subfolders based on some criteria, so that we can find and manage them easily. In the same way, a package in Python takes the concept of the modular approach to next logical level. As you know, a module can contain multiple objects, such as classes, functions, etc. A package can contain one or more relevant modules. Physically, a package is actually a folder containing one or more module files. module Let’s create a package named mypackage, using the following steps:
- Create a new folder named D:\MyApp.
D:\MyApp- Inside MyApp, create a subfolder with the name ‘mypackage’.MyApp- Create an empty init.py file in the mypackage folder.__init__.py- Using a Python-aware editor like IDLE, create modules greet.py and functions.py with the following code:
def SayHello(name): print("Hello ", name)def SayHello(name): print("Hello ", name)
def sum(x,y):    return x+y
def average(x,y):    return (x+y)/2
def power(x,y):    return x**y
`def sum(x,y): return x+y
def average(x,y): return (x+y)/2
def power(x,y): return x**y` That’s it. We have created our package called mypackage. The following is a folder structure:
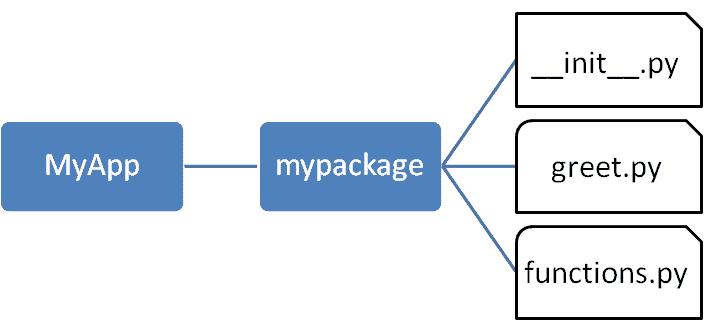
Importing a Module from a Package
Section titled “Importing a Module from a Package”Now, to test our package, navigate the command prompt to the MyApp folder and invoke the Python prompt from there.
MyApp
Import the functions module from the mypackage package and call its power() function.
It is also possible to import specific functions from a module in the package.
init.py
Section titled “init.py”The package folder contains a special file called init.py, which stores the package’s content. It serves two purposes:
__init__.py1. The Python interpreter recognizes a folder as the package if it contains init.py file.
__init__.py1. init.py exposes specified resources from its modules to be imported.
__init__.py
An empty init.py file makes all functions from the above modules available when this package is imported. Note that init.py is essential for the folder to be recognized by Python as a package. You can optionally define functions from individual modules to be made available.
__init__.py``__init__.py
We shall also create another Python script in the MyApp folder and import the mypackage package in it. It should be at the same level of the package to be imported.
MyApp
The init.py file is normally kept empty. However, it can also be used to choose specific functions from modules in the package folder and make them available for import. Modify init.py as below:
__init__.py``__init__.py
from .functions import average, powerfrom .greet import SayHellofrom .functions import average, power from .greet import SayHello
The specified functions can now be imported in the interpreter session or another executable script.
Create test.py in the MyApp folder to test mypackage.
test.py``MyApp
from mypackage import power, average, SayHelloSayHello()x=power(3,2)print("power(3,2) : ", x)from mypackage import power, average, SayHello SayHello() x=power(3,2) print("power(3,2) : ", x)
Note that functions power() and SayHello() are imported from the package and not from their respective modules, as done earlier. The output of the above script is:
power()``SayHello()
Install a Package Globally
Section titled “Install a Package Globally”Once a package is created, it can be installed for system-wide use by running the setup script. The script calls setup() function from the setuptools module.
setup()``setuptools
Let’s install mypackage for system-wide use by running a setup script.
Save the following code as setup.py in the parent folder MyApp. The script calls the setup() function from the setuptools module. The setup() function takes various arguments such as name, version, author, list of dependencies, etc. The zip_safe argument defines whether the package is installed in compressed mode or regular mode.
MyApp``setup()``setup()``zip_safe
from setuptools import setupsetup(name='mypackage',version='0.1',description='Testing installation of Package',url='#',author='auth',author_email='[email protected]',license='MIT',packages=['mypackage'],zip_safe=False)from setuptools import setup setup(name='mypackage', version='0.1', description='Testing installation of Package', url='#', author='auth', author_email='[email protected]', license='MIT', packages=['mypackage'], zip_safe=False)[email protected]
Now execute the following command to install mypackage using the pip utility. Ensure that the command prompt is in the parent folder, in this case D:\MyApp.
mypackagepipD:\MyApp
Now mypackage is available for system-wide use and can be imported in any script or interpreter.
You may also want to publish the package for public use. PyPI (stands for Python Package Index) is a repository of Python packages. Visit https://packaging.python.org/distributing to know more about the procedure of uploading a package to PyPI. PyPIhttps://packaging.python.org/distributing
pip in Python
PIP is the Package Installer for Python. It is used to install packages from Python Package Index (PyPI) and other indexes. PIPPython Package Index
PyPI - Python Package Index
Section titled “PyPI - Python Package Index”PyPI is the default repository of Python packages for Python community that includes frameworks, tools and, libraries. Python developers can install and use packages in the Python application. It is open to all Python developers to consume and distribute their distributions. Developers can search or browse projects from pypi.org. PyPI
Install pip
Section titled “Install pip”PIP has been included with Python installer since Python 3.4. You can verify whether the pip is installed on your machine by running the following command in your console:
If you are using an older version of pip, you can upgrade pip by running the following command on Windows:
Execute the following command on Linux or Mac OS to upgrade pip:
If pip isn’t already installed, then first try to bootstrap it from the standard library by executing the following command in your console or terminal window:
If that still doesn’t install pip, the following steps should install pip on your platform.
- Download get-pip.py from https://bootstrap.pypa.io/get-pip.py and save it to your local folder.
get-pip.pyhttps://bootstrap.pypa.io/get-pip.py1. Navigate command prompt or terminal to the folder where you have downloaded the file and run the command: python get-pip.pypython get-pip.pyThis command will install pip in your pc. Additionally, it also installs the wheel and setuptools. wheelsetuptools
pip Help command
Section titled “pip Help command”The pip help command is used to get a list of all the functions available in pip.
pip help
Installing packages
Section titled “Installing packages”PyPI maintains packages as projects. Use the following pip command to install the latest version of the project.
Pip install "project-name"Pip install "project-name"
Use the following command installs the specific version of the project:
pip install "project-name==2.4"pip install "project-name==2.4"
Use the following command to install a version that’s “compatible” with a certain version:
pip install "project-name~=2.4"pip install "project-name~=2.4"
Let’s install a package to send an HTTP request in Python. urllib3 is a powerful, user-friendly HTTP client for Python. Before using urllib3 package in your application, install it using the pip command, as shown below.
pip
The above command will install the latest version of urllib3. Now, you can import and use it, as shown below.
urllib3
import urllib3 http = urllib3.PoolManager() req = http.request('GET', 'http://www.google.com') print(req.status)import urllib3 http = urllib3.PoolManager() req = http.request('GET', 'http://www.google.com') print(req.status)
List packages
Section titled “List packages”The list command can be used to see all the packages that have been installed on the system. If you want to check all the packages, use the pip list command:
pip list
This will list all the packages available to use in your system. Notice that urllib3 package is also listed there.
urllib3
Show package
Section titled “Show package”If you want to check the metadata of a package, then use pip show command. The following command will display the metadata of the urllib3 package. [email protected]
Uninstalling a Package
Section titled “Uninstalling a Package”The pip uninstall command can be used to remove a package. For example, if you want to remove urllib3 package, you can simply use the following command:
pip uninstall``urllib3
The pip package manager will ask you to confirm if you want to uninstall the package.Proceed (y/n)?:If you press y, the package will be removed.
Proceed (y/n)?:
Thus, you can use pip as a package manager of your Python application.
Math Module
Some of the most popular mathematical functions are defined in the math module. These include trigonometric functions, representation functions, logarithmic functions, angle conversion functions, etc. In addition, two mathematical constants are also defined in this module.
Pi is a well-known mathematical constant, which is defined as the ratio of the circumference to the diameter of a circle and its value is 3.141592653589793.
import math
print(math.pi)  #output: 3.141592653589793
`import math
print(math.pi) #output: 3.141592653589793`Try it Another well-known mathematical constant defined in the math module is e. It is called Euler’s number and it is a base of the natural logarithm. Its value is 2.718281828459045.
import math
print(math.e)  #output: 2.718281828459045
`import math
print(math.e) #output: 2.718281828459045[Try it](/codeeditor?cid=python-3z83apcx9) The math module contains functions for calculating various trigonometric ratios for a given angle. The functions (sin, cos, tan, etc.) need the angle in radians as an argument. We, on the other hand, are used to express the angle in degrees. The math module presents two angle conversion functions: degrees() and radians(), to convert the angle from degrees to radians and vice versa. For example, the following statements convert the angle of 30 degrees to radians and back (Note: π radians is equivalent to 180 degrees). degrees()“radians()`
import math
print(math.radians(30))  #output: 0.5235987755982988
print(math.degrees(math.pi/6))  #output: 29.999999999999996
`import math
print(math.radians(30)) #output: 0.5235987755982988
print(math.degrees(math.pi/6)) #output: 29.999999999999996[Try it](/codeeditor?cid=python-3z83apcx9) The following statements show sin, cos and tan ratios for the angle of 30 degrees (0.5235987755982988 radians): sin, cos and tan`
import math
print(math.sin(0.5235987755982988))  #output: 0.49999999999999994
print(math.cos(0.5235987755982988))  #output: 0.8660254037844387
print(math.tan(0.5235987755982988))  #output: 0.5773502691896257
`import math
print(math.sin(0.5235987755982988)) #output: 0.49999999999999994
print(math.cos(0.5235987755982988)) #output: 0.8660254037844387
print(math.tan(0.5235987755982988)) #output: 0.5773502691896257[Try it](/codeeditor?cid=python-3z83apcx9) You may recall that sin(30)=0.5,cos(30)=32 (which is 0.8660254037844387) and tan(30)= 13 (which is 0.5773502691896257). sin(30)=0.5cos(30)=320.8660254037844387tan(30)= 135773502691896257`
math.log()
Section titled “math.log()”The math.log() method returns the natural logarithm of a given number. The natural logarithm is calculated to the base e.
math.log()``e
import math
print(math.log(10))  #output: 2.302585092994046
`import math
print(math.log(10)) #output: 2.302585092994046`Try it
math.log10()
Section titled “math.log10()”The math.log10() method returns the base-10 logarithm of the given number. It is called the standard logarithm.
math.log10()
import math
print(math.log10(10))  #output: 1.0
`import math
print(math.log10(10)) #output: 1.0`Try it
math.exp()
Section titled “math.exp()”The math.exp() method returns a float number after raising e to the power of the given number. In other words, exp(x) gives e**x.
math.exp()``exp(x)``e**x
import math
print(math.exp(10))  #output: 22026.465794806718
`import math
print(math.exp(10)) #output: 22026.465794806718`Try it This can be verified by the exponent operator.
import math
print(math.e**10)  #output: 22026.465794806703
`import math
print(math.e**10) #output: 22026.465794806703`Try it
math.pow()
Section titled “math.pow()”The math.pow() method receives two float arguments, raises the first to the second and returns the result. In other words, pow(4,4) is equivalent to 4**4.
math.pow()
import math
print(math.pow(2,4))  #output: 16.0
`import math
print(math.pow(2,4)) #output: 16.0`Try it
math.sqrt()
Section titled “math.sqrt()”The math.sqrt() method returns the square root of a given number.
math.sqrt()
import math
print(math.sqrt(100))  #output: 10.0
print(math.sqrt(3))  #output: 1.7320508075688772
`import math
print(math.sqrt(100)) #output: 10.0
print(math.sqrt(3)) #output: 1.7320508075688772[Try it](/codeeditor?cid=python-3z83apcx9) The following two functions are called representation functions. The ceil() function approximates the given number to the smallest integer, greater than or equal to the given floating point number. The floor() function returns the largest integer less than or equal to the given number. floor()`
import math
print(math.ceil(4.5867))  #output: 5print(math.floor(4.5687)) #output: 4
`import math
print(math.ceil(4.5867)) #output: 5
print(math.floor(4.5687)) #output: 4`Try it
Learn more about math module on Python docs.
math module on Python docs
Random Module
The random module is a built-in module to generate the pseudo-random variables. It can be used perform some action randomly such as to get a random number, selecting a random elements from a list, shuffle elements randomly, etc.
random
Generate Random Floats
Section titled “Generate Random Floats”The random.random() method returns a random float number between 0.0 to 1.0. The function doesn’t need any arguments.
random.random()
import random
print(random.random())
`import random
print(random.random())`Try it
Generate Random Integers
Section titled “Generate Random Integers”The random.randint() method returns a random integer between the specified integers.
random.randint()
import random
print(random.randint(1, 100))print(random.randint(1, 100))
`import random
print(random.randint(1, 100))
print(random.randint(1, 100))`Try it
Generate Random Numbers within Range
Section titled “Generate Random Numbers within Range”The random.randrange() method returns a randomly selected element from the range created by the start, stop and step arguments. The value of start is 0 by default. Similarly, the value of step is 1 by default.
random.randrange()
import  random
print(random.randrange(1, 10))print(random.randrange(1, 10, 2))print(random.randrange(0, 101, 10))
`import random
print(random.randrange(1, 10)) print(random.randrange(1, 10, 2)) print(random.randrange(0, 101, 10))`Try it
Select Random Elements
Section titled “Select Random Elements”The random.choice() method returns a randomly selected element from a non-empty sequence. An empty sequence as argument raises an IndexError.
random.choice()
import random
print(random.choice('computer'))print(random.choice([12,23,45,67,65,43]))print(random.choice((12,23,45,67,65,43)))
`import random
print(random.choice(‘computer’))
print(random.choice([12,23,45,67,65,43]))
print(random.choice((12,23,45,67,65,43)))`Try it
Shuffle Elements Randomly
Section titled “Shuffle Elements Randomly”The random.shuffle() method randomly reorders the elements in a list.
random.shuffle()list
numbers=[12,23,45,67,65,43]
random.shuffle(numbers)print(numbers)
random.shuffle(numbers)print(numbers)
`numbers=[12,23,45,67,65,43]
random.shuffle(numbers) print(numbers)
random.shuffle(numbers) print(numbers)`Try it Learn more about the random module in Python docs. random module in Python docs
Statistics Module
The statistics module provides functions to mathematical statistics of numeric data. The following popular statistical functions are defined in this module.
The mean() method calculates the arithmetic mean of the numbers in a list.
mean()
import statistics
print(statistics.mean([2,5,6,9]))  #output: 5.5
`import statistics
print(statistics.mean([2,5,6,9])) #output: 5.5`Try it
Median
Section titled “Median”The median() method returns the middle value of numeric data in a list.
median()
import statistics
print(statistics.median([1,2,3,8,9]))  #output: 3print(statistics.median([1,2,3,7,8,9]) )  #output: 5.0
`import statistics
print(statistics.median([1,2,3,8,9])) #output: 3 print(statistics.median([1,2,3,7,8,9]) ) #output: 5.0`Try it
The mode() method returns the most common data point in the list.
mode()
import statistics
print(statistics.mode([2,5,3,2,8,3,9,4,2,5,6]))  #output: 2
`import statistics
print(statistics.mode([2,5,3,2,8,3,9,4,2,5,6])) #output: 2`Try it
Standard Deviation
Section titled “Standard Deviation”The stdev() method calculates the standard deviation on a given sample in the form of a list.
stdev()
import statistics
print(statistics.stdev([1,1.5,2,2.5,3,3.5,4,4.5,5]))  #output: 1.3693063937629153
`import statistics
print(statistics.stdev([1,1.5,2,2.5,3,3.5,4,4.5,5])) #output: 1.3693063937629153`Try it Learn about the statistics module in Python docs. statistics module in Python docs
Learning objectives:
- Create and import custom modules
- Understand module attributes and namespace
- Organize code into packages
- Use pip to install third-party packages
- Utilize math, random, and statistics built-in modules
Project: “Statistics Calculator” — A program that uses math, random, and statistics modules to generate random datasets and compute statistical measures (mean, median, mode, standard deviation).
Module 11 — Advanced Python Features
Section titled “Module 11 — Advanced Python Features”Week 11
|-------|-------------|
Decorators
In programming, decorator is a design pattern that adds additional responsibilities to an object dynamically. In Python, a function is the first-order object. So, a decorator in Python adds additional responsibilities/functionalities to a function dynamically without modifying a function. function In Python, a function can be passed as an argument to another function. It is also possible to define a function inside another function, and a function can return another function.
So, a decorator in Python is a function that receives another function as an argument. The behavior of the argument function is extended by the decorator without actually modifying it. The decorator function can be applied over a function using the @decorator syntax.
Let’s understand the decorator in Python step-by-step.
Consider that we have the greet() function, as shown below.
greet()
def greet(): print('Hello! ', end='')def greet(): print('Hello! ', end='')
Now, we can extend the above function’s functionality without modifying it by passing it to another function, as shown below.
def mydecorator(fn):  fn()  print('How are you?')
mydecorator(greet)  #output:Hello! How are you?
`def mydecorator(fn): fn() print(‘How are you?’)
mydecorator(greet) #output:Hello! How are you?[Try it](/codeeditor?cid=python-3z8upjqbw) Above, the mydecorator() function takes a function as an argument. It calls the argument function and also prints some additional things. Thus, it extends the functionality of the greet() function without modifying it. However, it is not the actual decorator. mydecorator()greet()` The mydecorator() is not a decorator in Python. The decorator in Python can be defined over any appropriate function using the @decorator_function_name syntax to extend the functionality of the underlying function. `mydecorator()@decorator_function_nameThe following defines the decorator for the above greet() function.greet()`
def mydecorator(fn): def inner_function(): fn() print('How are you?') return inner_functiondef mydecorator(fn): def inner_function(): fn() print('How are you?') return inner_function
The mydecorator() function is the decorator function that takes a function (any function that does not take any argument) as an argument. The inner function inner_function() can access the outer function’s argument, so it executes some code before or after to extend the functionality before calling the argument function. The mydecorator function returns an inner function.
mydecorator()``inner_function()``mydecorator
Now, we can use mydecorator as a decorator to apply over a function that does not take any argument, as shown below.
mydecorator
@mydecoratordef greet(): print('Hello! ', end='')@mydecorator def greet(): print('Hello! ', end='')
Now, calling the above greet() function will give the following output.
greet()
greet() #output:Hello! How are you?greet() #output:Hello! How are you?Try it
The mydecorator can be applied to any function that does not require any argument. For example:
mydecorator
@mydecoratordef dosomething():  print('I am doing something.', end='')
dosomething()  #output: I am doing something. How are you?
`@mydecorator def dosomething(): print(‘I am doing something.’, end=”)
dosomething() #output: I am doing something. How are you?`Try it The typical decorator function will look like below.
def mydecoratorfunction(some_function): # decorator function def inner_function(): # write code to extend the behavior of some_function() some_function() # call some_function # write code to extend the behavior of some_function() return inner_function # return a wrapper functiondef mydecoratorfunction(some_function): # decorator function def inner_function(): # write code to extend the behavior of some_function() some_function() # call some_function # write code to extend the behavior of some_function() return inner_function # return a wrapper function
Built-in Decorators
Section titled “Built-in Decorators”Python library contains many built-in decorators as a shortcut of defining properties, class method, static methods, etc. @property@classmethod@staticmethod Learn about the built-in decorator @property next.
Generators
Python provides a generator to create your own iterator function. A generator is a special type of function which does not return a single value, instead, it returns an iterator object with a sequence of values. In a generator function, a yield statement is used rather than a return statement. The following is a simple generator function.
iterator functionyield
def mygenerator():    print('First item')    yield 10
    print('Second item')    yield 20
    print('Last item')    yield 30
`def mygenerator(): print(‘First item’) yield 10
print('Second item')yield 20
print('Last item')yield 30`[Try it](/codeeditor?cid=python-3z8mu5pra)
In the above example, the mygenerator() function is a generator function. It uses yield instead of return keyword. So, this will return the value against the yield keyword each time it is called. However, you need to create an iterator for this function, as shown below.
mygenerator()``yield``yield
gen = mygenerator()val = next(gen) #First itemprint(val) #10
val = next(gen) #Second itemprint(val) #20
val = next(gen) #Last itemprint(val) #30
val = next(gen) #error
`gen = mygenerator() val = next(gen) #First item print(val) #10
val = next(gen) #Second item print(val) #20
val = next(gen) #Last item print(val) #30
val = next(gen) #error[Try it](/codeeditor?cid=python-) The generator function cannot include the return keyword. If you include it, then it will terminate the function. The difference between yield and return is that yield returns a value and pauses the execution while maintaining the internal states, whereas the return statement returns a value and terminates the execution of the function. returnyieldreturnyieldreturn`
The following generator function includes the return keyword.
def mygenerator():    print('First item')    yield 10
    return
    print('Second item')    yield 20
    print('Last item')    yield 30
`def mygenerator(): print(‘First item’) yield 10
return
print('Second item')yield 20
print('Last item')yield 30`
Now, execute the above function as shown below.
gen = mygenerator()gen = mygenerator()val = next(gen) #First itemprint(val) #10
val = next(gen) #error
`gen = mygenerator() gen = mygenerator() val = next(gen) #First item print(val) #10
val = next(gen) #error[Try it](/codeeditor?cid=python-3z8mukqck) As you can see, the above generator stops executing after getting the first item because the return keyword is used after yielding the first item. yield`
Using for Loop with Generator Function
Section titled “Using for Loop with Generator Function”The generator function can also use the for loop.
def get_sequence_upto(x): for i in range(x): yield idef get_sequence_upto(x): for i in range(x): yield i
As you can see above, the get_sequence_upto function uses the yield keyword. The generator is called just like a normal function. However, its execution is paused on encountering the yield keyword. This sends the first value of the iterator stream to the calling environment. However, local variables and their states are saved internally.
get_sequence_upto``yield``yield
The above generator function get_sequence_upto() can be called as below.
get_sequence_upto()
seq = get_sequence_upto(5)print(next(seq)) #0print(next(seq)) #1print(next(seq)) #2print(next(seq)) #3print(next(seq)) #4print(next(seq)) #errorseq = get_sequence_upto(5) print(next(seq)) #0 print(next(seq)) #1 print(next(seq)) #2 print(next(seq)) #3 print(next(seq)) #4 print(next(seq)) #errorTry it
The function resumes when next() is issued to the iterator object. The function finally terminates when next() encounters the StopIteration error.
next()next()``StopIteration
In the following example, function square_of_sequence() acts as a generator. It yields the square of a number successively on every call of next().
square_of_sequence()next()
def square_of_sequence(x): for i in range(x): yield i*idef square_of_sequence(x): for i in range(x): yield i*i
The following script shows how to call the above generator function.
gen=square_of_sequence(5)while True: try: print ("Received on next(): ", next(gen)) except StopIteration: breakgen=square_of_sequence(5) while True: try: print ("Received on next(): ", next(gen)) except StopIteration: breakTry it
The above script uses the try..except block to handle the StopIteration error. It will break the while loop once it catches the StopIteration error.
try..except``StopIteration``StopIteration
Received on next(): 0 Received on next(): 1 Received on next(): 4 Received on next(): 9 Received on next(): 16Received on next(): 0 Received on next(): 1 Received on next(): 4 Received on next(): 9 Received on next(): 16
We can use the for loop to traverse the elements over the generator. In this case, the next() function is called implicitly and the StopIteration is also automatically taken care of.
next()``StopIteration
squres = square_of_sequence(5)for sqr in squres: print(sqr)squres = square_of_sequence(5) for sqr in squres: print(sqr)Try it
0 1 4 9 160 1 4 9 16
One of the advantages of the generator over the iterator is that elements are generated dynamically. Since the next item is generated only after the first is consumed, it is more memory efficient than the iterator.
Generator Expression
Section titled “Generator Expression”Python also provides a generator expression, which is a shorter way of defining simple generator functions. The generator expression is an anonymous generator function. The following is a generator expression for the square_of_sequence() function.
square_of_sequence()
squre = (x*x for x in range(5))print(next(squre)) #0print(next(squre)) #1print(next(squre)) #4print(next(squre)) #9print(next(squre)) #16squre = (x*x for x in range(5)) print(next(squre)) #0 print(next(squre)) #1 print(next(squre)) #4 print(next(squre)) #9 print(next(squre)) #16Try it
In the above example, (x*x for x in range(5)) is a generator expression. The first part of an expression is the yield value and the second part is the for loop with the collection.
(x*x for x in range(5))``yield
The generator expression can also be passed in a function. It should be passed without parentheses, as shown below.
import math
val = sum(x*x for x in range(5))print(val)
`import math
val = sum(x*x for x in range(5))
print(val)[Try it](/codeeditor?cid=python-3z8mv86r9) In the above example, a generator expression is passed without parentheses into the built-in function sum. sum`
Regex
The term Regular Expression is popularly shortened as regex. A regex is a sequence of characters that defines a search pattern, used mainly for performing find and replace operations in search engines and text processors.
Regular Expression
Python offers regex capabilities through the re module bundled as a part of the standard library.
re
Raw strings
Section titled “Raw strings”Different functions in Python’s re module use raw string as an argument. A normal string, when prefixed with ‘r’ or ‘R’ becomes a raw string. string
rawstr = r'Hello! How are you?'print(rawstr) #Hello! How are you?rawstr = r'Hello! How are you?' print(rawstr) #Hello! How are you?
The difference between a normal string and a raw string is that the normal string in print() function translates escape characters (such as \n, \t etc.) if any, while those in a raw string are not.
print()\n``\t
str1 = "Hello!How are you?"print("normal string:", str1)
str2 = r"Hello!How are you?"print("raw string:",str2)
`str1 = “Hello! How are you?” print(“normal string:”, str1)
str2 = r”Hello! How are you?” print(“raw string:“,str2)`Try it
normal string: Hello! How are you? raw string: Hello!\nHow are you?normal string: Hello! How are you? raw string: Hello!\nHow are you?
In the above example, \n inside str1 (normal string) has translated as a newline being printed in the next line. But, it is printed as \n in str2 - a raw string.
\n``str1``\n``str2
meta characters
Section titled “meta characters”Some characters carry a special meaning when they appear as a part pattern matching string. In Windows or Linux DOS commands, we use * and ? - they are similar to meta characters. Python’s re module uses the following characters as meta characters:
. ^ $ * + ? [ ] \ | ( )
When a set of alpha-numeric characters are placed inside square brackets [], the target string is matched with these characters. A range of characters or individual characters can be listed in the square bracket. For example:
[]
The following specific characters carry certain specific meaning.
re.match() function
Section titled “re.match() function”This function in re module tries to find if the specified pattern is present at the beginning of the given string.
re
re.match(pattern, string)re.match(pattern, string)
The function returns None, if the given pattern is not in the beginning, and a match objects if found.
from re import match
mystr = "Welcome to TutorialsTeacher"obj1 = match("We", mystr)print(obj1)
obj2 = match("teacher", mystr)print(obj2)
print("start:", obj1.start(), "end:", obj1.end())
`from re import match
mystr = “Welcome to TutorialsTeacher” obj1 = match(“We”, mystr) print(obj1)
obj2 = match(“teacher”, mystr) print(obj2)
print(“start:”, obj1.start(), “end:”, obj1.end())[Try it](/codeeditor?cid=python-3z8wxs8qx) The match object has start and end properties. start“end`
<re.Match object; span=(0, 2), match='We'> None start: 0 end: 2<re.Match object; span=(0, 2), match='We'> None start: 0 end: 2
The following example demonstrates the use of the range of characters to find out if a string starts with ‘W’ and is followed by an alphabet.
from re import match
strings=["Welcome to TutorialsTeacher", "weather forecast","Winston Churchill", "W.G.Grace","Wonders of India", "Water park"]
for string in strings:    obj = match("W[a-z]",string)    print(obj)
`from re import match
strings=[“Welcome to TutorialsTeacher”, “weather forecast”,“Winston Churchill”, “W.G.Grace”,“Wonders of India”, “Water park”]
for string in strings: obj = match(“W[a-z]“,string) print(obj)`Try it
<re.Match object; span=(0, 2), match='We'> None <re.Match object; span=(0, 2), match='Wi'> None <re.Match object; span=(0, 2), match='Wo'> <re.Match object; span=(0, 2), match='Wa'><re.Match object; span=(0, 2), match='We'> None <re.Match object; span=(0, 2), match='Wi'> None <re.Match object; span=(0, 2), match='Wo'> <re.Match object; span=(0, 2), match='Wa'>
re.search() function
Section titled “re.search() function”The re.search() function searches for a specified pattern anywhere in the given string and stops the search on the first occurrence.
re.search()
from re import search
string = "Try to earn while you learn"
obj = search("earn", string)print(obj)print(obj.start(), obj.end(), obj.group())
`from re import search
string = “Try to earn while you learn”
obj = search(“earn”, string) print(obj) print(obj.start(), obj.end(), obj.group())`Try it
<re.Match object; span=(7, 11), match='earn'> 7 11 earn<re.Match object; span=(7, 11), match='earn'> 7 11 earn
This function also returns the Match object with start and end attributes. It also gives a group of characters of which the pattern is a part of.
Match
re.findall() Function
Section titled “re.findall() Function”As against the search() function, the findall() continues to search for the pattern till the target string is exhausted. The object returns a list of all occurrences.
search()``findall()
from re import findall
string = "Try to earn while you learn"
obj = findall("earn", string)print(obj)
`from re import findall
string = “Try to earn while you learn”
obj = findall(“earn”, string) print(obj)`Try it
['earn', 'earn']['earn', 'earn']
This function can be used to get the list of words in a sentence. We shall use \W* pattern for the purpose. We also check which of the words do not have any vowels in them.
from re import findall, search
obj = findall(r"w*", "Fly in the sky.")print(obj)
for word in obj:  obj = search(r"[aeiou]",word)  if word!='' and obj==None:    print(word)
`from re import findall, search
obj = findall(r”w*”, “Fly in the sky.”) print(obj)
for word in obj: obj = search(r”[aeiou]“,word) if word!=” and obj==None: print(word)`Try it
['Fly', '', 'in', '', 'the', '', 'sky', '', ''] Fly sky['Fly', '', 'in', '', 'the', '', 'sky', '', ''] Fly sky
re.finditer() function
Section titled “re.finditer() function”The re.finditer() function returns an iterator object of all matches in the target string. For each matched group, start and end positions can be obtained by span() attribute.
re.finditer()
from re import finditer
string = "Try to earn while you learn"it = finditer("earn", string)for match in it:    print(match.span())
`from re import finditer
string = “Try to earn while you learn” it = finditer(“earn”, string) for match in it: print(match.span())`Try it
(7, 11) (23, 27)(7, 11) (23, 27)
re.split() function
Section titled “re.split() function”The re.split() function works similar to the split() method of str object in Python. It splits the given string every time a white space is found. In the above example of the findall() to get all words, the list also contains each occurrence of white space as a word. That is eliminated by the split() function in re module.
re.split()split()str``findall()``split()``re
from re import split
string = "Flat is better than nested. Sparse is better than dense."words = split(r' ', string)print(words)
`from re import split
string = “Flat is better than nested. Sparse is better than dense.” words = split(r’ ’, string) print(words)`Try it
['Flat', 'is', 'better', 'than', 'nested.', 'Sparse', 'is', 'better', 'than', 'dense.']['Flat', 'is', 'better', 'than', 'nested.', 'Sparse', 'is', 'better', 'than', 'dense.']
re.compile() Function
Section titled “re.compile() Function”The re.compile() function returns a pattern object which can be repeatedly used in different regex functions. In the following example, a string ‘is’ is compiled to get a pattern object and is subjected to the search() method.
re.compile()``search()
from re import *
pattern = compile(r'[aeiou]')string = "Flat is better than nested. Sparse is better than dense."words = split(r' ', string)for word in words:    print(word, pattern.match(word))
`from re import *
pattern = compile(r’[aeiou]’) string = “Flat is better than nested. Sparse is better than dense.” words = split(r’ ’, string) for word in words: print(word, pattern.match(word))`Try it
Flat None is <re.Match object; span=(0, 1), match='i'> better None than None nested. None Sparse None is <re.Match object; span=(0, 1), match='i'> better None than None dense. NoneFlat None is <re.Match object; span=(0, 1), match='i'> better None than None nested. None Sparse None is <re.Match object; span=(0, 1), match='i'> better None than None dense. None
The same pattern object can be reused in searching for words having vowels, as shown below.
for word in words: print(word, pattern.search(word))for word in words: print(word, pattern.search(word))Try it
Flat <re.Match object; span=(2, 3), match='a'> is <re.Match object; span=(0, 1), match='i'> better <re.Match object; span=(1, 2), match='e'> than <re.Match object; span=(2, 3), match='a'> nested. <re.Match object; span=(1, 2), match='e'> Sparse <re.Match object; span=(2, 3), match='a'> is <re.Match object; span=(0, 1), match='i'> better <re.Match object; span=(1, 2), match='e'> than <re.Match object; span=(2, 3), match='a'> dense. <re.Match object; span=(1, 2), match='e'>Flat <re.Match object; span=(2, 3), match='a'> is <re.Match object; span=(0, 1), match='i'> better <re.Match object; span=(1, 2), match='e'> than <re.Match object; span=(2, 3), match='a'> nested. <re.Match object; span=(1, 2), match='e'> Sparse <re.Match object; span=(2, 3), match='a'> is <re.Match object; span=(0, 1), match='i'> better <re.Match object; span=(1, 2), match='e'> than <re.Match object; span=(2, 3), match='a'> dense. <re.Match object; span=(1, 2), match='e'>
Collections Module
The collections module provides alternatives to built-in container data types such as list, tuple and dict.
namedtuple()
Section titled “namedtuple()”The namedtuple() function returns a tuple-like object with named fields. These field attributes are accessible by lookup as well as by index.
namedtuple()
General usage of this function is:
collections.namedtuple(type_name, field-list)The following statement declares a student class having name, age and marks as fields.
import collections
student = collections.namedtuple('student', ['name', 'age', 'marks'])
`import collections
student = collections.namedtuple(‘student’, [‘name’, ‘age’, ‘marks’])` To create a new object of this namedtuple, do the following:
s1 = student("Imran", 21, 98)print(s1.name)print(s1.age)print(s1.marks)
print(s1[0])print(s1[1])print(s1[2])
`s1 = student(“Imran”, 21, 98) print(s1.name) print(s1.age) print(s1.marks)
print(s1[0])
print(s1[1])
print(s1[2])[Try it](/codeeditor?cid=python-3z83c3ubb) The example create an object of the student tuple and access the values of the field by using the dot notation s1.name and also using index s1[0]. students1.names1[0]`
OrderedDict()
Section titled “OrderedDict()”The OrderedDict() function is similar to a normal dictionary object in Python. However, it remembers the order of the keys in which they were first inserted.
OrderedDict()
import collections
d1 = collections.OrderedDict()d1['A'] = 65d1['C'] = 67d1['B'] = 66d1['D'] = 68
for k,v in d1.items():    print (k,v)
`import collections
d1 = collections.OrderedDict() d1[‘A’] = 65 d1[‘C’] = 67 d1[‘B’] = 66 d1[‘D’] = 68
for k,v in d1.items(): print (k,v)`Try it
A 65 C 67 B 66 D 68A 65 C 67 B 66 D 68
Upon traversing the dictionary, pairs will appear in the order of their insertion.
deque()
Section titled “deque()”A deque object support appends and pops from either ends of a list. It is more memory efficient than a normal list object. In a normal list object, the removal of any item causes all items to the right to be shifted towards left by one index. Hence, it is very slow.
import collections
q = collections.deque([10,20,30,40])q.appendleft(0)print(q)
q.append(50)print(q)
print(q.pop())print(q)
print(q.popleft())print(q)
`import collections
q = collections.deque([10,20,30,40]) q.appendleft(0) print(q)
q.append(50) print(q)
print(q.pop()) print(q)
print(q.popleft()) print(q)`Try it Learn more about the collections module in Python docs. collections module in Python docs
Learning objectives:
- Create and use decorators
- Write generator functions with yield
- Use regular expressions for text pattern matching
- Leverage specialized data structures from collections module
Project: “Log File Analyzer” — A program that reads server log files, uses regex to extract meaningful data, generators for memory-efficient processing, and decorators for logging/timing.
Module 12 — Practical Python Applications
Section titled “Module 12 — Practical Python Applications”Week 12
|-------|-------------|
Database CRUD
In this tutorial you will learn how to perform CRUD operations in Python with the SQLite database. Python has built-in support for SQLite in the form of the sqlite3 module. This module contains functions for performing persistent CRUD operations on SQLite database.
Sqlite Database
Section titled “Sqlite Database”SQLite is a self-contained transactional relational database engine that doesn’t require a server configuration, as in the case of Oracle, MySQL, etc. It is an open source and in-process library developed by D. Richard Hipp in August 2000. The entire SQLite database is contained in a single file, which can be put anywhere in the computer’s file system.
SQLite is widely used as an embedded database in mobile devices, web browsers and other stand-alone applications. In spite of being small in size, it is a fully ACID compliant database conforming to ANSI SQL standards.
SQLite is freely downloadable from the official web site https://www.sqlite.org/download.html. This page contains pre-compiled binaries for all major operating systems. A bundle of command-line tools contain command-line shell and other utilities to manage SQLite database files. https://www.sqlite.org/download.html We shall download the latest version of SQLite (version 3.25.1) along with command-line tools and extract the archive.
To create a new SQLite database, navigate from the command prompt to the folder where you have unzipped the archive and enter the following command:
It is now possible to execute any SQL query. The following statement creates a new table. (Ensure that the statement ends with a semicolon)
Add a record in the above table.
To retrieve the record, use the SELECT query as below:
Python DB-API
Section titled “Python DB-API”Python Database API is a set of standards recommended by a Special Interest Group for database module standardization. Python modules that provide database interfacing functionality with all major database products are required to adhere to this standard. DB-API standards were further modified to DB-API 2.0 by another Python Enhancement proposal (PEP-249). Python Database APIPython Enhancement proposal Standard Python distribution has in-built support for SQLite database connectivity. It contains sqlite3 module which adheres to DB-API 2.0 and is written by Gerhard Haring. Other RDBMS products also have DB-API compliant modules:
- MySQL: PyMySql module
PyMySql module- Oracle: Cx-Oracle module
Cx-Oracle module- SQL Server: PyMsSql module
PyMsSql module- PostGreSQL: psycopg2 module
psycopg2 module- ODBC: pyodbc module
pyodbc module
As per the prescribed standards, the first step in the process is to obtain the connection to the object representing the database. In order to establish a connection with a SQLite database, sqlite3 module needs to be imported and the connect() function needs to be executed.
connect()The connect() function returns a connection object referring to the existing database or a new database if it doesn’t exist.connect()The following methods are defined in the connection class:
A cursor is a Python object that enables you to work with the database. It acts as a handle for a given SQL query; it allows the retrieval of one or more rows of the result. Hence, a cursor object is obtained from the connection to execute SQL queries using the following statement:
The following methods of the cursor object are useful.
The commit() and rollback() methods of the connection class ensure transaction control. The execute() method of the cursor receives a string containing the SQL query. A string having an incorrect SQL query raises an exception, which should be properly handled. That’s why the execute() method is placed within the try block and the effect of the SQL query is persistently saved using the commit() method. If however, the SQL query fails, the resulting exception is processed by the except block and the pending transaction is undone using the rollback() method.
commit()``rollback()``execute()``execute()``commit()``rollback()
Typical use of the execute() method is as follows:
execute()
try: cur=db.cursor() cur.execute("Query") db.commit() print ("success message")except: print ("error") db.rollback()db.close()try: cur=db.cursor() cur.execute("Query") db.commit() print ("success message") except: print ("error") db.rollback() db.close()
Create a New Table
Section titled “Create a New Table”A string enclosing the CREATE TABLE query is passed as parameter to the execute() method of the cursor object. The following code creates the student table in the test.db database.
execute()
import sqlite3db=sqlite3.connect('test.db')try: cur =db.cursor() cur.execute('''CREATE TABLE student ( StudentID INTEGER PRIMARY KEY AUTOINCREMENT, name TEXT (20) NOT NULL, age INTEGER, marks REAL);''') print ('table created successfully')except: print ('error in operation') db.rollback()db.close()import sqlite3 db=sqlite3.connect('test.db') try: cur =db.cursor() cur.execute('''CREATE TABLE student ( StudentID INTEGER PRIMARY KEY AUTOINCREMENT, name TEXT (20) NOT NULL, age INTEGER, marks REAL);''') print ('table created successfully') except: print ('error in operation') db.rollback() db.close()
This can be verified using the .tables command in sqlite shell.
.tables
Insert a Record
Section titled “Insert a Record”Once again, the execute() method of the cursor object should be called with a string argument representing the INSERT query syntax. We have created a student table having three fields: name, age and marks. The string holding the INSERT query is defined as:
execute()
We have to use it as a parameter to the execute() method. To account for possible exceptions, the execute() statement is placed in the try block as explained earlier. The complete code for the inset operation is as follows:
execute()``execute()
import sqlite3db=sqlite3.connect('test.db')qry="insert into student (name, age, marks) values('Rajeev', 20, 50);"try: cur=db.cursor() cur.execute(qry) db.commit() print ("one record added successfully")except: print ("error in operation") db.rollback()db.close()import sqlite3 db=sqlite3.connect('test.db') qry="insert into student (name, age, marks) values('Rajeev', 20, 50);" try: cur=db.cursor() cur.execute(qry) db.commit() print ("one record added successfully") except: print ("error in operation") db.rollback() db.close()
You can check the result by using the SELECT query in Sqlite shell.
Using Parameters in a Query
Section titled “Using Parameters in a Query”Often, the values of Python variables need to be used in SQL operations. One way is to use Python’s string format() function to put Python data in a string. However, this may lead to SQL injection attacks to your program. Instead, use parameter substitution as recommended in Python DB-API. The ? character is used as a placeholder in the query string and provides the values in the form of a tuple in the execute() method. The following example inserts a record using the parameter substitution method:
format()``execute()
import sqlite3db=sqlite3.connect('test.db')qry="insert into student (name, age, marks) values(?,?,?);"try: cur=db.cursor() cur.execute(qry, ('Vijaya', 16,75)) db.commit() print ("one record added successfully")except: print("error in operation") db.rollback()db.close()import sqlite3 db=sqlite3.connect('test.db') qry="insert into student (name, age, marks) values(?,?,?);" try: cur=db.cursor() cur.execute(qry, ('Vijaya', 16,75)) db.commit() print ("one record added successfully") except: print("error in operation") db.rollback() db.close()
The executemany() method is used to add multiple records at once. Data to be added should be given in a list of tuples, with each tuple containing one record. The list object (containing tuples) is the parameter of the executemany() method, along with the query string.
executemany()``executemany()
import sqlite3db=sqlite3.connect('test.db')qry="insert into student (name, age, marks) values(?,?,?);"students=[('Amar', 18, 70), ('Deepak', 25, 87)]try: cur=db.cursor() cur.executemany(qry, students) db.commit() print ("records added successfully")except: print ("error in operation") db.rollback()db.close()import sqlite3 db=sqlite3.connect('test.db') qry="insert into student (name, age, marks) values(?,?,?);" students=[('Amar', 18, 70), ('Deepak', 25, 87)] try: cur=db.cursor() cur.executemany(qry, students) db.commit() print ("records added successfully") except: print ("error in operation") db.rollback() db.close()
Retrieve Records
Section titled “Retrieve Records”When the query string holds a SELECT query, the execute() method forms a result set object containing the records returned. Python DB-API defines two methods to fetch the records:
execute()1. fetchone(): Fetches the next available record from the result set. It is a tuple consisting of values of each column of the fetched record.
- fetchall(): Fetches all remaining records in the form of a list of tuples. Each tuple corresponds to one record and contains values of each column in the table.
When using the fetchone() method, use a loop to iterate through the result set, as below:
fetchone()
import sqlite3db=sqlite3.connect('test.db')sql="SELECT * from student;"cur=db.cursor()cur.execute(sql)while True: record=cur.fetchone() if record==None: break print (record)db.close()import sqlite3 db=sqlite3.connect('test.db') sql="SELECT * from student;" cur=db.cursor() cur.execute(sql) while True: record=cur.fetchone() if record==None: break print (record) db.close()
When executed, the following output is displayed in the Python shell:
(1, 'Rajeev', 20, 50.0) (2, 'Vijaya', 16, 75.0) (3, 'Amar', 18, 70.0) (4, 'Deepak', 25, 87.0)The fetchall() method returns a list of tuples, each being one record.
fetchall()
students=cur.fetchall()for rec in students:print (rec)students=cur.fetchall() for rec in students: print (rec)
Update a Record
Section titled “Update a Record”The query string in the execute() method should contain an UPDATE query syntax. To update the value of ‘age’ to 17 for ‘Amar’, define the string as below:
execute()
You can also use the substitution technique to pass the parameter to the UPDATE query.
import sqlite3db=sqlite3.connect('test.db')qry="update student set age=? where name=?;"try: cur=db.cursor() cur.execute(qry, (19,'Deepak')) db.commit() print("record updated successfully")except: print("error in operation") db.rollback()db.close()import sqlite3 db=sqlite3.connect('test.db') qry="update student set age=? where name=?;" try: cur=db.cursor() cur.execute(qry, (19,'Deepak')) db.commit() print("record updated successfully") except: print("error in operation") db.rollback() db.close()
Delete a Record
Section titled “Delete a Record”The query string should contain the DELETE query syntax. For example, the below code is used to delete ‘Bill’ from the student table.
You can use the ? character for parameter substitution.
import sqlite3db=sqlite3.connect('test.db')qry="DELETE from student where name=?;"try: cur=db.cursor() cur.execute(qry, ('Bill',)) db.commit() print("record deleted successfully")except: print("error in operation") db.rollback()db.close()import sqlite3 db=sqlite3.connect('test.db') qry="DELETE from student where name=?;" try: cur=db.cursor() cur.execute(qry, ('Bill',)) db.commit() print("record deleted successfully") except: print("error in operation") db.rollback() db.close()
Tkinter GUI
Modern computer applications are user-friendly. User interaction is not restricted to console-based I/O. They have a more ergonomic graphical user interface (GUI) thanks to high speed processors and powerful graphics hardware. These applications can receive inputs through mouse clicks and can enable the user to choose from alternatives with the help of radio buttons, dropdown lists, and other GUI elements (or widgets).
Such applications are developed using one of various graphics libraries available. A graphics library is a software toolkit having a collection of classes that define a functionality of various GUI elements. These graphics libraries are generally written in C/C++. Many of them have been ported to Python in the form of importable modules. Some of them are listed below:
Tkinter is the Python port for Tcl-Tk GUI toolkit developed by Fredrik Lundh. This module is bundled with standard distributions of Python for all platforms.
PyQtis, the Python interface to Qt, is a very popular cross-platform GUI framework. PyQtis PyGTK is the module that ports Python to another popular GUI widget toolkit called GTK. PyGTK WxPython is a Python wrapper around WxWidgets, another cross-platform graphics library. WxPython This tutorial explains the use of Tkinter in developing GUI-based Python programs.
Basic GUI Application
Section titled “Basic GUI Application”GUI elements and their functionality are defined in the Tkinter module. The following code demonstrates the steps in creating a UI.
from tkinter import *window=Tk()# add widgets here
window.title('Hello Python')window.geometry("300x200+10+20")window.mainloop()
`from tkinter import * window=Tk()
add widgets here
Section titled “add widgets here”window.title(‘Hello Python’)
window.geometry(“300x200+10+20”)
window.mainloop()First of all, import the TKinter module. After importing, setup the application object by calling the Tk() function. This will create a top-level window (root) having a frame with a title bar, control box with the minimize and close buttons, and a client area to hold other widgets. The geometry() method defines the width, height and coordinates of the top left corner of the frame as below (all values are in pixels): window.geometry("widthxheight+XPOS+YPOS")The application object then enters an event listening loop by calling the mainloop() method. The application is now constantly waiting for any event generated on the elements in it. The event could be text entered in a text field, a selection made from the dropdown or radio button, single/double click actions of mouse, etc. The application's functionality involves executing appropriate callback functions in response to a particular type of event. We shall discuss event handling later in this tutorial. The event loop will terminate as and when the close button on the title bar is clicked. The above code will create the following window:Tk()geometry()window.geometry(“widthxheight+XPOS+YPOS”)“mainloop()`
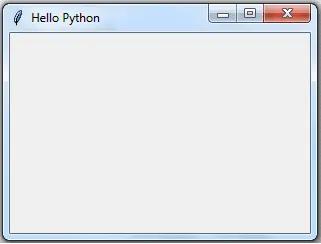
All Tkinter widget classes are inherited from the Widget class. Let’s add the most commonly used widgets.
Button
Section titled “Button”The button can be created using the Button class. The Button class constructor requires a reference to the main window and to the options.
Signature: Button(window, attributes)
Button(window, attributes)
You can set the following important properties to customize a button:
- text : caption of the button
- bg : background colour
- fg : foreground colour
- font : font name and size
- image : to be displayed instead of text
- command : function to be called when clicked
from tkinter import *window=Tk()btn=Button(window, text="This is Button widget", fg='blue')btn.place(x=80, y=100)window.title('Hello Python')window.geometry("300x200+10+10")window.mainloop()from tkinter import * window=Tk() btn=Button(window, text="This is Button widget", fg='blue') btn.place(x=80, y=100) window.title('Hello Python') window.geometry("300x200+10+10") window.mainloop()
A label can be created in the UI in Python using the Label class. The Label constructor requires the top-level window object and options parameters. Option parameters are similar to the Button object.
The following adds a label in the window.
from tkinter import *window=Tk()lbl=Label(window, text="This is Label widget", fg='red', font=("Helvetica", 16))lbl.place(x=60, y=50)window.title('Hello Python')window.geometry("300x200+10+10")window.mainloop()from tkinter import * window=Tk() lbl=Label(window, text="This is Label widget", fg='red', font=("Helvetica", 16)) lbl.place(x=60, y=50) window.title('Hello Python') window.geometry("300x200+10+10") window.mainloop()
Here, the label’s caption will be displayed in red colour using Helvetica font of 16 point size.
This widget renders a single-line text box for accepting the user input. For multi-line text input use the Text widget. Apart from the properties already mentioned, the Entry class constructor accepts the following:
- bd : border size of the text box; default is 2 pixels.
- show : to convert the text box into a password field, set show property to ”*”.
The following code adds the text field.
txtfld=Entry(window, text=“This is Entry Widget”, bg=‘black’,fg=‘white’, bd=5)
txtfld=Entry(window, text="This is Entry Widget", bg='black',fg='white', bd=5)
The following example creates a window with a button, label and entry field.
from tkinter import *window=Tk()btn=Button(window, text="This is Button widget", fg='blue')btn.place(x=80, y=100)lbl=Label(window, text="This is Label widget", fg='red', font=("Helvetica", 16))lbl.place(x=60, y=50)txtfld=Entry(window, text="This is Entry Widget", bd=5)txtfld.place(x=80, y=150)window.title('Hello Python')window.geometry("300x200+10+10")window.mainloop()from tkinter import * window=Tk() btn=Button(window, text="This is Button widget", fg='blue') btn.place(x=80, y=100) lbl=Label(window, text="This is Label widget", fg='red', font=("Helvetica", 16)) lbl.place(x=60, y=50) txtfld=Entry(window, text="This is Entry Widget", bd=5) txtfld.place(x=80, y=150) window.title('Hello Python') window.geometry("300x200+10+10") window.mainloop()
The above example will create the following window.
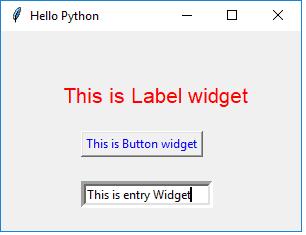
Selection Widgets
Section titled “Selection Widgets”Radiobutton: This widget displays a toggle button having an ON/OFF state. There may be more than one button, but only one of them will be ON at a given time.
Checkbutton: This is also a toggle button. A rectangular check box appears before its caption. Its ON state is displayed by the tick mark in the box which disappears when it is clicked to OFF.
Combobox: This class is defined in the ttk module of tkinterpackage. It populates drop down data from a collection data type, such as a tuple or a list as values parameter.
Listbox: Unlike Combobox, this widget displays the entire collection of string items. The user can select one or multiple items.
The following example demonstrates the window with the selection widgets: Radiobutton, Checkbutton, Listbox and Combobox:
from tkinter import *from tkinter.ttk import Comboboxwindow=Tk()var = StringVar()var.set("one")data=("one", "two", "three", "four")cb=Combobox(window, values=data)cb.place(x=60, y=150)
lb=Listbox(window, height=5, selectmode='multiple')for num in data:    lb.insert(END,num)lb.place(x=250, y=150)
v0=IntVar()v0.set(1)r1=Radiobutton(window, text="male", variable=v0,value=1)r2=Radiobutton(window, text="female", variable=v0,value=2)r1.place(x=100,y=50)r2.place(x=180, y=50)
v1 = IntVar()v2 = IntVar()C1 = Checkbutton(window, text = "Cricket", variable = v1)C2 = Checkbutton(window, text = "Tennis", variable = v2)C1.place(x=100, y=100)C2.place(x=180, y=100)
window.title('Hello Python')window.geometry("400x300+10+10")window.mainloop()
`from tkinter import * from tkinter.ttk import Combobox window=Tk() var = StringVar() var.set(“one”) data=(“one”, “two”, “three”, “four”) cb=Combobox(window, values=data) cb.place(x=60, y=150)
lb=Listbox(window, height=5, selectmode=‘multiple’) for num in data: lb.insert(END,num) lb.place(x=250, y=150)
v0=IntVar() v0.set(1) r1=Radiobutton(window, text=“male”, variable=v0,value=1) r2=Radiobutton(window, text=“female”, variable=v0,value=2) r1.place(x=100,y=50) r2.place(x=180, y=50)
v1 = IntVar() v2 = IntVar() C1 = Checkbutton(window, text = “Cricket”, variable = v1) C2 = Checkbutton(window, text = “Tennis”, variable = v2) C1.place(x=100, y=100) C2.place(x=180, y=100)
window.title(‘Hello Python’)
window.geometry(“400x300+10+10”)
window.mainloop()`
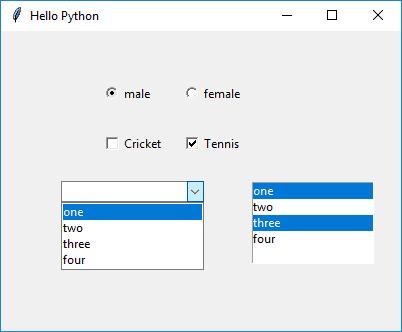
Event Handling
Section titled “Event Handling”An event is a notification received by the application object from various GUI widgets as a result of user interaction. The Application object is always anticipating events as it runs an event listening loop. User’s actions include mouse button click or double click, keyboard key pressed while control is inside the text box, certain element gains or goes out of focus etc.
Events are expressed as strings in
Many events are represented just as qualifier. The type defines the class of the event.
The following table shows how the Tkinter recognizes different events:
An event should be registered with one or more GUI widgets in the application. If it’s not, it will be ignored. In Tkinter, there are two ways to register an event with a widget. First way is by using the bind() method and the second way is by using the command parameter in the widget constructor.
bind()
Bind() Method
Section titled “Bind() Method”The bind() method associates an event to a callback function so that, when the even occurs, the function is called.
bind()
Widget.bind(event, callback)For example, to invoke the MyButtonClicked() function on left button click, use the following code:
MyButtonClicked()
from tkinter import *window=Tk()btn = Button(window, text='OK')btn.bind('<Button-1>', MyButtonClicked)from tkinter import * window=Tk() btn = Button(window, text='OK') btn.bind('<Button-1>', MyButtonClicked)
The event object is characterized by many properties such as source widget, position coordinates, mouse button number and event type. These can be passed to the callback function if required.
Command Parameter
Section titled “Command Parameter”Each widget primarily responds to a particular type. For example, Button is a source of the Button event. So, it is by default bound to it. Constructor methods of many widget classes have an optional parameter called command. This command parameter is set to callback the function which will be invoked whenever its bound event occurs. This method is more convenient than the bind() method.
bind()
btn = Button(window, text=‘OK’, command=myEventHandlerFunction)
btn = Button(window, text='OK', command=myEventHandlerFunction)
In the example given below, the application window has two text input fields and another one to display the result. There are two button objects with the captions Add and Subtract. The user is expected to enter the number in the two Entry widgets. Their addition or subtraction is displayed in the third.
The first button (Add) is configured using the command parameter. Its value is the add() method in the class. The second button uses the bind() method to register the left button click with the sub() method. Both methods read the contents of the text fields by the get() method of the Entry widget, parse to numbers, perform the addition/subtraction and display the result in third text field using the insert() method.
add()``bind()``sub()``get()``insert()
from tkinter import *class MyWindow:    def __init__(self, win):        self.lbl1=Label(win, text='First number')        self.lbl2=Label(win, text='Second number')        self.lbl3=Label(win, text='Result')        self.t1=Entry(bd=3)        self.t2=Entry()        self.t3=Entry()        self.btn1 = Button(win, text='Add')        self.btn2=Button(win, text='Subtract')        self.lbl1.place(x=100, y=50)        self.t1.place(x=200, y=50)        self.lbl2.place(x=100, y=100)        self.t2.place(x=200, y=100)        self.b1=Button(win, text='Add', command=self.add)        self.b2=Button(win, text='Subtract')        self.b2.bind('<Button-1>', self.sub)        self.b1.place(x=100, y=150)        self.b2.place(x=200, y=150)        self.lbl3.place(x=100, y=200)        self.t3.place(x=200, y=200)    def add(self):        self.t3.delete(0, 'end')        num1=int(self.t1.get())        num2=int(self.t2.get())        result=num1+num2        self.t3.insert(END, str(result))    def sub(self, event):        self.t3.delete(0, 'end')        num1=int(self.t1.get())        num2=int(self.t2.get())        result=num1-num2        self.t3.insert(END, str(result))
window=Tk()mywin=MyWindow(window)window.title('Hello Python')window.geometry("400x300+10+10")window.mainloop()
`from tkinter import *
class MyWindow:
def init(self, win):
self.lbl1=Label(win, text=‘First number’)
self.lbl2=Label(win, text=‘Second number’)
self.lbl3=Label(win, text=‘Result’)
self.t1=Entry(bd=3)
self.t2=Entry()
self.t3=Entry()
self.btn1 = Button(win, text=‘Add’)
self.btn2=Button(win, text=‘Subtract’)
self.lbl1.place(x=100, y=50)
self.t1.place(x=200, y=50)
self.lbl2.place(x=100, y=100)
self.t2.place(x=200, y=100)
self.b1=Button(win, text=‘Add’, command=self.add)
self.b2=Button(win, text=‘Subtract’)
self.b2.bind('
window=Tk() mywin=MyWindow(window) window.title(‘Hello Python’) window.geometry(“400x300+10+10”) window.mainloop()` The above example creates the following UI.
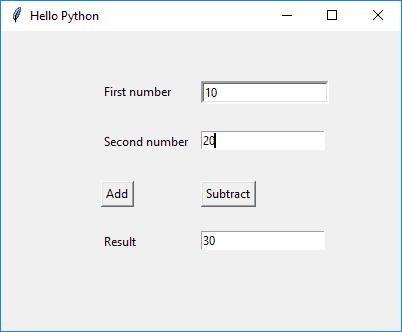
Thus, you can create the UI using TKinter in Python.
OS Module
It is possible to automatically perform many operating system tasks. The OS module in Python provides functions for creating and removing a directory (folder), fetching its contents, changing and identifying the current directory, etc.
You first need to import the os module to interact with the underlying operating system. So, import it using the import os statement before using its functions.
os``import os
Getting Current Working Directory
Section titled “Getting Current Working Directory”The getcwd() function confirms returns the current working directory.
getcwd()
import os
print(os.getcwd())  #output: 'C:\Python37'
`import os
print(os.getcwd()) #output: ‘C:\Python37’`
Creating a Directory
Section titled “Creating a Directory”We can create a new directory using the os.mkdir() function, as shown below.
os.mkdir()
import os
os.mkdir("C:MyPythonProject")`import os
os.mkdir(“C:MyPythonProject”)A new directory corresponding to the path in the string argument of the function will be created. If you open the C:\ drive, then you will see the MyPythonProject folder has been created.C:`MyPythonProject
By default, if you don’t specify the whole path in the mkdir() function, it will create the specified directory in the current working directory or drive. The following will create MyPythonProject in the C:\Python37 directory.
mkdir()``MyPythonProject``C:\Python37
import os
print(os.getcwd()) #output: 'C:Python37'os.mkdir("MyPythonProject")`import os
print(os.getcwd()) #output: ‘C:Python37’ os.mkdir(“MyPythonProject”)`
Changing the Current Working Directory
Section titled “Changing the Current Working Directory”We must first change the current working directory to a newly created one before doing any operations in it. This is done using the chdir() function. The following change current working directory to C:\MyPythonProject.
chdir()``C:\MyPythonProject
import os
os.chdir("C:MyPythonProject") # changing current workign directoryprint(os.getcwd()) #output: 'C:MyPythonProject'`import os
os.chdir(“C:MyPythonProject”) # changing current workign directory
print(os.getcwd()) #output: ‘C:MyPythonProject’You can change the current working directory to a drive. The following makes the C:\ drive as the current working directory.C:`
os.chdir("C:\")print(os.getcwd()) #output: 'C:\'os.chdir("C:\") print(os.getcwd()) #output: 'C:\'
In order to set the current directory to the parent directory use ”..” as the argument in the chdir() function.
".."``chdir()
os.chdir("C:\MyPythonProject")
print(os.getcwd()) #output: 'C:\MyPythonProject'os.chdir("..")print(os.getcwd()) #output: 'C:\'`os.chdir(“C:\MyPythonProject”)
print(os.getcwd()) #output: ‘C:\MyPythonProject’ os.chdir(”..”) print(os.getcwd()) #output: ‘C:‘`
Removing a Directory
Section titled “Removing a Directory”The rmdir() function in the OS module removes the specified directory either with an absolute or relative path. Note that, for a directory to be removed, it should be empty.
rmdir()
import os
os.rmdir("C:\MyPythonProject")`import os
os.rmdir(“C:\MyPythonProject”)` However, you can not remove the current working directory. To remove it, you must change the current working directory, as shown below.
import os
print(os.getcwd()) #output: 'C:\MyPythonProject'
os.rmdir("C:\MyPythonProject") #PermissionError: [WinError 32] The process cannot access the file because it is being used by another processos.chdir("..")os.rmdir("MyPythonProject")`import os
print(os.getcwd()) #output: ‘C:\MyPythonProject’
os.rmdir(“C:\MyPythonProject”) #PermissionError: [WinError 32] The process cannot access the file because it is being used by another process
os.chdir(”..”)
os.rmdir(“MyPythonProject”)Above, the MyPythonProject will not be removed because it is the current directory. We changed the current working directory to the parent directory using os.chdir("..") and then remove it using the rmdir() function.MyPythonProjectos.chdir("..")rmdir()`
List Files and Sub-directories
Section titled “List Files and Sub-directories”The listdir() function returns the list of all files and directories in the specified directory.
listdir()
import os
print(os.listdir("c:python37"))`import os
print(os.listdir(“c:python37”))` If we don’t specify any directory, then list of files and directories in the current working directory will be returned.
import os
print(os.listdir()) #output: ['.config', '.dotnet', 'python']`import os
print(os.listdir()) #output: [‘.config’, ‘.dotnet’, ‘python’]` Learn more about OS modules in Python docs. OS modules in Python docs
Sys Module
The sys module provides functions and variables used to manipulate different parts of the Python runtime environment. You will learn some of the important features of this module here.
sys.argv
Section titled “sys.argv”sys.argv returns a list of command line arguments passed to a Python script. The item at index 0 in this list is always the name of the script. The rest of the arguments are stored at the subsequent indices.
sys.argv
Here is a Python script (test.py) consuming two arguments from the command line.
import sys
print("You entered: ",sys.argv[1], sys.argv[2], sys.argv[3])`import sys
print(“You entered: “,sys.argv[1], sys.argv[2], sys.argv[3])` This script is executed from command line as follows:
Above, sys.argv[1] contains the first argument ‘Python’, sys.argv[2] contains the second argument ‘Python’, and sys.argv[3] contains the third argument ‘Java’.sys.argv[0] contains the script file name test.py.
sys.argv[1]``sys.argv[2]``sys.argv[3]``sys.argv[0]``test.py
sys.exit
Section titled “sys.exit”This causes the script to exit back to either the Python console or the command prompt. This is generally used to safely exit from the program in case of generation of an exception.
sys.maxsize
Section titled “sys.maxsize”Returns the largest integer a variable can take.
import sys
print(sys.maxsize) #output: 9223372036854775807`import sys
print(sys.maxsize) #output: 9223372036854775807`Try it
sys.path
Section titled “sys.path”This is an environment variable that is a search path for all Python modules.
import sys
print(sys.path)`import sys
print(sys.path)`Try it
sys.version
Section titled “sys.version”This attribute displays a string containing the version number of the current Python interpreter.
import sys
print(sys.version)`import sys
print(sys.version)`Try it Learn more about the sys module in Python docs. sys module in Python docs
Learning objectives:
- Perform CRUD operations on SQLite databases
- Build a simple GUI application with Tkinter
- Interact with the operating system using os module
- Handle command-line arguments with sys module
Project: “Notes App with GUI & Database” — A Tkinter-based notes application with SQLite backend for persistent storage, allowing add, edit, delete, and search operations.
Module 13 — Python Ecosystem & Best Practices
Section titled “Module 13 — Python Ecosystem & Best Practices”Week 13
|-------|-------------|
Python Built-in Modules
The Python interactive shell has a number of built-in functions. They are loaded automatically as a shell starts and are always available, such as print() and input() for I/O, number conversion functions int(), float(), complex(), data type conversions list(), tuple(), set(), etc. Python interactive shellprint()input()int()float()complex()list()tuple()set() In addition to built-in functions, a large number of pre-defined functions are also available as a part of libraries bundled with Python distributions. These functions are defined in modules are called built-in modules. modules Built-in modules are written in C and integrated with the Python shell. Each built-in module contains resources for certain system-specific functionalities such as OS management, disk IO, etc. The standard library also contains many Python scripts (with the .py extension) containing useful utilities.
To display a list of all available modules, use the following command in the Python console:
>>> help('modules')
IPython _weakrefset heapq secrets__future__ _winapi hmac select_abc abc html selectors_ast aifc http setuptools_asyncio antigravity idlelib shelve_bisect argparse imaplib shlex_blake2 array imghdr shutil_bootlocale ast imp signal_bz2 asynchat importlib simplegeneric_codecs asyncio ind site_codecs_cn asyncore inspect six_codecs_hk atexit io smtpd_codecs_iso2022 audioop ipaddress smtplib_codecs_jp autoreload ipython_genutils sndhdr_codecs_kr backcall itertools socket_codecs_tw base64 jedi socketserver_collections bdb json sqlite3_collections_abc binascii keyword sre_compile_compat_pickle binhex lib2to3 sre_constants_compression bisect linecache sre_parse_contextvars builtins locale ssl_csv bz2 logging stat_ctypes cProfile lzma statistics_ctypes_test calendar macpath storemagic_datetime cgi mailbox string_decimal cgitb mailcap stringprep_distutils_findvs chunk marshal struct_dummy_thread cmath math subprocess_elementtree cmd mimetypes sunau_functools code mmap symbol_hashlib codecs modulefinder sympyprinting_heapq codeop msilib symtable_imp collections msvcrt sys_io colorama multiprocessing sysconfig_json colorsys netrc tabnanny_locale compileall nntplib tarfile_lsprof concurrent nt telnetlib_lzma configparser ntpath tempfile_markupbase contextlib nturl2path test_md5 contextvars numbers tests_msi copy opcode textwrap_multibytecodec copyreg operator this_multiprocessing crypt optparse threading_opcode csv os time_operator ctypes parser timeit_osx_support curses parso tkinter_overlapped cythonmagic pathlib token_pickle dataclasses pdb tokenize_py_abc datetime pickle trace_pydecimal dbm pickleshare traceback_pyio decimal pickletools tracemalloc_queue decorator pip traitlets_random difflib pipes tty_sha1 dis pkg_resources turtle_sha256 distutils pkgutil turtledemo_sha3 doctest platform types_sha512 dummy_threading plistlib typing_signal easy_install poplib unicodedata_sitebuiltins email posixpath unittest_socket encodings pprint urllib_sqlite3 ensurepip profile uu_sre enum prompt_toolkit uuid_ssl errno pstats venv_stat faulthandler pty warnings_string filecmp py_compile wave_strptime fileinput pyclbr wcwidth_struct fnmatch pydoc weakref_symtable formatter pydoc_data webbrowser_testbuffer fractions pyexpat winreg_testcapi ftplib pygments winsound_testconsole functools queue wsgiref_testimportmultiple gc quopri xdrlib_testmultiphase genericpath random xml_thread getopt re xmlrpc_threading_local getpass reprlib xxsubtype_tkinter gettext rlcompleter zipapp_tracemalloc glob rmagic zipfile_warnings gzip runpy zipimport_weakref hashlib sched zlib
Enter any module name to get more help. Or, type "modules spam" to searchfor modules whose name or summary contain the string "spam".`>>> help(‘modules’)
IPython _weakrefset heapq secrets future _winapi hmac select _abc abc html selectors _ast aifc http setuptools _asyncio antigravity idlelib shelve _bisect argparse imaplib shlex _blake2 array imghdr shutil _bootlocale ast imp signal _bz2 asynchat importlib simplegeneric _codecs asyncio ind site _codecs_cn asyncore inspect six _codecs_hk atexit io smtpd _codecs_iso2022 audioop ipaddress smtplib _codecs_jp autoreload ipython_genutils sndhdr _codecs_kr backcall itertools socket _codecs_tw base64 jedi socketserver _collections bdb json sqlite3 _collections_abc binascii keyword sre_compile _compat_pickle binhex lib2to3 sre_constants _compression bisect linecache sre_parse _contextvars builtins locale ssl _csv bz2 logging stat _ctypes cProfile lzma statistics _ctypes_test calendar macpath storemagic _datetime cgi mailbox string _decimal cgitb mailcap stringprep _distutils_findvs chunk marshal struct _dummy_thread cmath math subprocess _elementtree cmd mimetypes sunau _functools code mmap symbol _hashlib codecs modulefinder sympyprinting _heapq codeop msilib symtable _imp collections msvcrt sys _io colorama multiprocessing sysconfig _json colorsys netrc tabnanny _locale compileall nntplib tarfile _lsprof concurrent nt telnetlib _lzma configparser ntpath tempfile _markupbase contextlib nturl2path test _md5 contextvars numbers tests _msi copy opcode textwrap _multibytecodec copyreg operator this _multiprocessing crypt optparse threading _opcode csv os time _operator ctypes parser timeit _osx_support curses parso tkinter _overlapped cythonmagic pathlib token _pickle dataclasses pdb tokenize _py_abc datetime pickle trace _pydecimal dbm pickleshare traceback _pyio decimal pickletools tracemalloc _queue decorator pip traitlets _random difflib pipes tty _sha1 dis pkg_resources turtle _sha256 distutils pkgutil turtledemo _sha3 doctest platform types _sha512 dummy_threading plistlib typing _signal easy_install poplib unicodedata _sitebuiltins email posixpath unittest _socket encodings pprint urllib _sqlite3 ensurepip profile uu _sre enum prompt_toolkit uuid _ssl errno pstats venv _stat faulthandler pty warnings _string filecmp py_compile wave _strptime fileinput pyclbr wcwidth _struct fnmatch pydoc weakref _symtable formatter pydoc_data webbrowser _testbuffer fractions pyexpat winreg _testcapi ftplib pygments winsound _testconsole functools queue wsgiref _testimportmultiple gc quopri xdrlib _testmultiphase genericpath random xml _thread getopt re xmlrpc _threading_local getpass reprlib xxsubtype _tkinter gettext rlcompleter zipapp _tracemalloc glob rmagic zipfile _warnings gzip runpy zipimport _weakref hashlib sched zlib
Enter any module name to get more help. Or, type “modules spam” to search for modules whose name or summary contain the string “spam”.` Learn about some of the frequently used built-in modules in the next few chapters.
OS Module (deep dive)
It is possible to automatically perform many operating system tasks. The OS module in Python provides functions for creating and removing a directory (folder), fetching its contents, changing and identifying the current directory, etc.
You first need to import the os module to interact with the underlying operating system. So, import it using the import os statement before using its functions.
os``import os
Getting Current Working Directory
Section titled “Getting Current Working Directory”The getcwd() function confirms returns the current working directory.
getcwd()
import os
print(os.getcwd()) #output: 'C:\Python37'`import os
print(os.getcwd()) #output: ‘C:\Python37’`
Creating a Directory
Section titled “Creating a Directory”We can create a new directory using the os.mkdir() function, as shown below.
os.mkdir()
import os
os.mkdir("C:MyPythonProject")`import os
os.mkdir(“C:MyPythonProject”)A new directory corresponding to the path in the string argument of the function will be created. If you open the C:\ drive, then you will see the MyPythonProject folder has been created.C:`MyPythonProject
By default, if you don’t specify the whole path in the mkdir() function, it will create the specified directory in the current working directory or drive. The following will create MyPythonProject in the C:\Python37 directory.
mkdir()``MyPythonProject``C:\Python37
import os
print(os.getcwd()) #output: 'C:Python37'os.mkdir("MyPythonProject")`import os
print(os.getcwd()) #output: ‘C:Python37’ os.mkdir(“MyPythonProject”)`
Changing the Current Working Directory
Section titled “Changing the Current Working Directory”We must first change the current working directory to a newly created one before doing any operations in it. This is done using the chdir() function. The following change current working directory to C:\MyPythonProject.
chdir()``C:\MyPythonProject
import os
os.chdir("C:MyPythonProject") # changing current workign directoryprint(os.getcwd()) #output: 'C:MyPythonProject'`import os
os.chdir(“C:MyPythonProject”) # changing current workign directory
print(os.getcwd()) #output: ‘C:MyPythonProject’You can change the current working directory to a drive. The following makes the C:\ drive as the current working directory.C:`
os.chdir("C:\")print(os.getcwd()) #output: 'C:\'os.chdir("C:\") print(os.getcwd()) #output: 'C:\'
In order to set the current directory to the parent directory use ”..” as the argument in the chdir() function.
".."``chdir()
os.chdir("C:\MyPythonProject")
print(os.getcwd()) #output: 'C:\MyPythonProject'os.chdir("..")print(os.getcwd()) #output: 'C:\'`os.chdir(“C:\MyPythonProject”)
print(os.getcwd()) #output: ‘C:\MyPythonProject’ os.chdir(”..”) print(os.getcwd()) #output: ‘C:‘`
Removing a Directory
Section titled “Removing a Directory”The rmdir() function in the OS module removes the specified directory either with an absolute or relative path. Note that, for a directory to be removed, it should be empty.
rmdir()
import os
os.rmdir("C:\MyPythonProject")`import os
os.rmdir(“C:\MyPythonProject”)` However, you can not remove the current working directory. To remove it, you must change the current working directory, as shown below.
import os
print(os.getcwd()) #output: 'C:\MyPythonProject'
os.rmdir("C:\MyPythonProject") #PermissionError: [WinError 32] The process cannot access the file because it is being used by another processos.chdir("..")os.rmdir("MyPythonProject")`import os
print(os.getcwd()) #output: ‘C:\MyPythonProject’
os.rmdir(“C:\MyPythonProject”) #PermissionError: [WinError 32] The process cannot access the file because it is being used by another process
os.chdir(”..”)
os.rmdir(“MyPythonProject”)Above, the MyPythonProject will not be removed because it is the current directory. We changed the current working directory to the parent directory using os.chdir("..") and then remove it using the rmdir() function.MyPythonProjectos.chdir("..")rmdir()`
List Files and Sub-directories
Section titled “List Files and Sub-directories”The listdir() function returns the list of all files and directories in the specified directory.
listdir()
import os
print(os.listdir("c:python37"))`import os
print(os.listdir(“c:python37”))` If we don’t specify any directory, then list of files and directories in the current working directory will be returned.
import os
print(os.listdir()) #output: ['.config', '.dotnet', 'python']`import os
print(os.listdir()) #output: [‘.config’, ‘.dotnet’, ‘python’]` Learn more about OS modules in Python docs. OS modules in Python docs
Sys Module (deep dive)
The sys module provides functions and variables used to manipulate different parts of the Python runtime environment. You will learn some of the important features of this module here.
sys.argv
Section titled “sys.argv”sys.argv returns a list of command line arguments passed to a Python script. The item at index 0 in this list is always the name of the script. The rest of the arguments are stored at the subsequent indices.
sys.argv
Here is a Python script (test.py) consuming two arguments from the command line.
import sys
print("You entered: ",sys.argv[1], sys.argv[2], sys.argv[3])`import sys
print(“You entered: “,sys.argv[1], sys.argv[2], sys.argv[3])` This script is executed from command line as follows:
Above, sys.argv[1] contains the first argument ‘Python’, sys.argv[2] contains the second argument ‘Python’, and sys.argv[3] contains the third argument ‘Java’.sys.argv[0] contains the script file name test.py.
sys.argv[1]``sys.argv[2]``sys.argv[3]``sys.argv[0]``test.py
sys.exit
Section titled “sys.exit”This causes the script to exit back to either the Python console or the command prompt. This is generally used to safely exit from the program in case of generation of an exception.
sys.maxsize
Section titled “sys.maxsize”Returns the largest integer a variable can take.
import sys
print(sys.maxsize) #output: 9223372036854775807`import sys
print(sys.maxsize) #output: 9223372036854775807`Try it
sys.path
Section titled “sys.path”This is an environment variable that is a search path for all Python modules.
import sys
print(sys.path)`import sys
print(sys.path)`Try it
sys.version
Section titled “sys.version”This attribute displays a string containing the version number of the current Python interpreter.
import sys
print(sys.version)`import sys
print(sys.version)`Try it Learn more about the sys module in Python docs. sys module in Python docs
Python IDEs
There are many free and commercial IDEs available for Python. Here, we will learn how to use some open-source editors to execute Python scripts or statements.
Jupyter Notebook
Section titled “Jupyter Notebook”The Jupyter Notebook is a browser-based graphical interface to the IPython shell. It allows the user to include formatted text, static and dynamic visualizations, mathematical equations, JavaScript widgets, etc. along with the Python code. The Jupyter Notebook document can be exported to PDF, Python script, or HTML.
By default, the IPython kernel drives the Jupyter Notebook application. However, it supports other languages like Julia and R. (Jupyter stands for JUlia, PYThon, and R).
To install Jupyter, use the pip utility shipped with Python software.
After successful installation, we can start the Jupyter editor from the command prompt as below.
Jupyter Notebook is a client-server application. The server is deployed on the localhost’s default port 8888 and the client is opened in a browser window, as shown below:
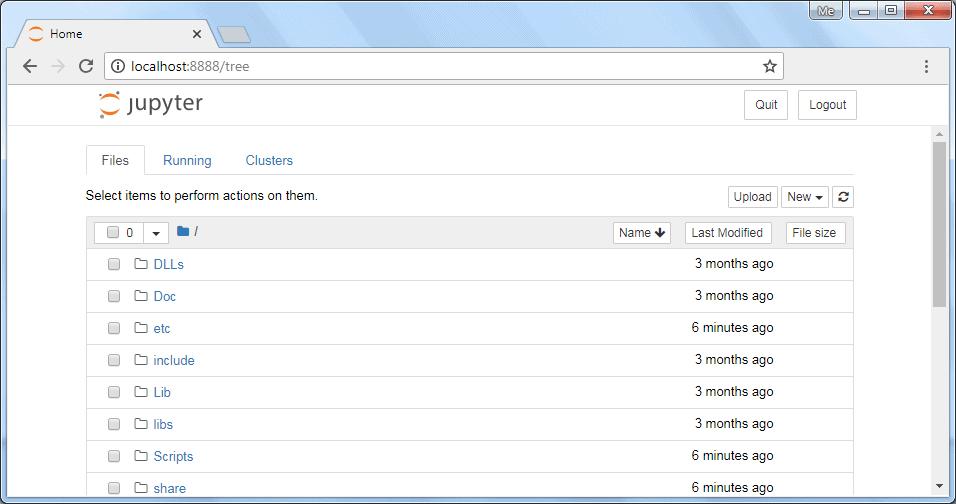
As you can see, Jupyter will display files and folders from the Python installation folder. You can create, open, and execute python scripts from the appropriate folders. Start a new notebook by choosing Python 3 from the “new” dropdown, as shown below:
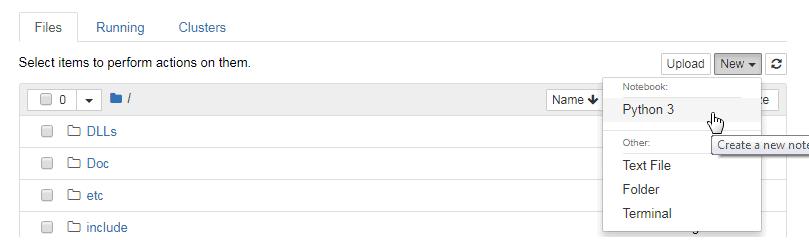
This will open another window to enter python statements and run them as shown below.
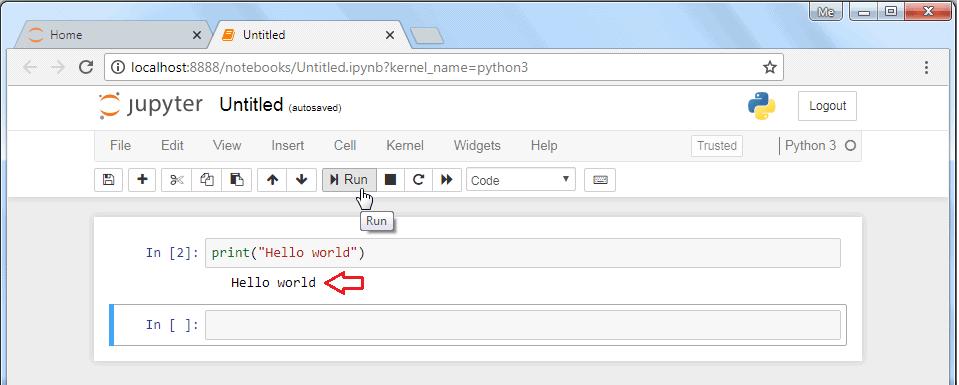
The interface is similar to IPython shell. However, there are a lot of other advantages.
For instance, you can insert and delete cells. A cell can contain code, heading, or a markdown text, which acts as documentation. The code in any cell can be run. Another advantage is that data visualizations generated by libraries like Matplotlib can be incorporated inline.
The notebook is saved with the .ipynb extension. It can be exported to HTML or PDF format so that it can be shared.
.ipynb
Visual Studio Code
Section titled “Visual Studio Code”Visual Studio Code is an open-source IDE to develop different types of applications on Windows, Mac, and Linux platform. You can develop Python 3 applications by installing Python extension for VS Code from the Visual Studio Marketplace. Visual Studio CodePython extension for VS Code
Online Python Shell
Section titled “Online Python Shell”Installing Python (or any software) can be a little daunting for a newbie. Fortunately there are many online resources to get familiar with the syntax, features and philosophy of Python before deciding to install Python in the local machine.
You can launch an online Python Shell directly from the official website - https://www.python.org/shell. The Shell terminal shows a Python prompt >>> in front of which any valid Python expression can be written, which is executed on pressing ‘Enter’.
https://www.python.org/shell>>>
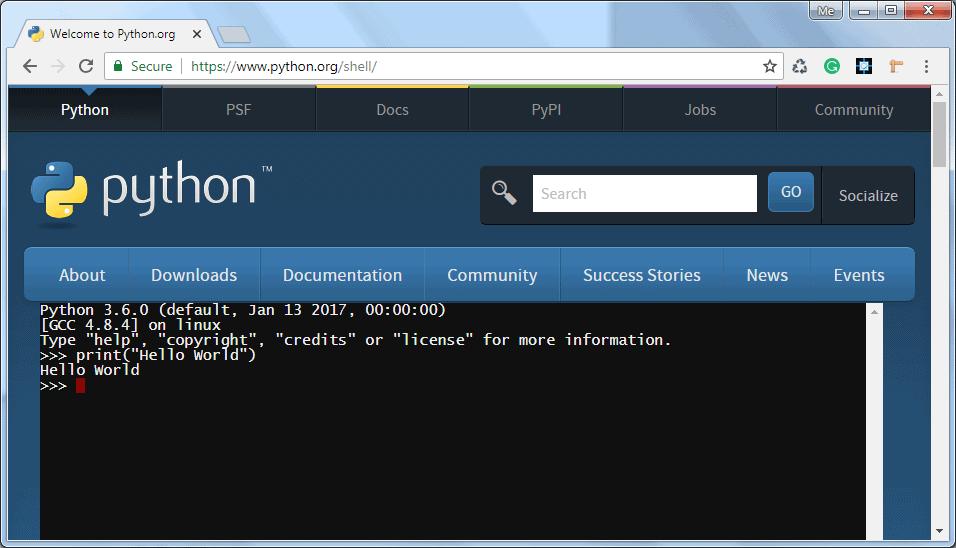
Many interactive Python environment shells can be found on the internet. They work based on REPL (Read, Evaluate, Print, Loop). Using https://repl.it it is possible to execute Python in interactive as well as in scripting mode.
https://repl.it
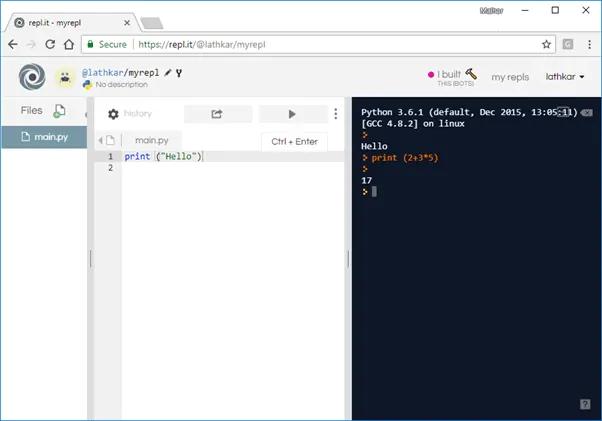
The right-hand column in the above diagram is an interactive shell, whereas a Python script can be entered and run in the left pane.
Learn about the basic syntax of Python in the next chapter.
PIP & Package Management
PIP is the Package Installer for Python. It is used to install packages from Python Package Index (PyPI) and other indexes. PIPPython Package Index
PyPI - Python Package Index
Section titled “PyPI - Python Package Index”PyPI is the default repository of Python packages for Python community that includes frameworks, tools and, libraries. Python developers can install and use packages in the Python application. It is open to all Python developers to consume and distribute their distributions. Developers can search or browse projects from pypi.org. PyPI
Install pip
Section titled “Install pip”PIP has been included with Python installer since Python 3.4. You can verify whether the pip is installed on your machine by running the following command in your console:
If you are using an older version of pip, you can upgrade pip by running the following command on Windows:
Execute the following command on Linux or Mac OS to upgrade pip:
If pip isn’t already installed, then first try to bootstrap it from the standard library by executing the following command in your console or terminal window:
If that still doesn’t install pip, the following steps should install pip on your platform.
- Download get-pip.py from https://bootstrap.pypa.io/get-pip.py and save it to your local folder.
get-pip.pyhttps://bootstrap.pypa.io/get-pip.py1. Navigate command prompt or terminal to the folder where you have downloaded the file and run the command: python get-pip.pypython get-pip.pyThis command will install pip in your pc. Additionally, it also installs the wheel and setuptools. wheelsetuptools
pip Help command
Section titled “pip Help command”The pip help command is used to get a list of all the functions available in pip.
pip help
Installing packages
Section titled “Installing packages”PyPI maintains packages as projects. Use the following pip command to install the latest version of the project.
Pip install "project-name"Pip install "project-name"
Use the following command installs the specific version of the project:
pip install "project-name==2.4"pip install "project-name==2.4"
Use the following command to install a version that’s “compatible” with a certain version:
pip install "project-name~=2.4"pip install "project-name~=2.4"
Let’s install a package to send an HTTP request in Python. urllib3 is a powerful, user-friendly HTTP client for Python. Before using urllib3 package in your application, install it using the pip command, as shown below.
pip
The above command will install the latest version of urllib3. Now, you can import and use it, as shown below.
urllib3
import urllib3 http = urllib3.PoolManager() req = http.request('GET', 'http://www.google.com') print(req.status)import urllib3 http = urllib3.PoolManager() req = http.request('GET', 'http://www.google.com') print(req.status)
List packages
Section titled “List packages”The list command can be used to see all the packages that have been installed on the system. If you want to check all the packages, use the pip list command:
pip list
This will list all the packages available to use in your system. Notice that urllib3 package is also listed there.
urllib3
Show package
Section titled “Show package”If you want to check the metadata of a package, then use pip show command. The following command will display the metadata of the urllib3 package. [email protected]
Uninstalling a Package
Section titled “Uninstalling a Package”The pip uninstall command can be used to remove a package. For example, if you want to remove urllib3 package, you can simply use the following command:
pip uninstall``urllib3
The pip package manager will ask you to confirm if you want to uninstall the package.Proceed (y/n)?:If you press y, the package will be removed.
Proceed (y/n)?:
Thus, you can use pip as a package manager of your Python application.
Learning objectives:
- Explore commonly used built-in modules
- Understand environment management and virtual environments
- Choose the right IDE for Python development
- Manage project dependencies with pip and requirements.txt
Project: “CLI File Organizer” — A command-line tool that scans a directory, categorizes files by extension using os/sys modules, and organizes them into folders.
Module 14 — Final Capstone Project
Section titled “Module 14 — Final Capstone Project”Week 14
Project: “School Grade Portal” — A complete application that brings together everything learned:
Requirements:
- Student and teacher classes (OOP — Module 8-9)
- Grade management with dictionaries and lists (Module 4)
- File/DB persistence (Module 7, 12)
- Search and reporting functions (Module 5)
- Error handling for all edge cases (Module 7)
- Optional: Tkinter GUI or CLI interface (Module 12)
- Use of modules and packages for code organization (Module 10)
- Decorators for logging function calls (Module 11)
Deliverables:
- Well-organized Python project with multiple modules
- README with usage instructions
- requirements.txt file
- User manual for teachers/students
Summary
Section titled “Summary”| Module | Topic | Project |
|---|---|---|
| 1 | Python Foundations | My First Python Script |
| 2 | Variables, Data Types & Strings | Personal Info Manager |
| 3 | Operators & Control Flow | Number Guessing Game |
| 4 | Data Structures | Student Grade Tracker |
| 5 | Functions | Math Tools Library |
| 6 | Mid-Term Project | Student Management System |
| 7 | File Handling & Exceptions | File-based Contact Book |
| 8 | OOP Basics | Library Management System |
| 9 | OOP Advanced | Bank Account System |
| 10 | Modules & Packages | Statistics Calculator |
| 11 | Advanced Python Features | Log File Analyzer |
| 12 | Practical Python Apps | Notes App with GUI & DB |
| 13 | Python Ecosystem & Best Practices | CLI File Organizer |
| 14 | Final Capstone Project | School Grade Portal |